TheraJunction therapist guide
This is the full reference guide for therapists and practice administrators. Print it or keep it open beside the application. A typeset PDF version is available at download.therajunction.com/therapist-guide.pdf. The searchable web guide is help.therajunction.com. Work through the first week in order, then consult the clinical documentation and billing chapters as you start seeing patients.
Open the app at app.therajunction.com.
First Edition | September 2026
Copyright © 2026 TheraJunction, Inc. All rights reserved.
Contact: contact@therajunction.com | Web: therajunction.com
Contents
- What TheraJunction is
- Create your account
- 2.1 Sign up
- 2.2 Choose therapist
- 2.3 Other ways in
- Set up your practice
- 3.1 Solo or group
- 3.2 Practice info
- 3.3 Locations
- 3.4 Your credentials
- 3.5 Invite your team
- 3.6 Insurance and NPI
- 3.7 Services catalog
- 3.8 Availability
- 3.9 Directory listing
- Finish your profile
- Connect Stripe
- Find your way around
- Get your first patient
- 7.1 Add a patient yourself
- 7.2 Send the invite
- 7.3 Accept a request from the directory
- 7.4 Intake
- 7.5 Recording consent
- 7.6 Caregivers
- Run your first session
- 8.1 In person
- 8.2 Teletherapy
- 8.3 Add a report when you did not record
- 8.4 Practice with the AI patient
- Notes, goals, and home practice
- 9.1 AI SOAP notes and documentation
- 9.2 Therapy goals and progress tracking
- 9.3 Home practice and exercise generation
- Everyday tools
- 10.1 Calendar
- 10.2 Messages
- 10.3 AI assistant
- 10.4 Support groups and resources
- Settings you will come back to
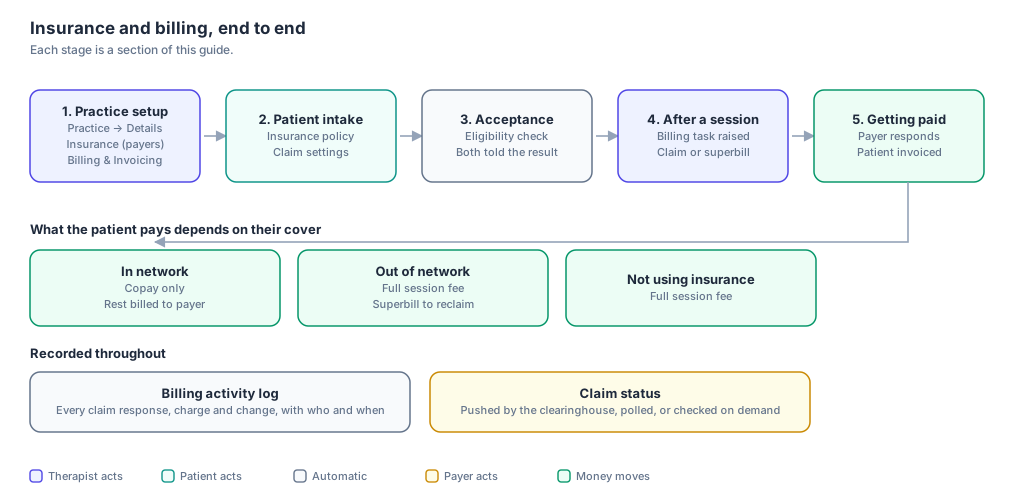
- Billing after a session
- 12.1 The post-session workflow
- 12.2 Durable billing tasks
- 12.3 The Billing Hub tabs
- Practice details for claims
- The patient's insurance
- 14.1 Adding a policy
- 14.2 Insurance card photos
- 14.3 Chart-level claim settings
- Acceptance and eligibility
- Claims
- 16.1 Building an 837P claim from a session
- 16.2 Procedure and diagnosis coding
- 16.3 Intelligent prior-claim prefill
- 16.4 Pre-submission validation
- 16.5 Clearinghouse submission and status tracking
- 16.6 Remittance advice (835 ERA) and posting
- 16.7 Denials versus rejections
- 16.8 Correcting, appealing, or voiding claims
- What the patient pays
- Invoices and superbills
- How money reaches you
- What patients see for billing
- Privacy, HIPAA, and compliance
- Week-one checklist
1. What TheraJunction is
TheraJunction is a dedicated electronic health record (EHR), practice management, and clinical billing platform engineered specifically for speech-language pathologists (SLPs) in private practice. It provides a single workspace for your entire clinical and business operation:
- Practice management: solo or multi-clinician group rosters, multiple physical office locations, service catalogs, and calendar availability.
- Client charts: demographics, contact information, family onboarding checklists, dual electronic consents, medical history, and clinical notes.
- Encounter delivery: in-person sessions with streaming live transcription, built-in WebRTC teletherapy with screen sharing, and manual encounter reports.
- AI documentation: automated transcription into structured Subjective, Objective, Assessment, Plan (SOAP) clinical notes and clinical summaries.
- Treatment tracking: measurable clinical goals, trial baselines, progress percentages, and custom home practice exercise sheet generation.
- Integrated revenue cycle: real-time 270/271 insurance eligibility checks, electronic 837P professional claim filing via clearinghouse (Stedi), 835 electronic remittance advice (ERA) posting with automated patient cost share true-up, itemized out-of-network superbills, private-pay invoices, and Stripe card processing with optional automatic payments.
- Client and caregiver portal: lightweight, secure portal for family intake, consent signing, appointment tracking, messaging, home exercises, and online payment.
- AI patient simulation: an interactive, voice-driven simulated client for practicing teletherapy, testing audio equipment, rehearsing clinical assessment techniques, and evaluating automated SOAP note drafting with zero risk to real patient charts.
- Support groups and community: patient and caregiver support communities where therapists create or join groups to help families deal with speech and language conditions. Supports in-person, virtual, and hybrid group sessions with integrated video rooms, discussion threads, and shared resources.
This guide walks you through account registration, setting up your practice, welcoming your first patients, running clinical encounters, and operating electronic billing from first claim to remittance.
2. Create your account
2.1 Sign up
Navigate to app.therajunction.com in your web browser. You can authenticate using your professional email address.
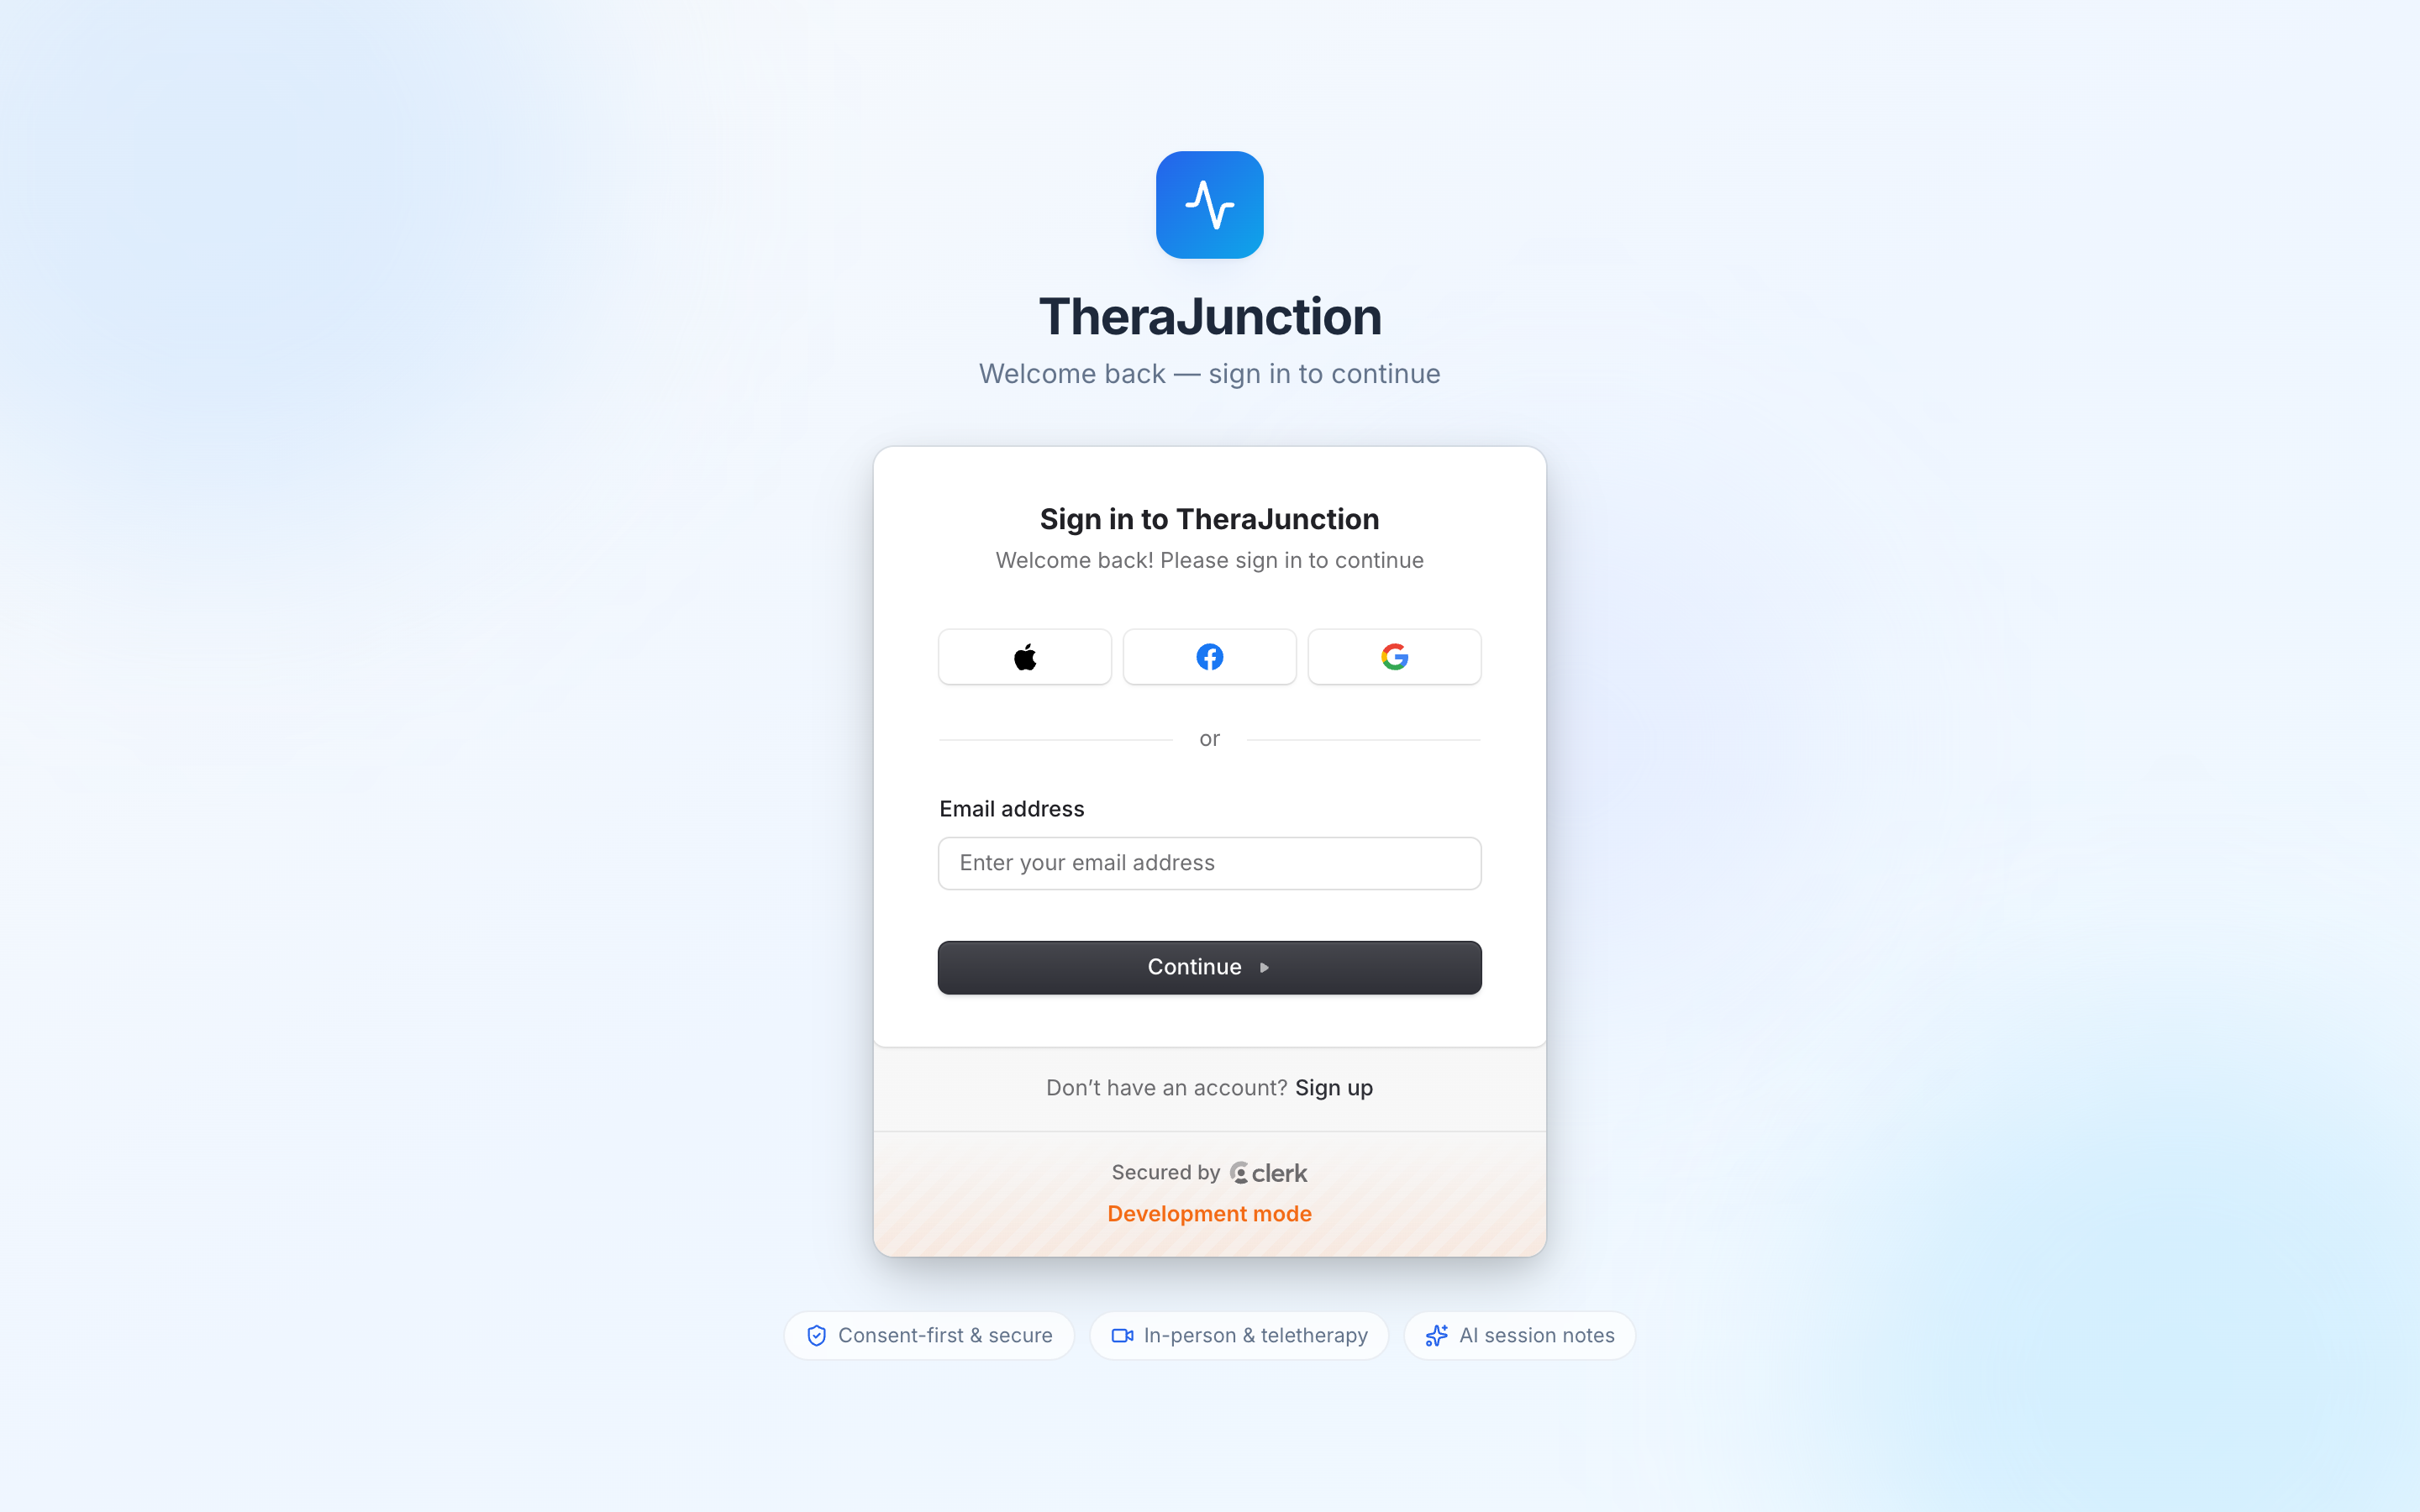
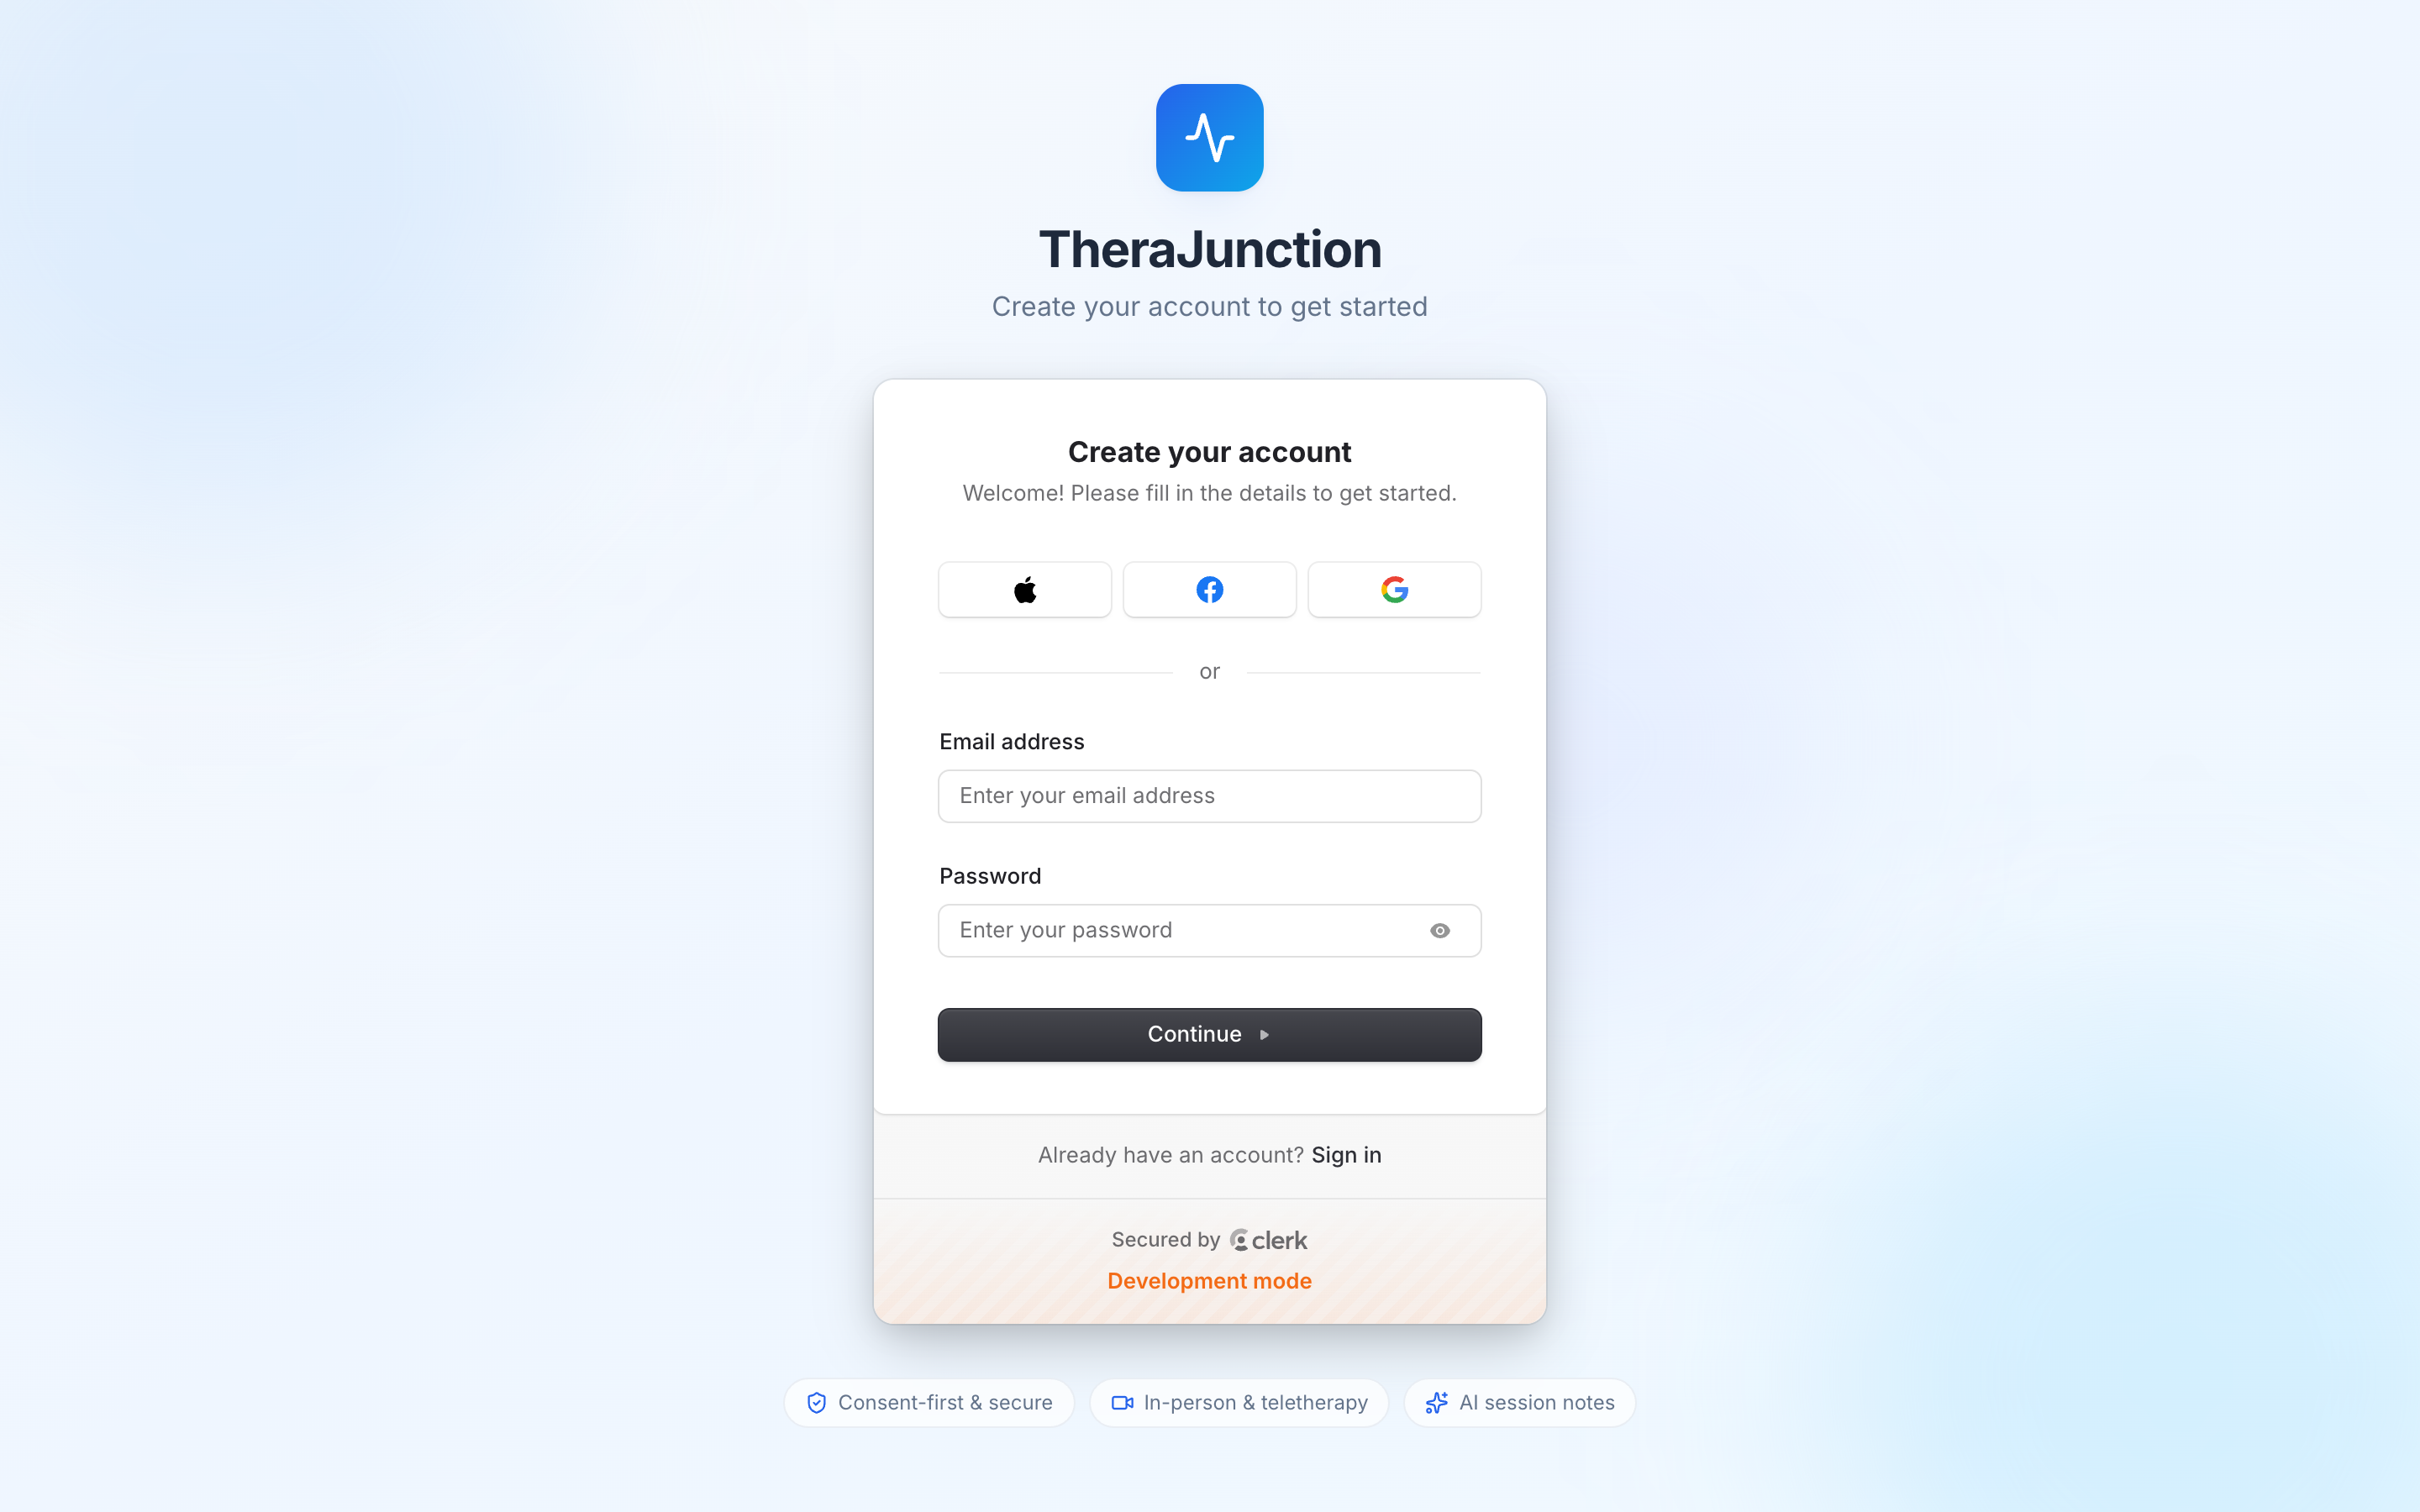
If you are a new provider who has not yet registered, click Sign up to create your initial credentials.
2.2 Choose therapist
On your first login, the platform prompts you to choose your operational role. Select I'm a Therapist.
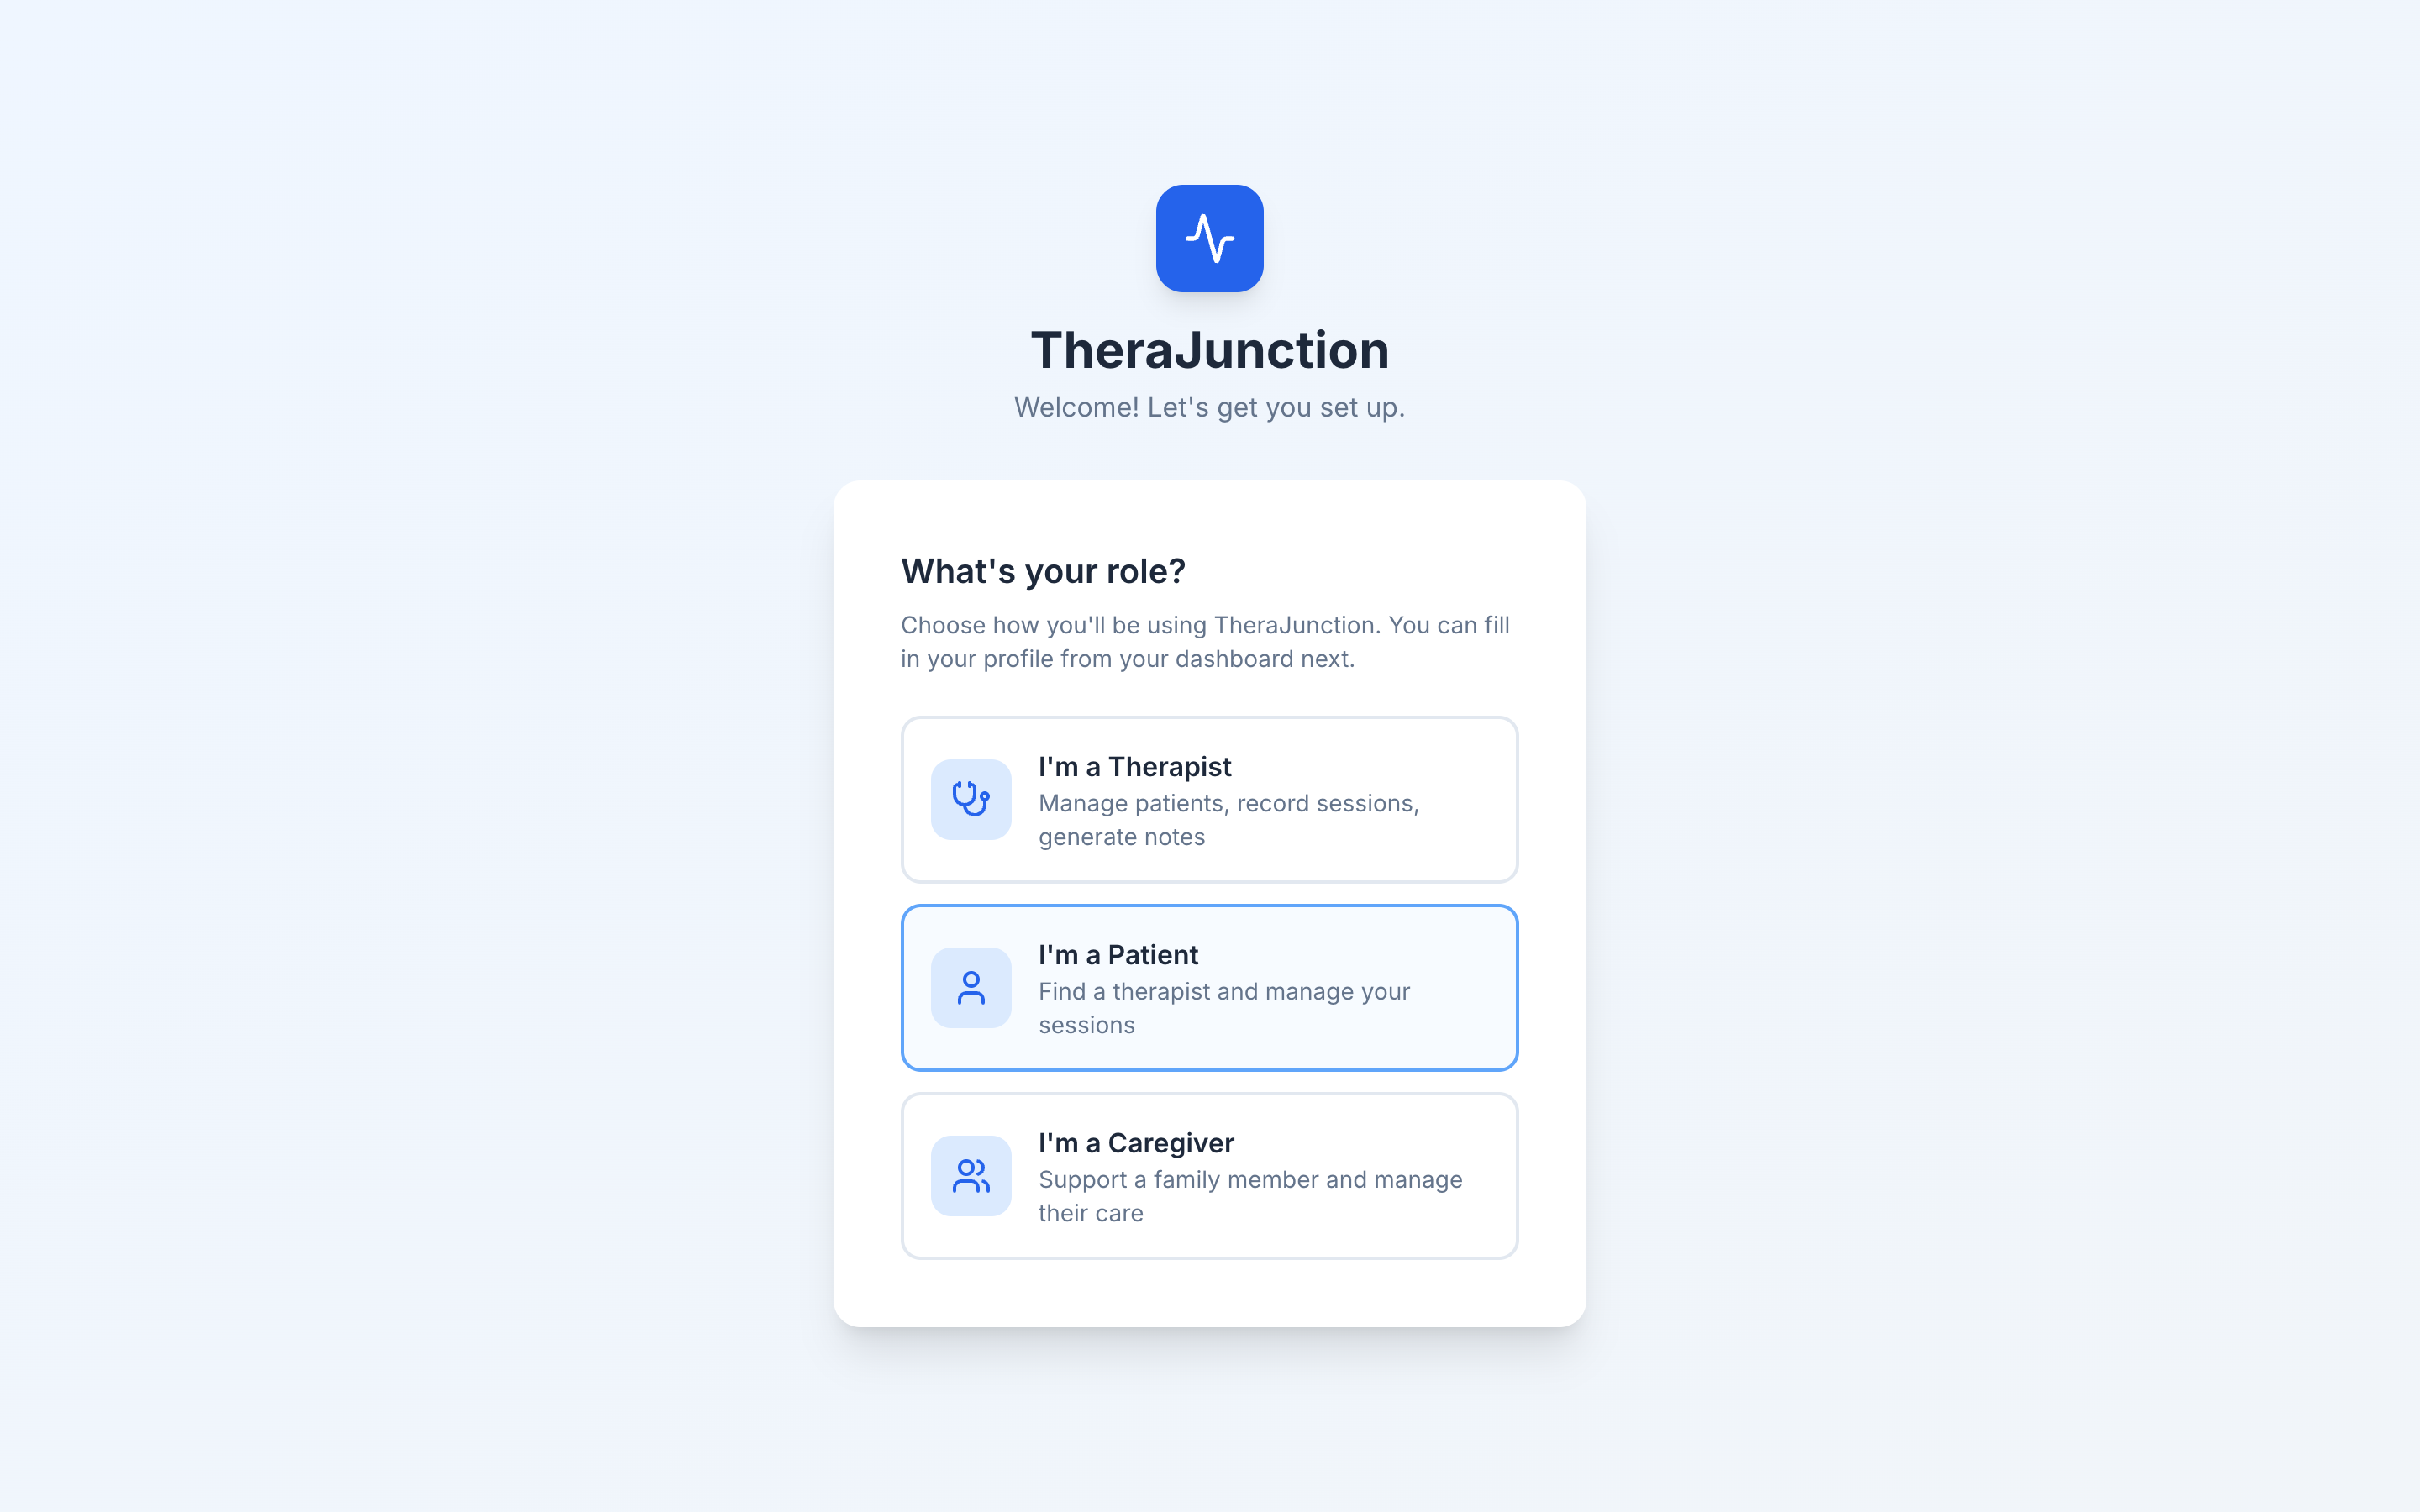
Selecting the therapist role assigns the clinician permission profile to your account, establishes your provider record in the database, and automatically launches the practice setup wizard. Do not choose patient or caregiver unless you are testing the portal from an auxiliary client account.
2.3 Other ways in
Two other onboarding entry points exist:
- Claim a directory listing: If you received an invitation or outreach link for a public directory profile, that claim link verifies your email, attaches your public directory listing, and routes you directly into practice configuration.
- Join an existing group practice: If a group practice owner or clinic director invited you by email, accepting the invitation attaches you to the practice roster. You skip practice-wide entity setup and only complete your own clinician profile: individual credentials, licensed states, personal payer credentialing, and schedule availability.
3. Set up your practice
The practice setup wizard guides you through your operational profile. Progress saves automatically after each step. You can click Save & exit at any point and return later via the dashboard banner Finish setting up your practice. Until setup is complete, your practice is not listed on the public directory and online client booking remains inactive.
3.1 Solo or group
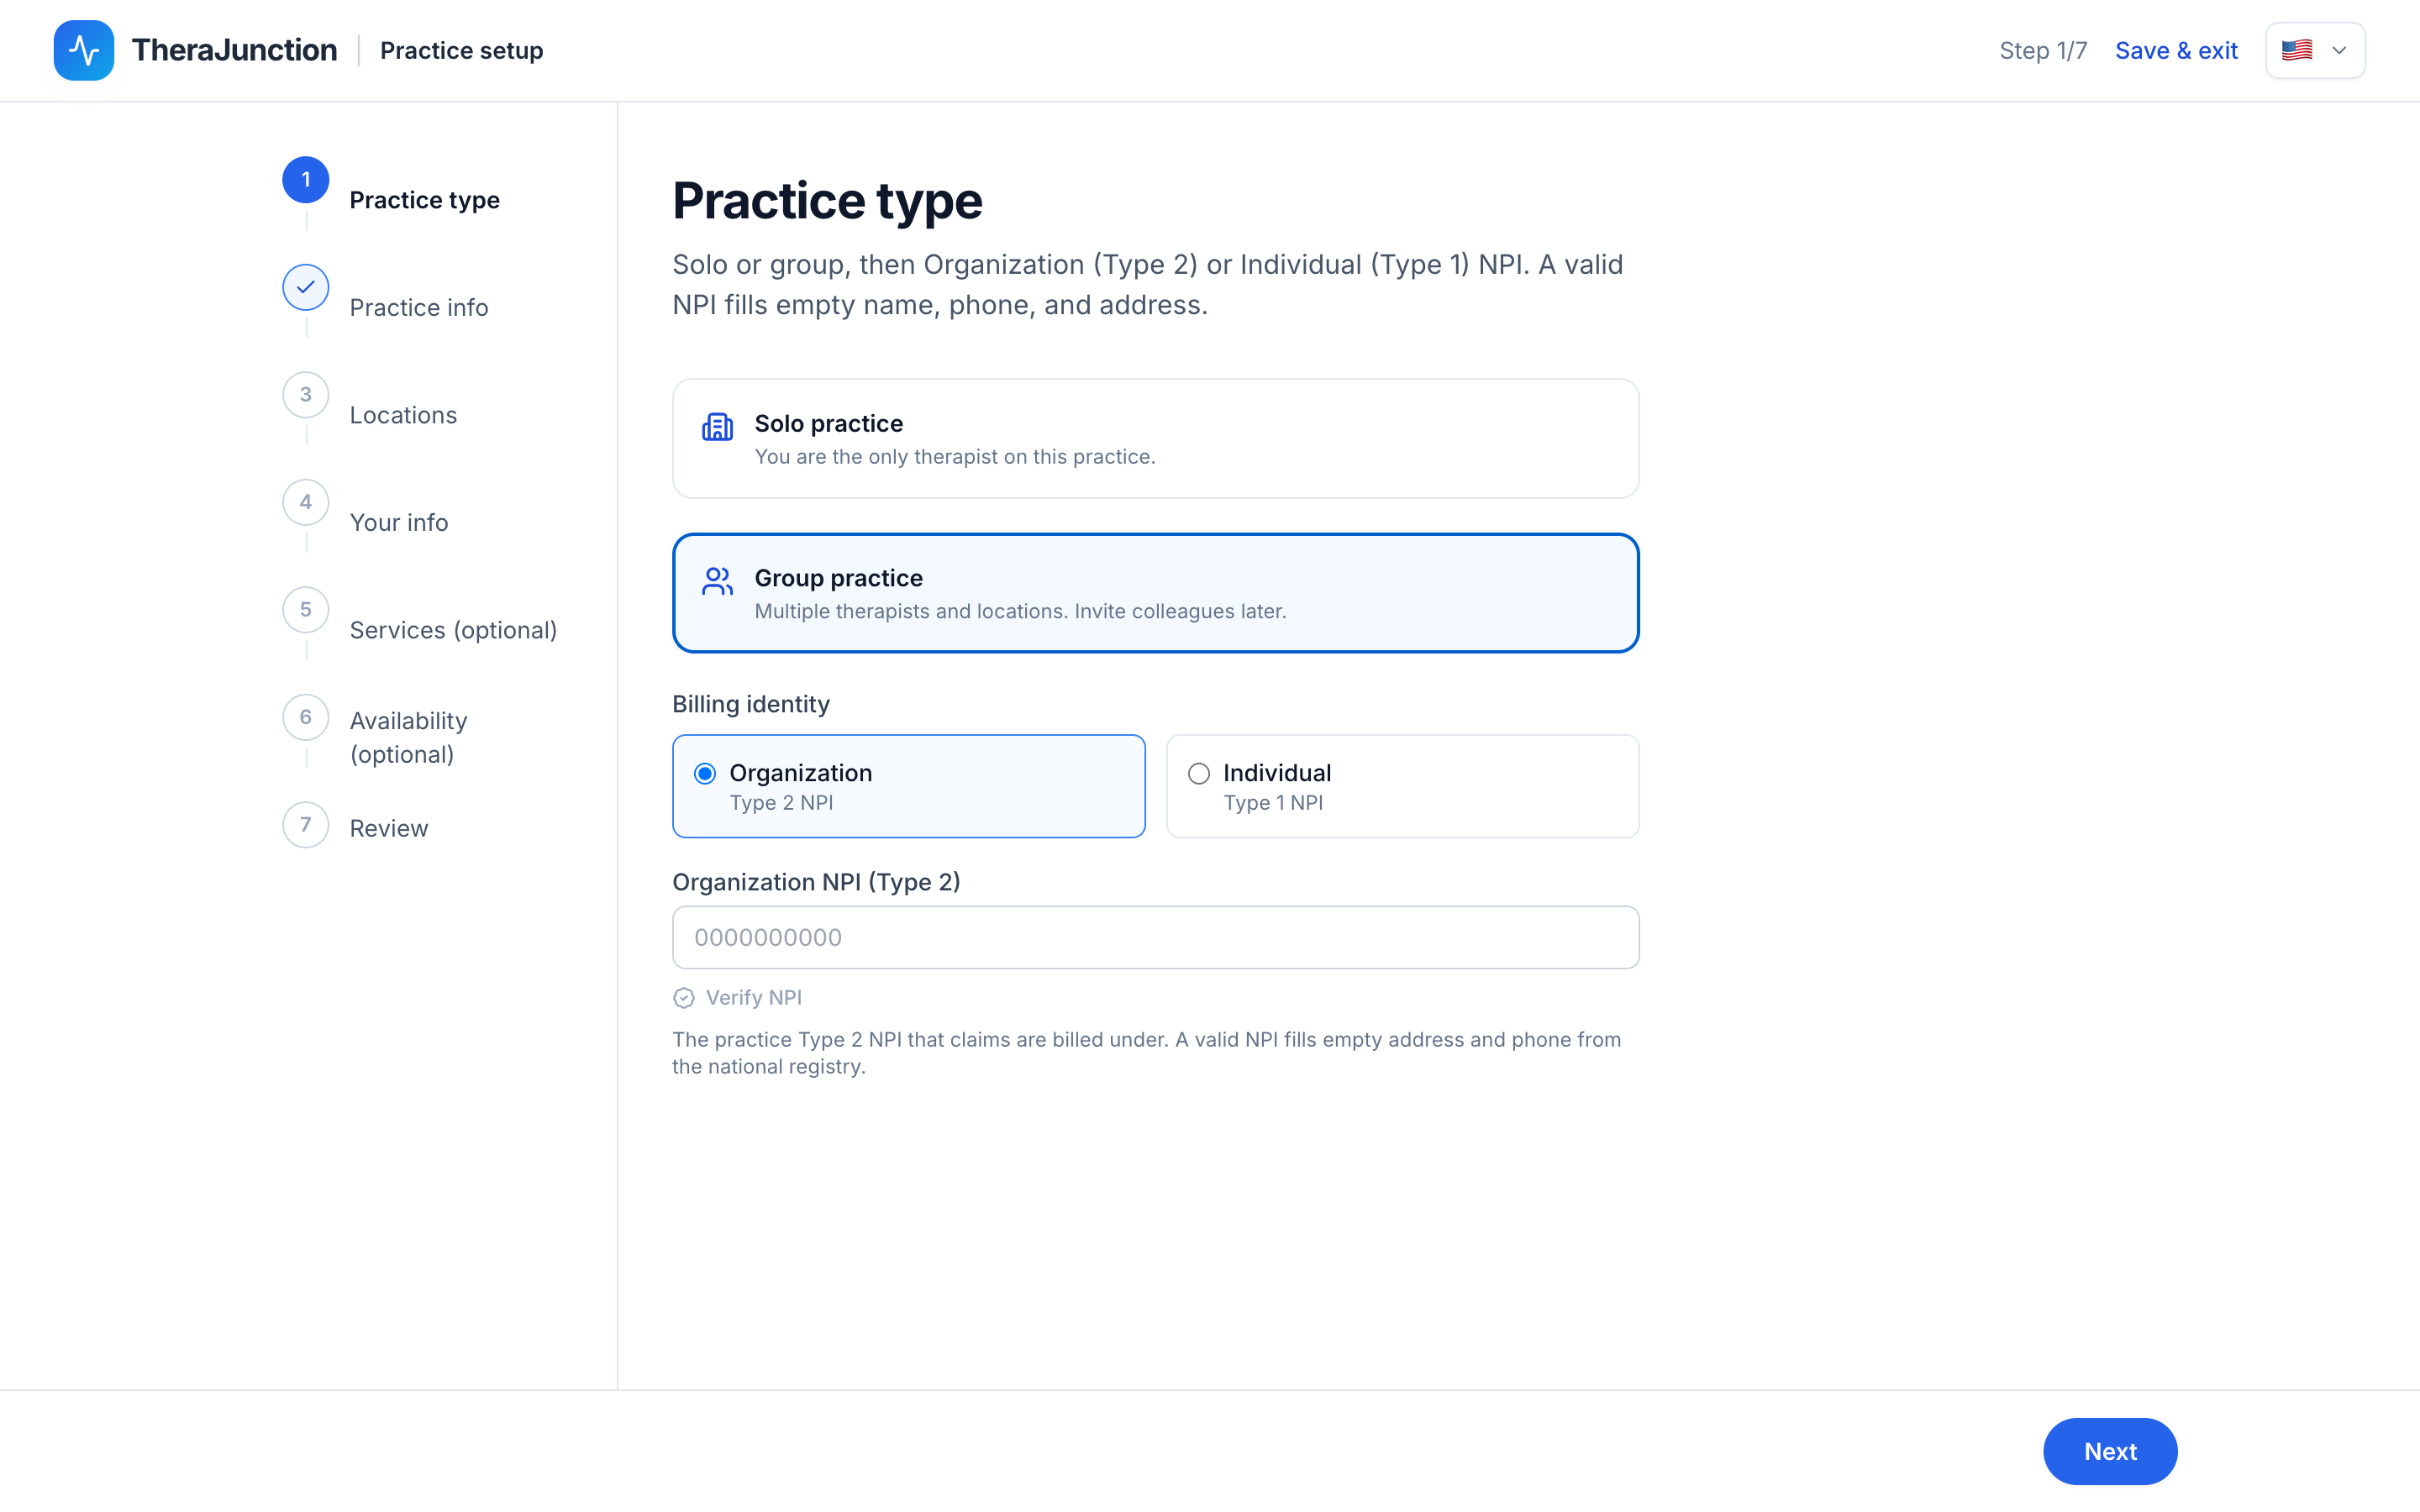
Choose between a solo practice or a group practice:
- Solo practice: One clinician who manages both clinical care and practice administration under a single provider record.
- Group practice: Shared clinical facilities, a multi-therapist roster, administrative roles, and invitation links for colleagues.
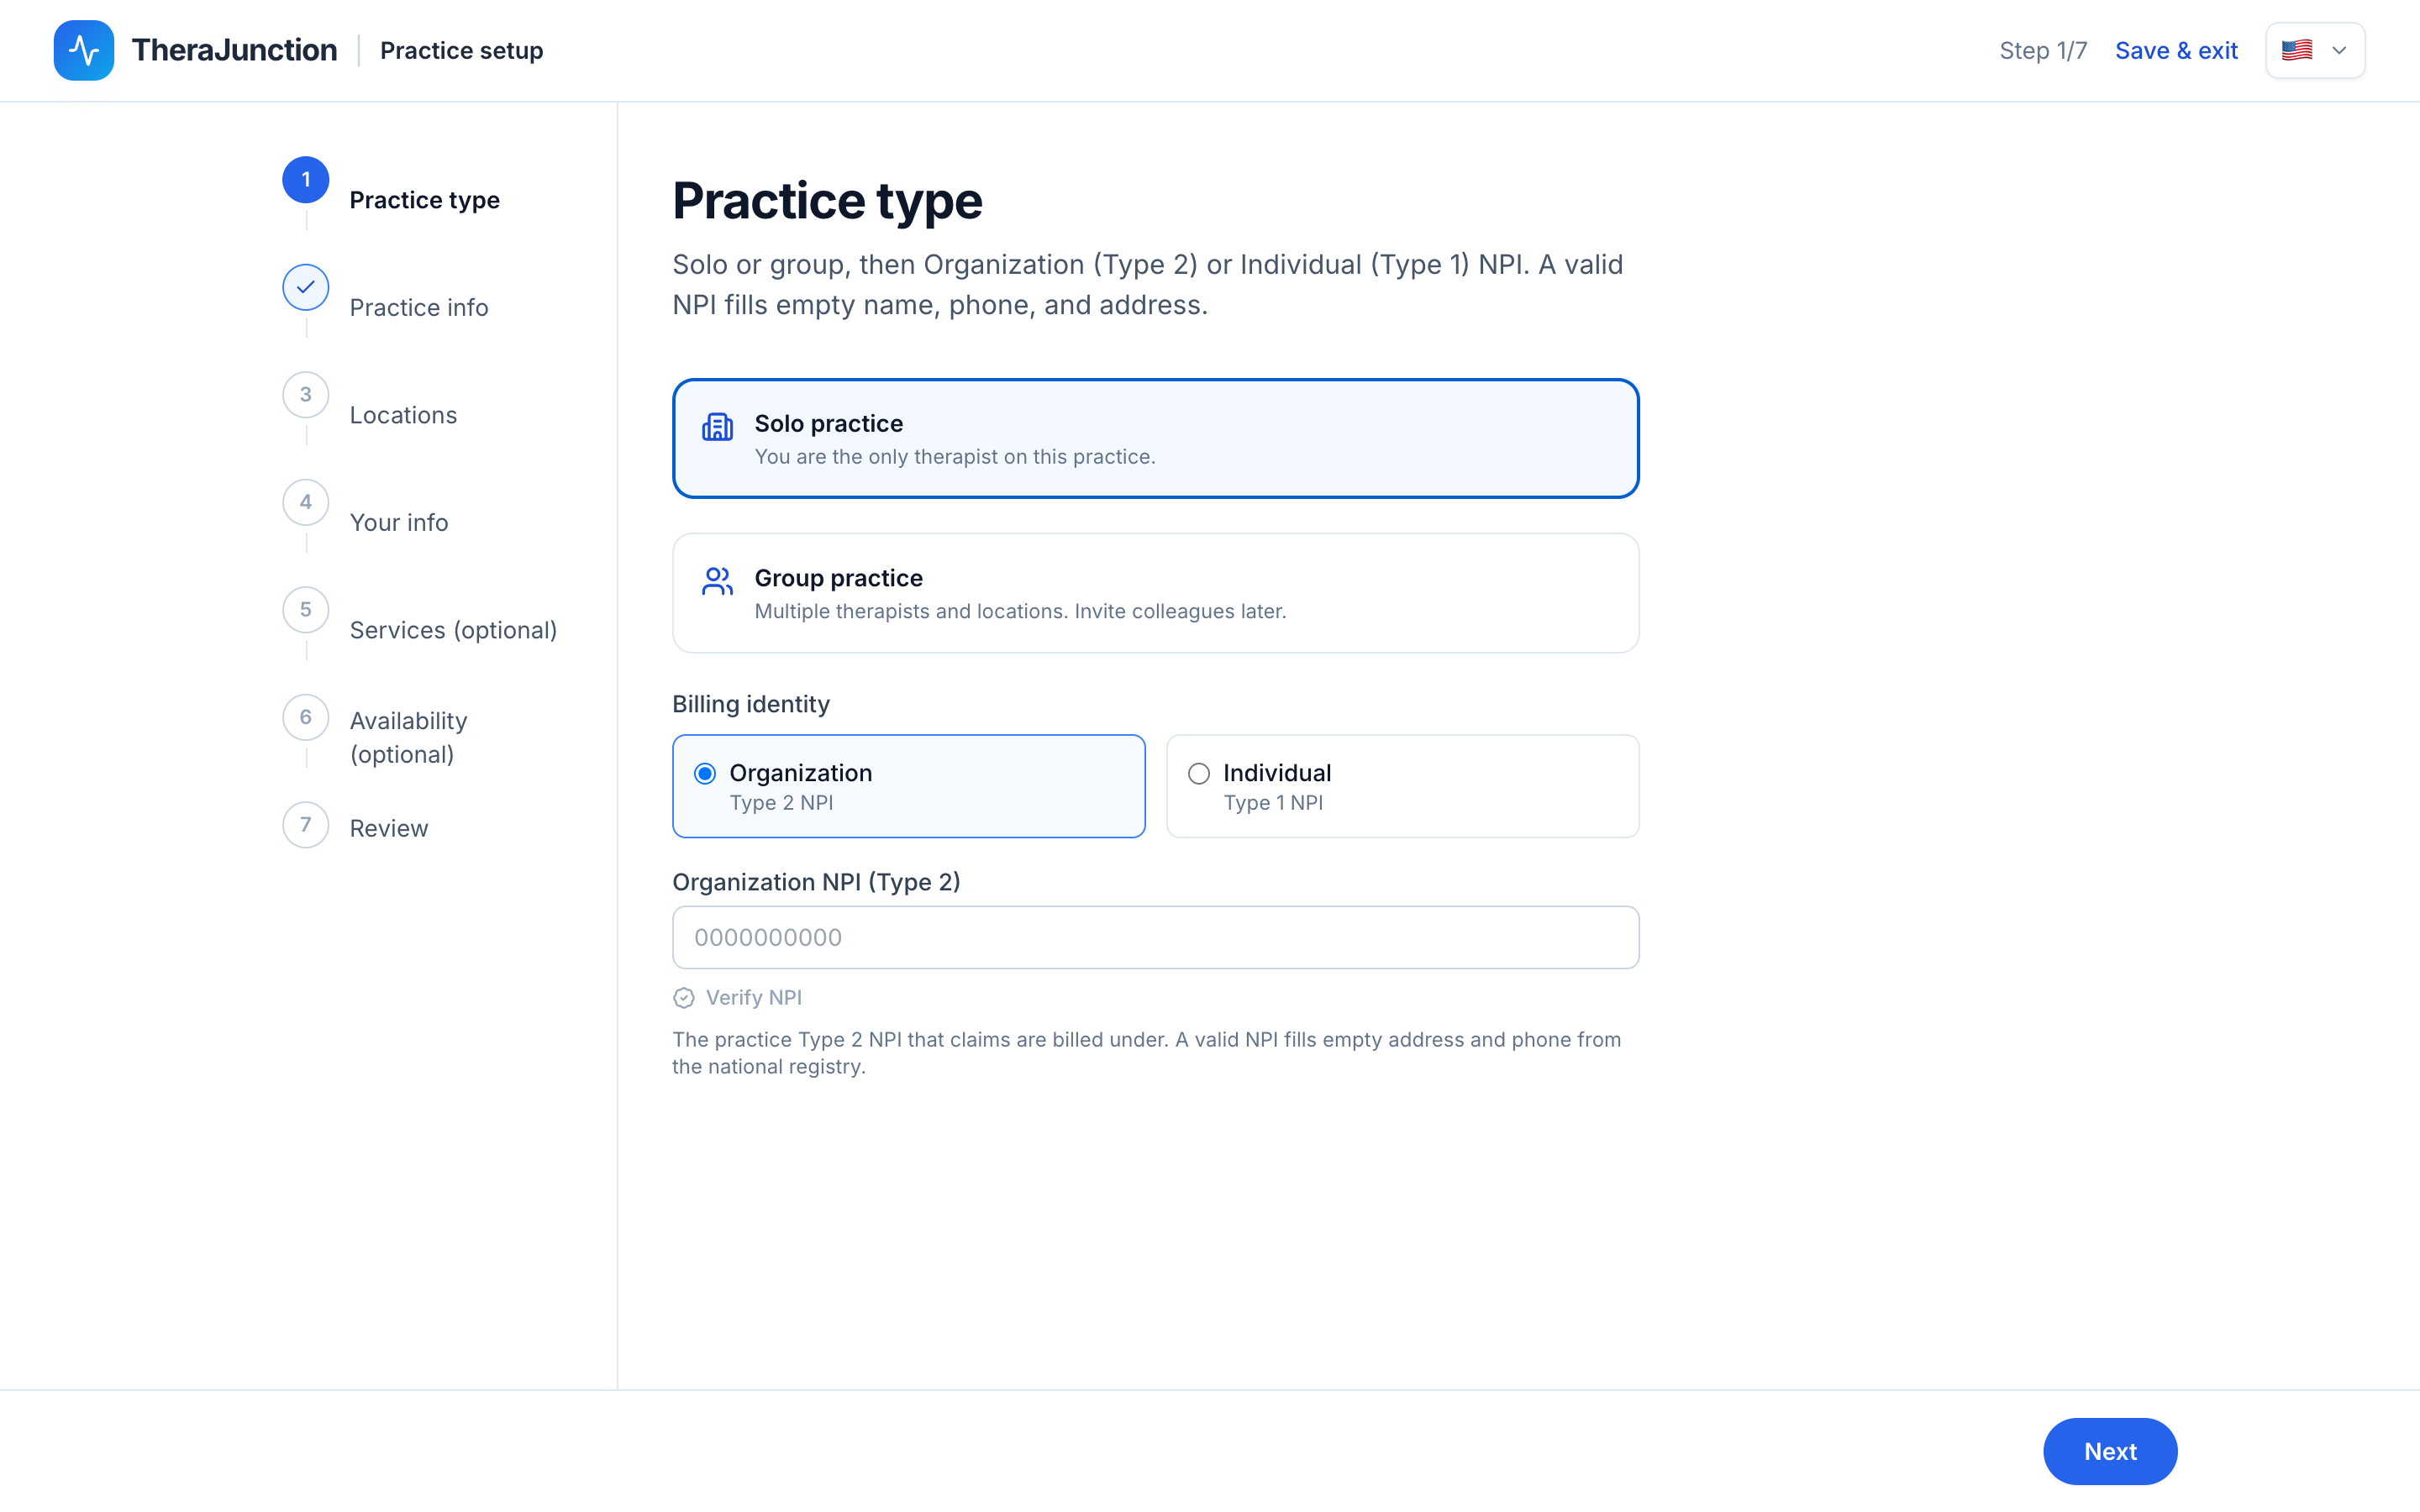
On this same screen, specify your practice billing identity:
- Organization (Type 2 NPI): Used by incorporated practices (LLC, PLLC, PC, or Corporation). Claims list the organization as the billing provider (Loop 2010AA / Box 33) and individual treating clinicians as rendering providers (Loop 2310B / Box 24J). Requires an Employer Identification Number (EIN).
- Individual (Type 1 NPI): Standard for sole proprietors and independent practitioners billing under their own personal NPI.
Entering a valid 10-digit National Provider Identifier queries the federal NPPES registry in real time. When found, TheraJunction offers to auto-populate your legal business name, contact phone, and practice address.
3.2 Practice info
Enter your practice business details: legal name, primary contact email, office telephone, website URL, operational hours, accepted payment methods, and modalities offered.
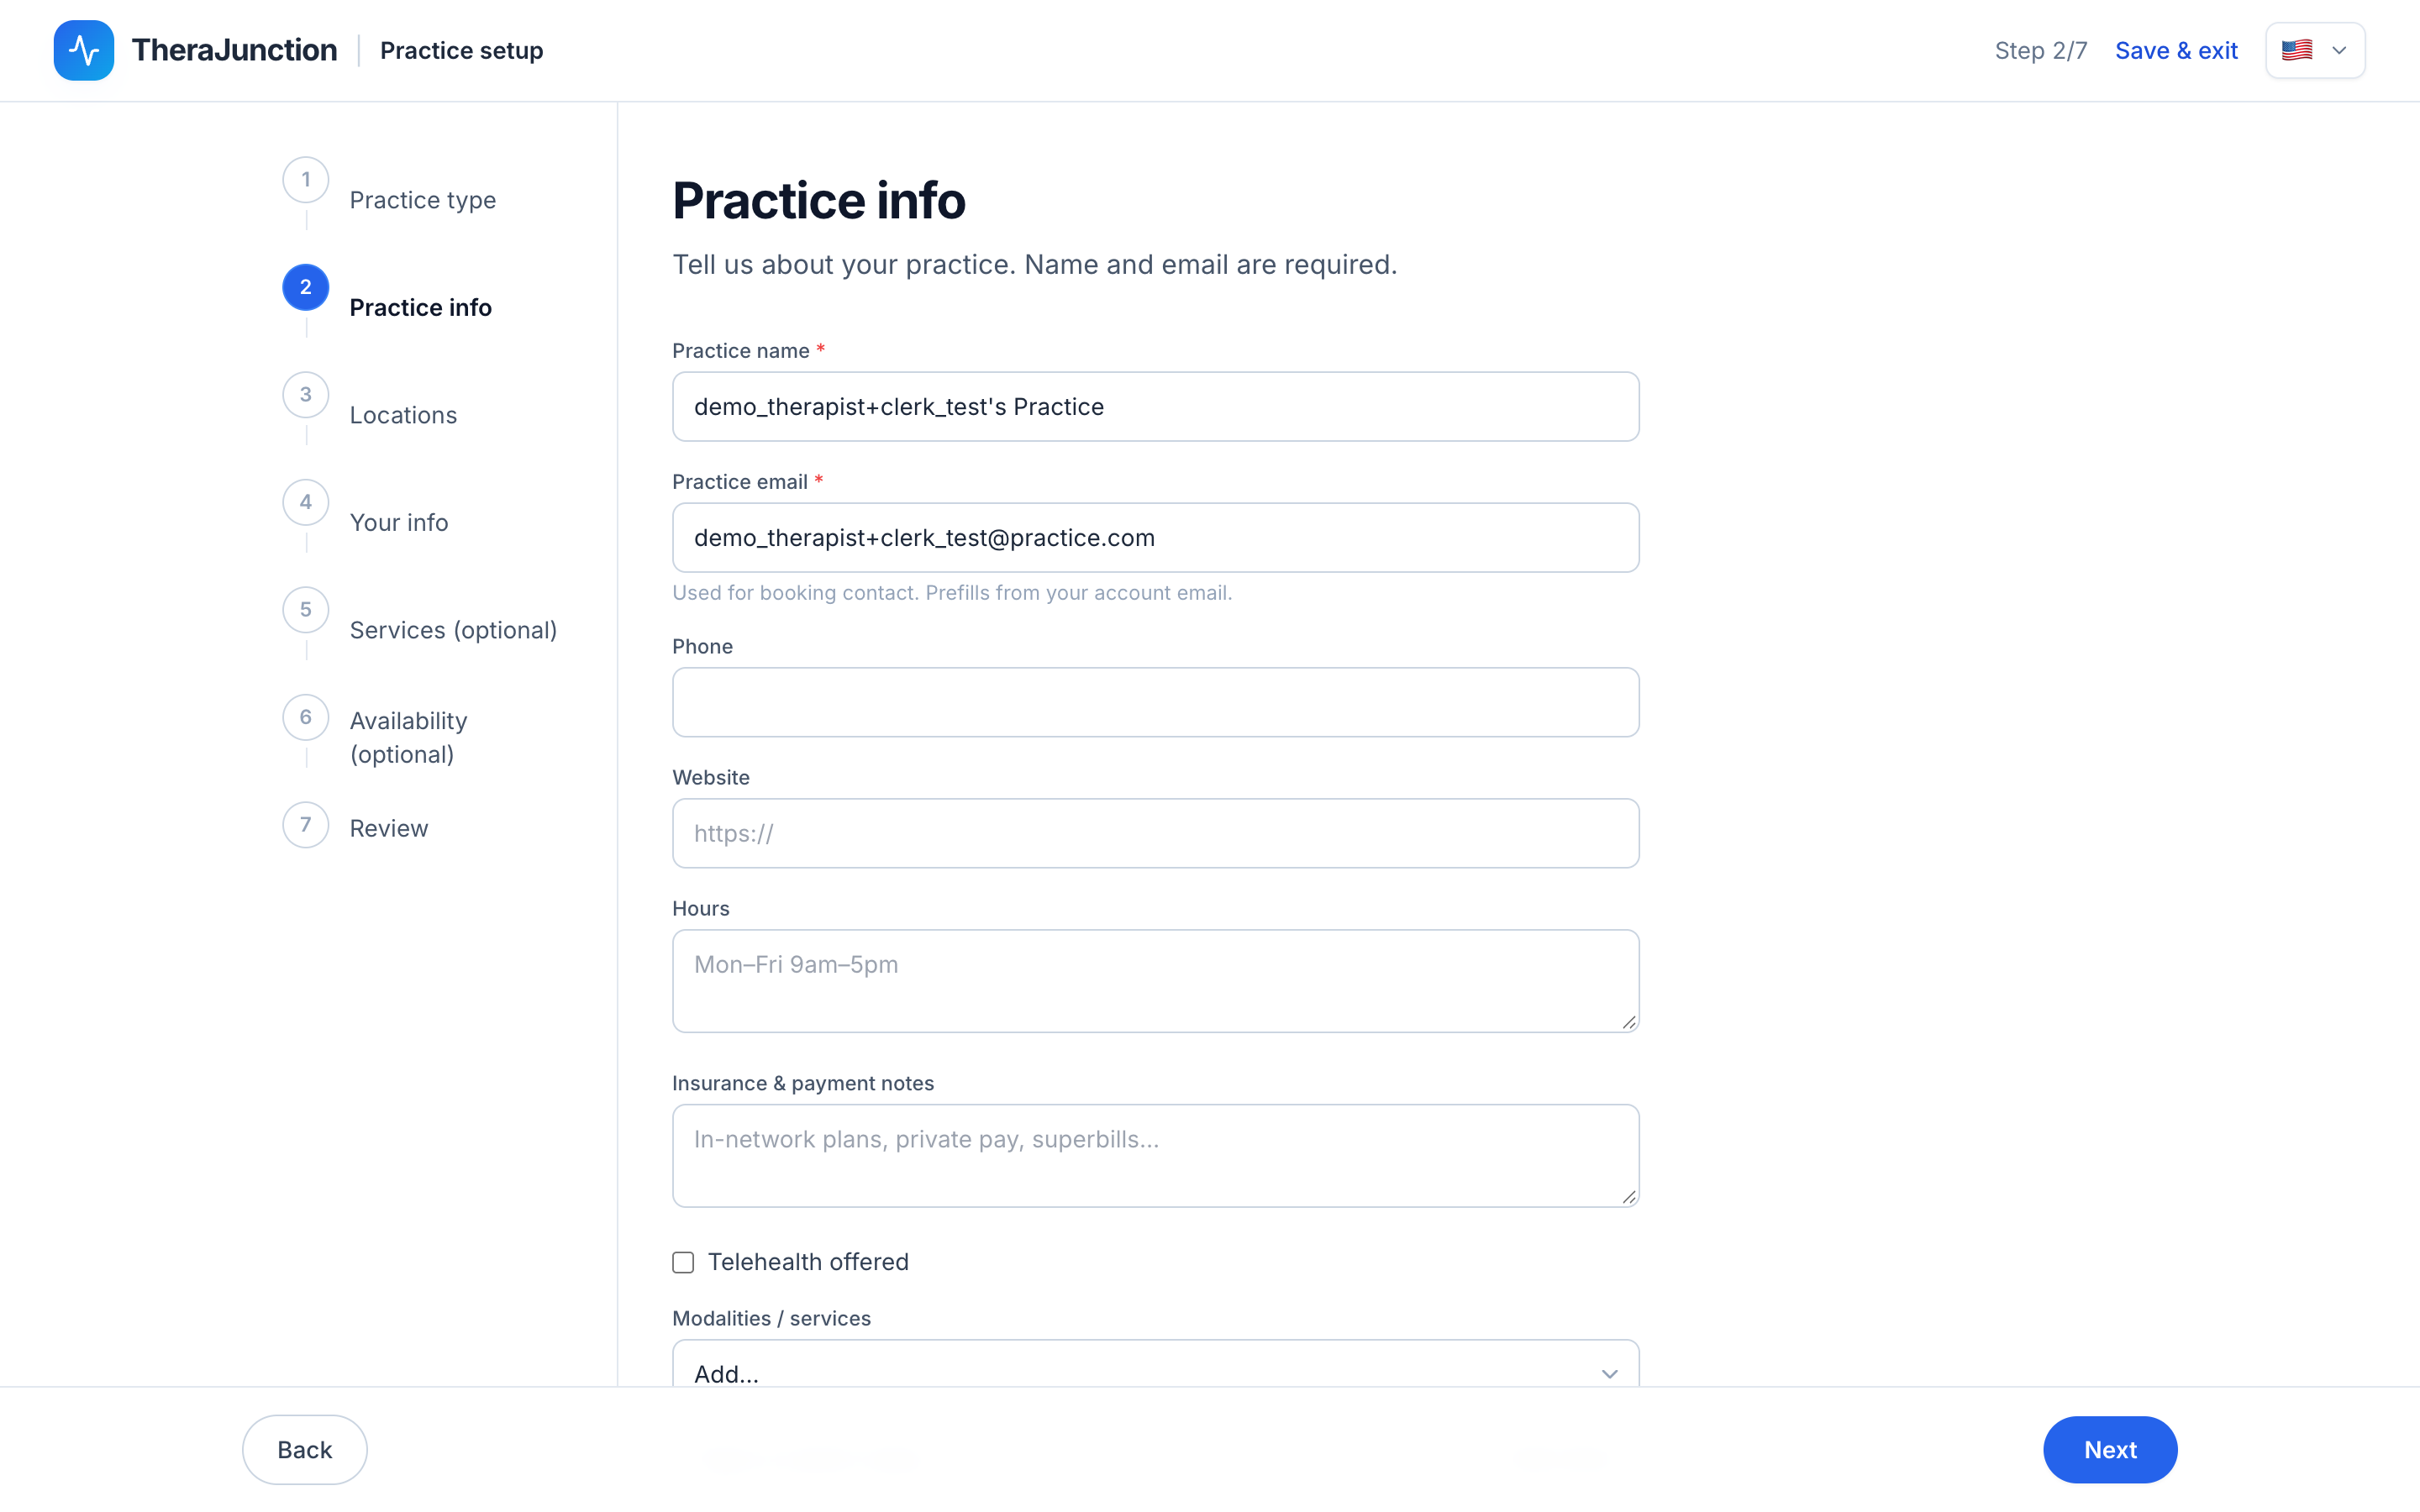
Modality options include pediatric speech, language disorders, childhood apraxia of speech (CAS), autism spectrum communication, fluency and stuttering, adult neurogenic disorders (aphasia, dysarthria), voice therapy, feeding and dysphagia, and augmentative and alternative communication (AAC). Indicate whether you offer teletherapy. Your practice name and email will appear on patient invoices, superbills, and claim submissions.
3.3 Locations
Add each physical office location where therapy is delivered, including street address, suite or unit number, city, state, and zip code. Mark one office as the primary location. Group practices can add multiple office branches.
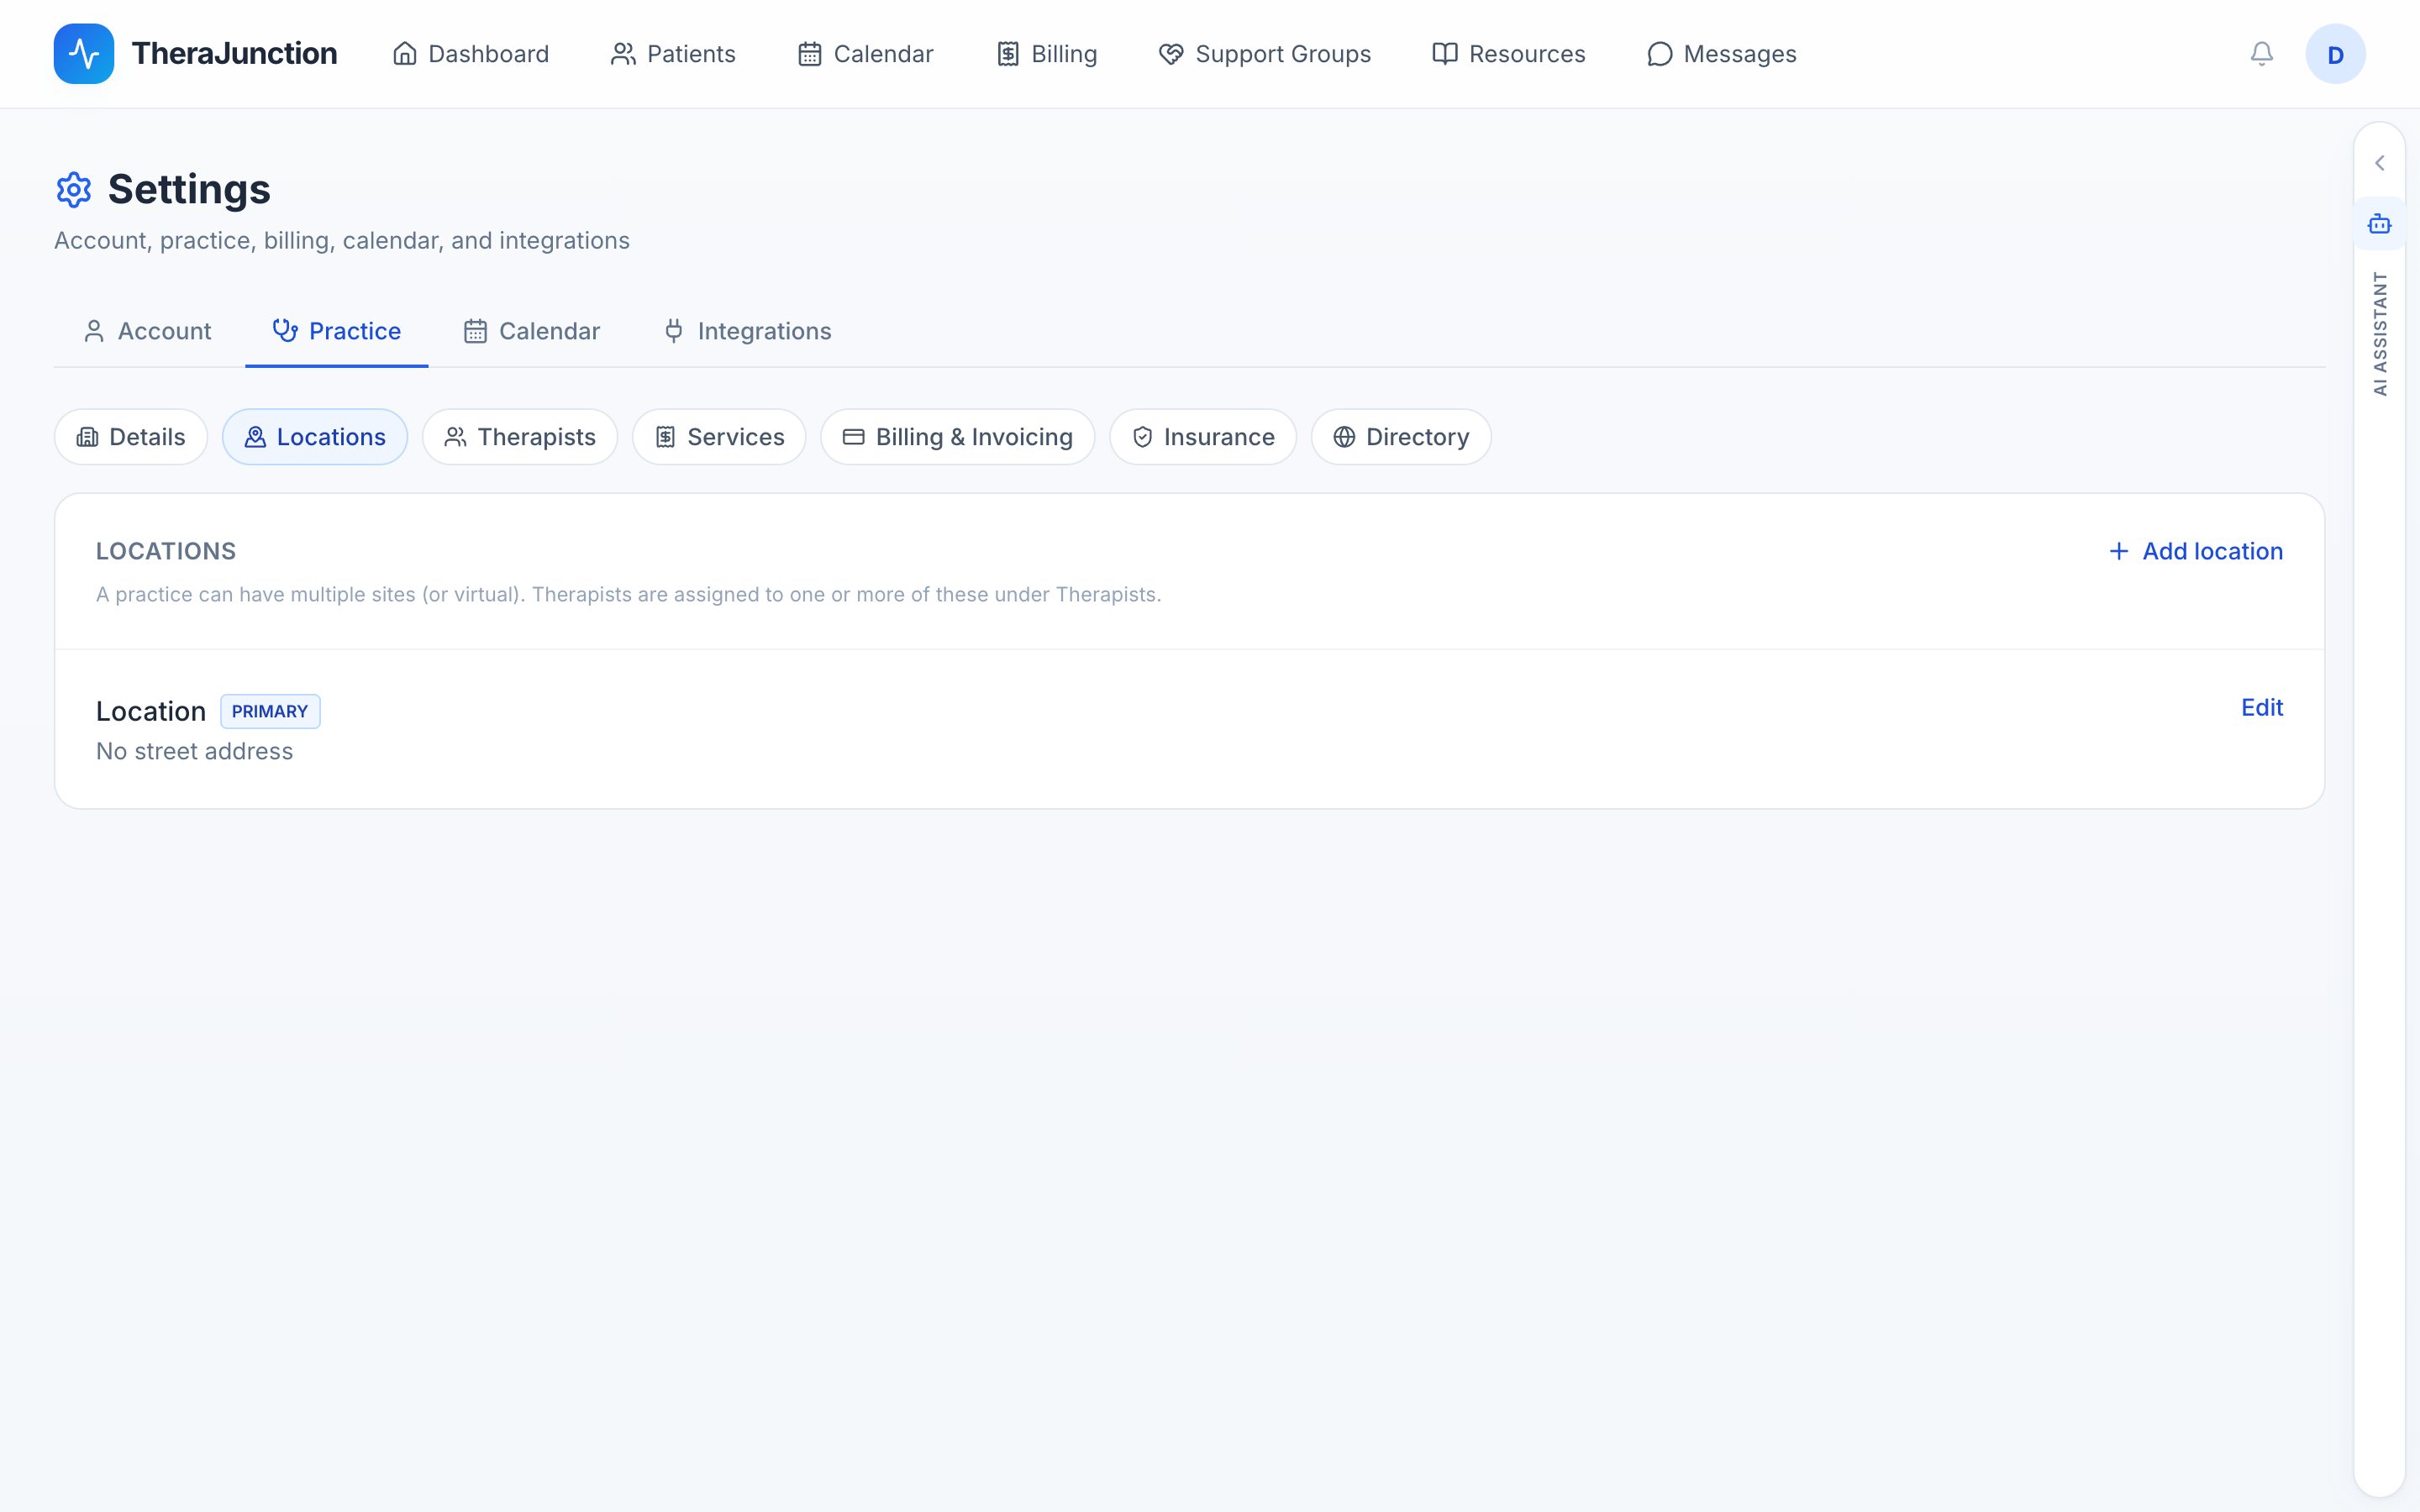
Teletherapy is not a physical street address. Do not enter a virtual telehealth service as an office location. Telehealth encounters are tagged electronically on each visit, which automatically assigns Place of Service 10 (Telehealth in Patient Home) or 02 (Telehealth Other than Home) on insurance claims. Locations can be adjusted later under Settings → Practice → Locations.
3.4 Your credentials
Enter your professional profile: full display name, academic degrees, clinical credentials (such as CCC-SLP, CF-SLP, or SLPA), license type, and state license numbers. Specify all states in which you hold an active license. Licensed states determine which client inquiries you can legally accept and where online booking is permitted. Select your primary clinical specialties and spoken languages.
3.5 Invite your team
For group practices, practice administrators invite colleagues using Add therapist. Enter each clinician's name and email address.
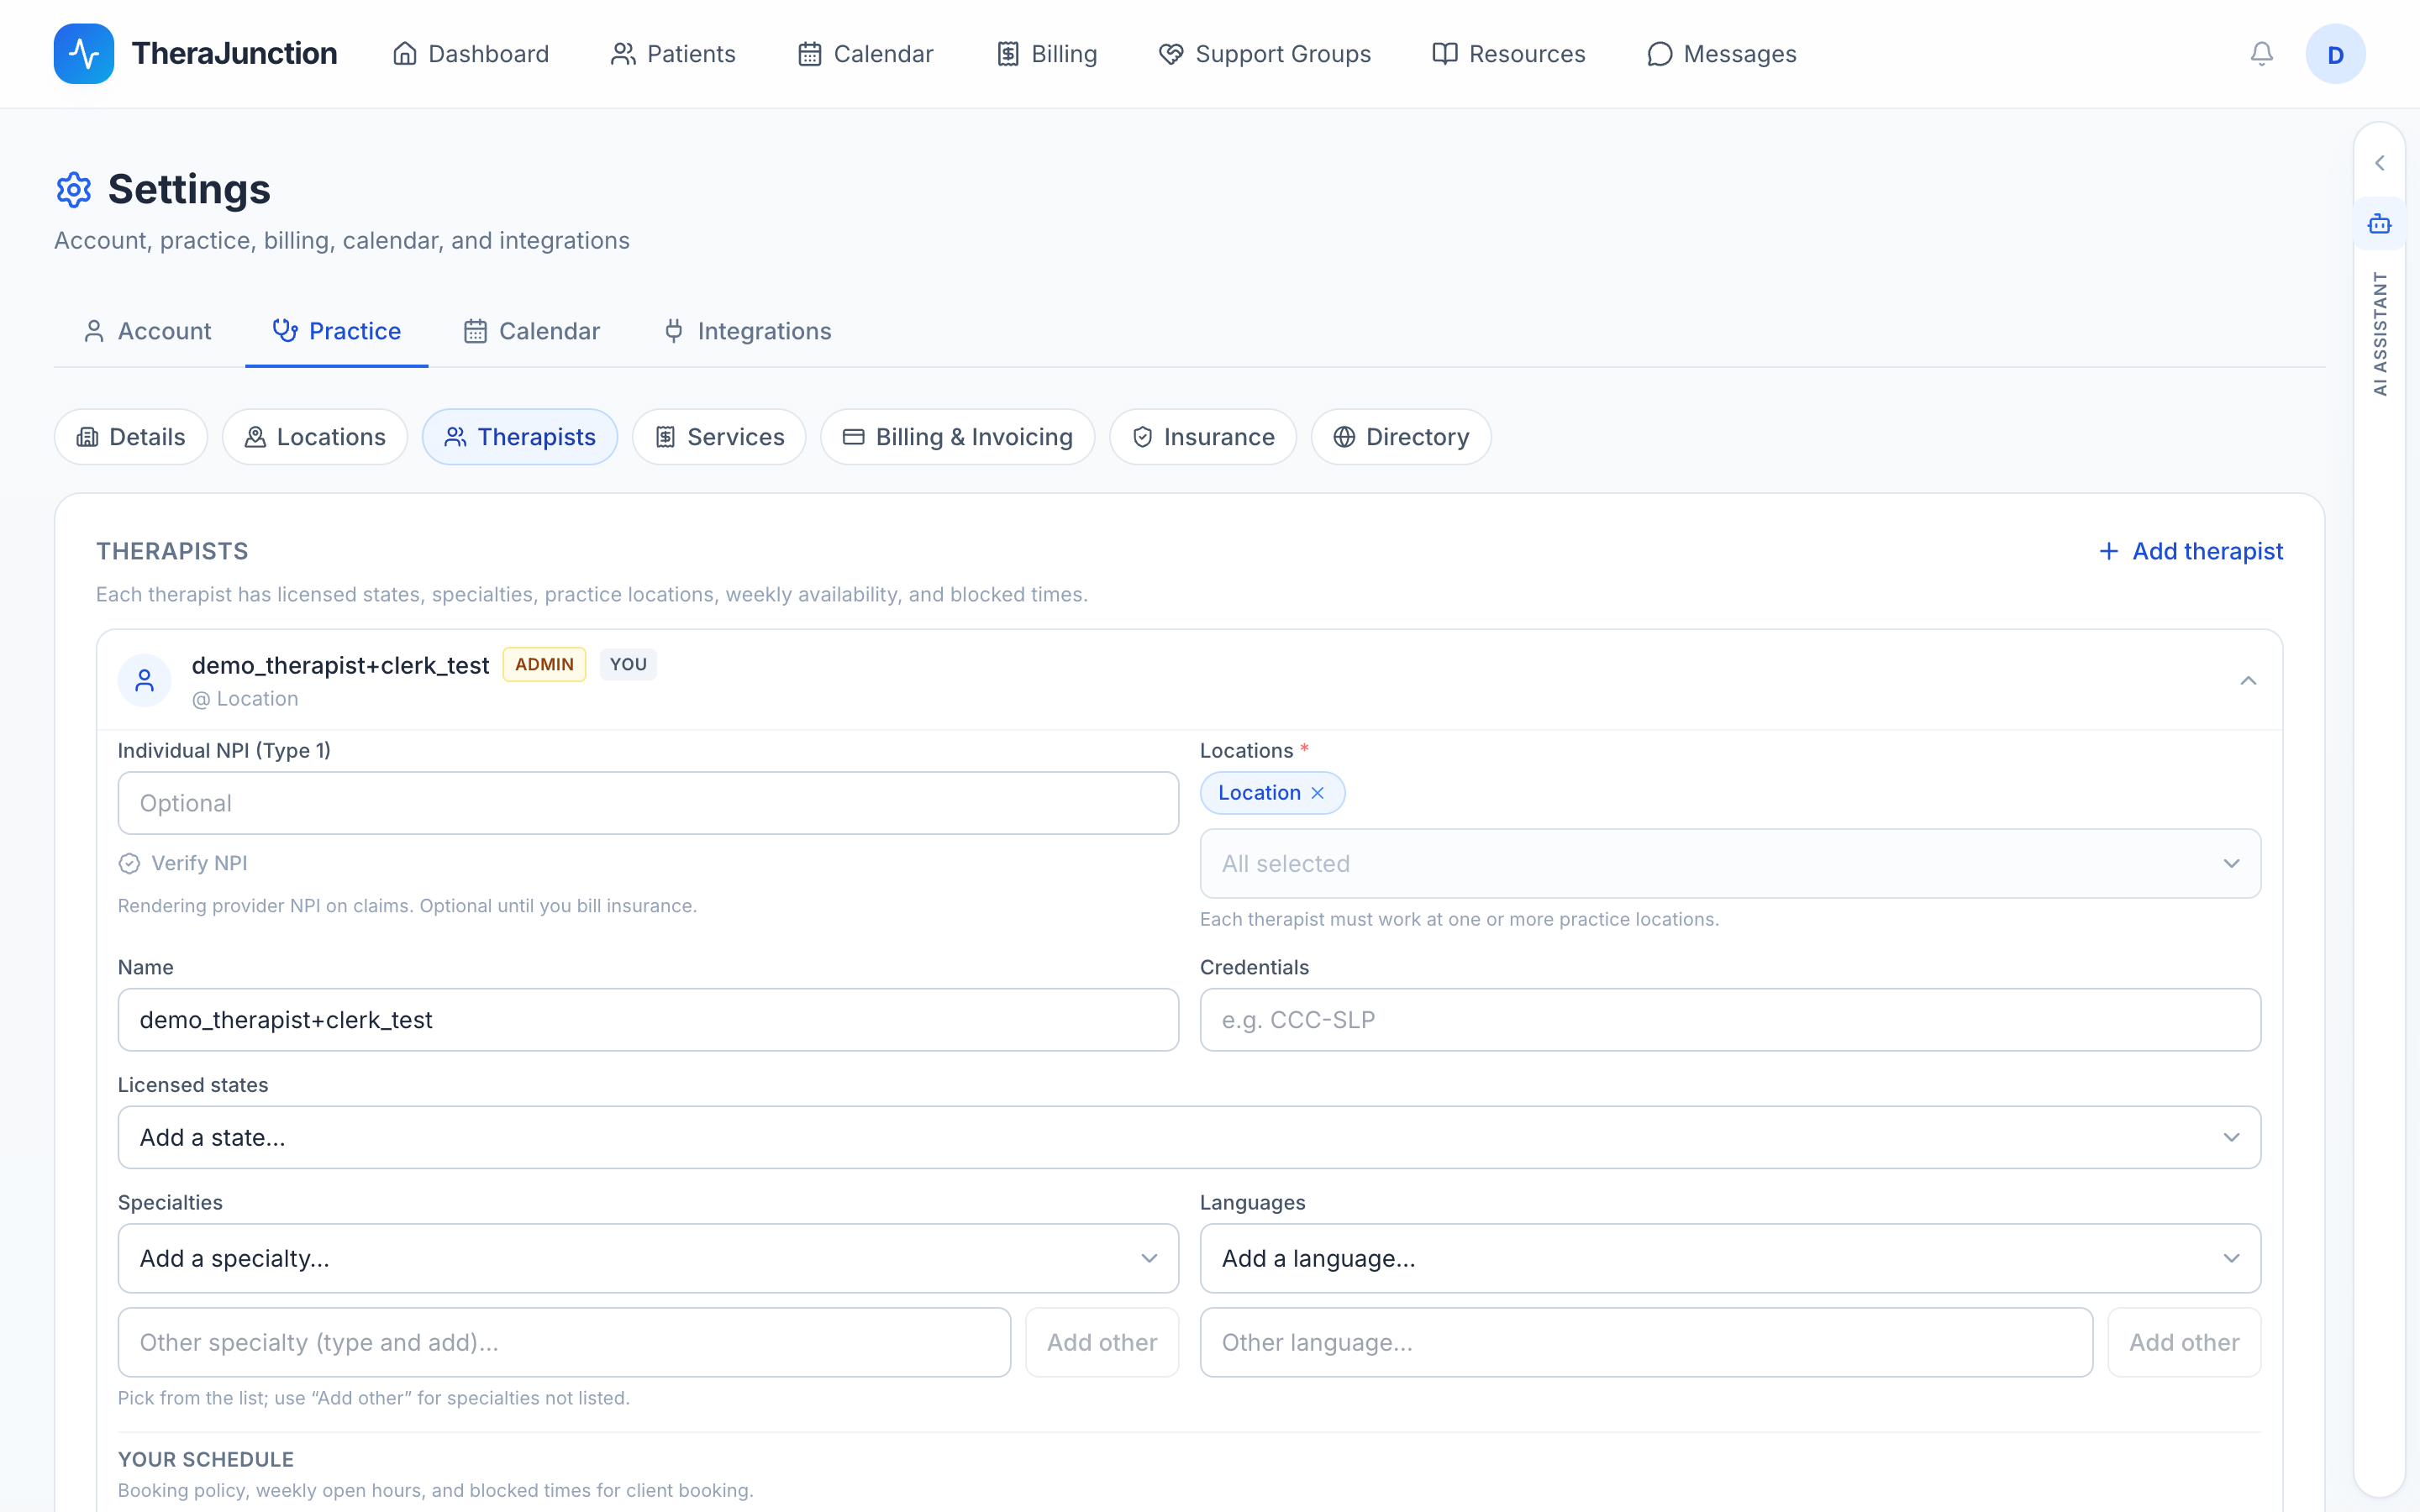
Invited colleagues receive an email invitation to create their account and complete their individual licensing and availability. Administrators can also add therapist names to the public directory profile before those clinicians have created their login accounts.
3.6 Insurance and NPI
Configure your clinical billing credentials:
- NPI: Your 10-digit National Provider Identifier.
- Taxonomy code: Ten-character specialty classification. The standard code
for Speech-Language Pathologists is
235Z00000X. - Accepted payers: Select the health plans your practice works with from the pre-populated national payer directory (including Aetna, Blue Cross Blue Shield, Cigna, UnitedHealthcare, Medicare, and state Medicaid programs).
- Network status: Designate whether your practice is in-network or out-of-network with each payer. This status determines whether finished sessions generate electronic claims or out-of-network superbills.
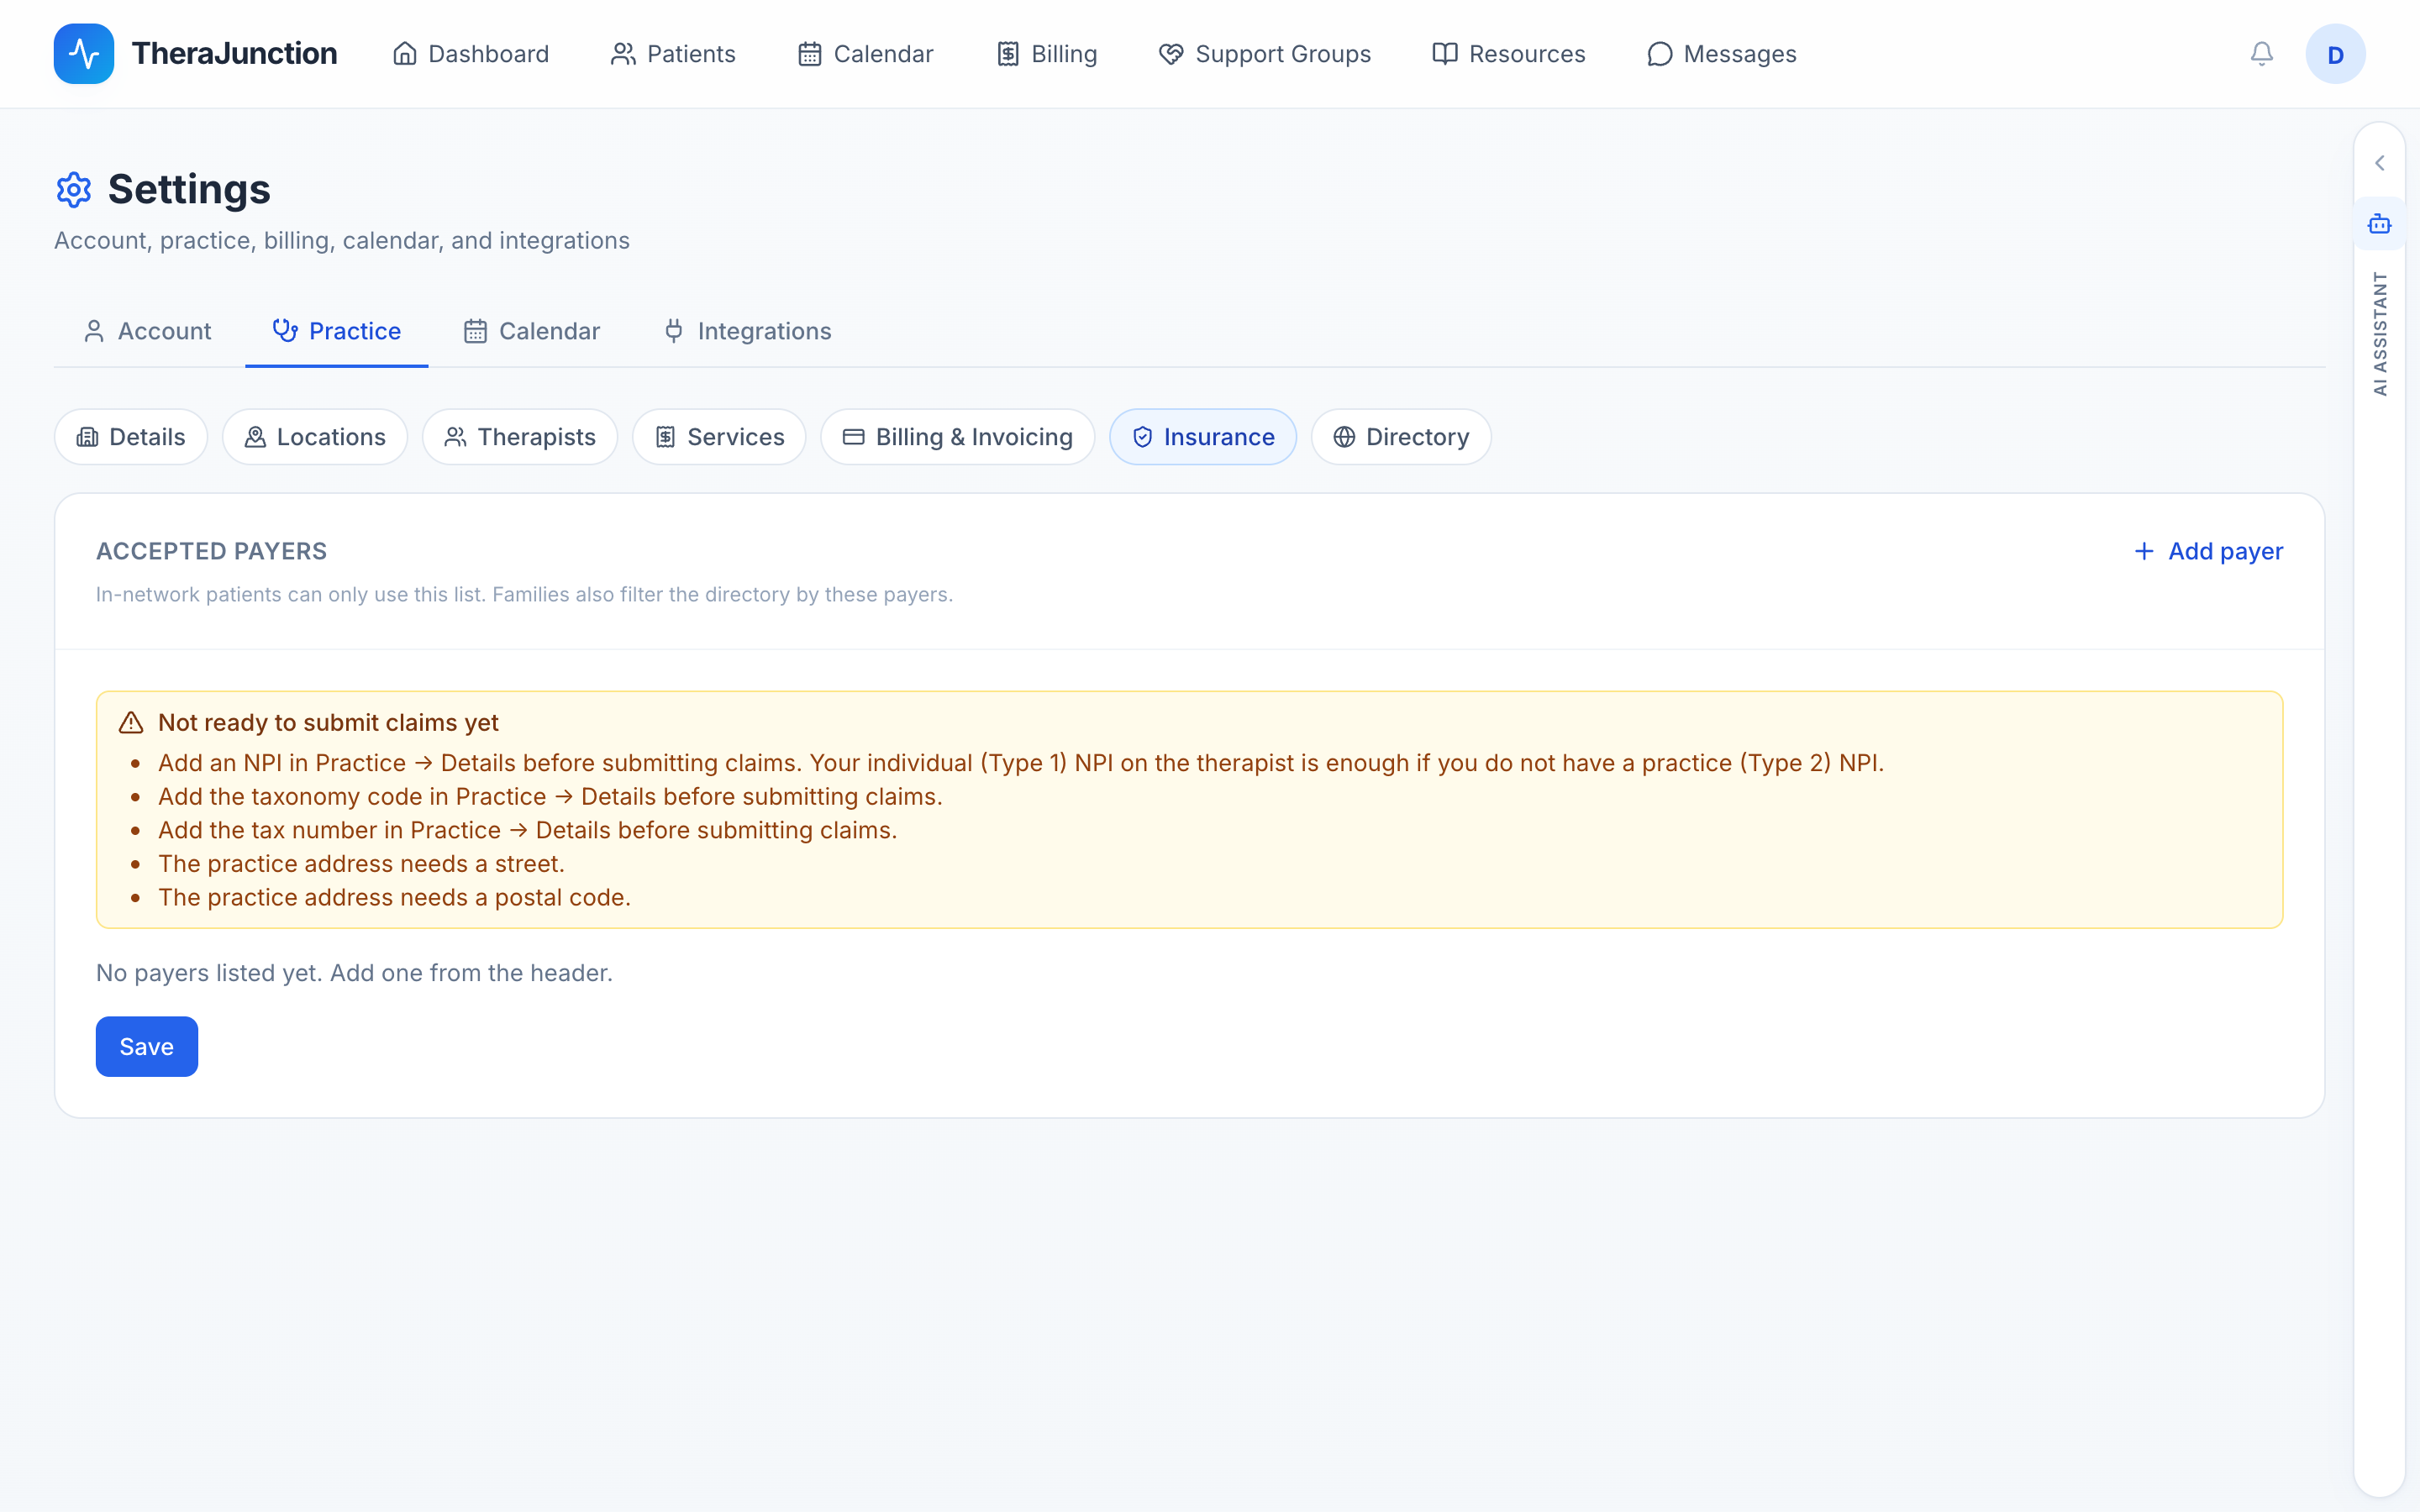
Payers can be added or updated anytime under Settings → Practice → Insurance. Detailed claim assembly rules are covered in Claims.
3.7 Services catalog
Define the services your practice offers. Each service includes a name, an optional procedure code (CPT), a duration in minutes, and a standard fee.
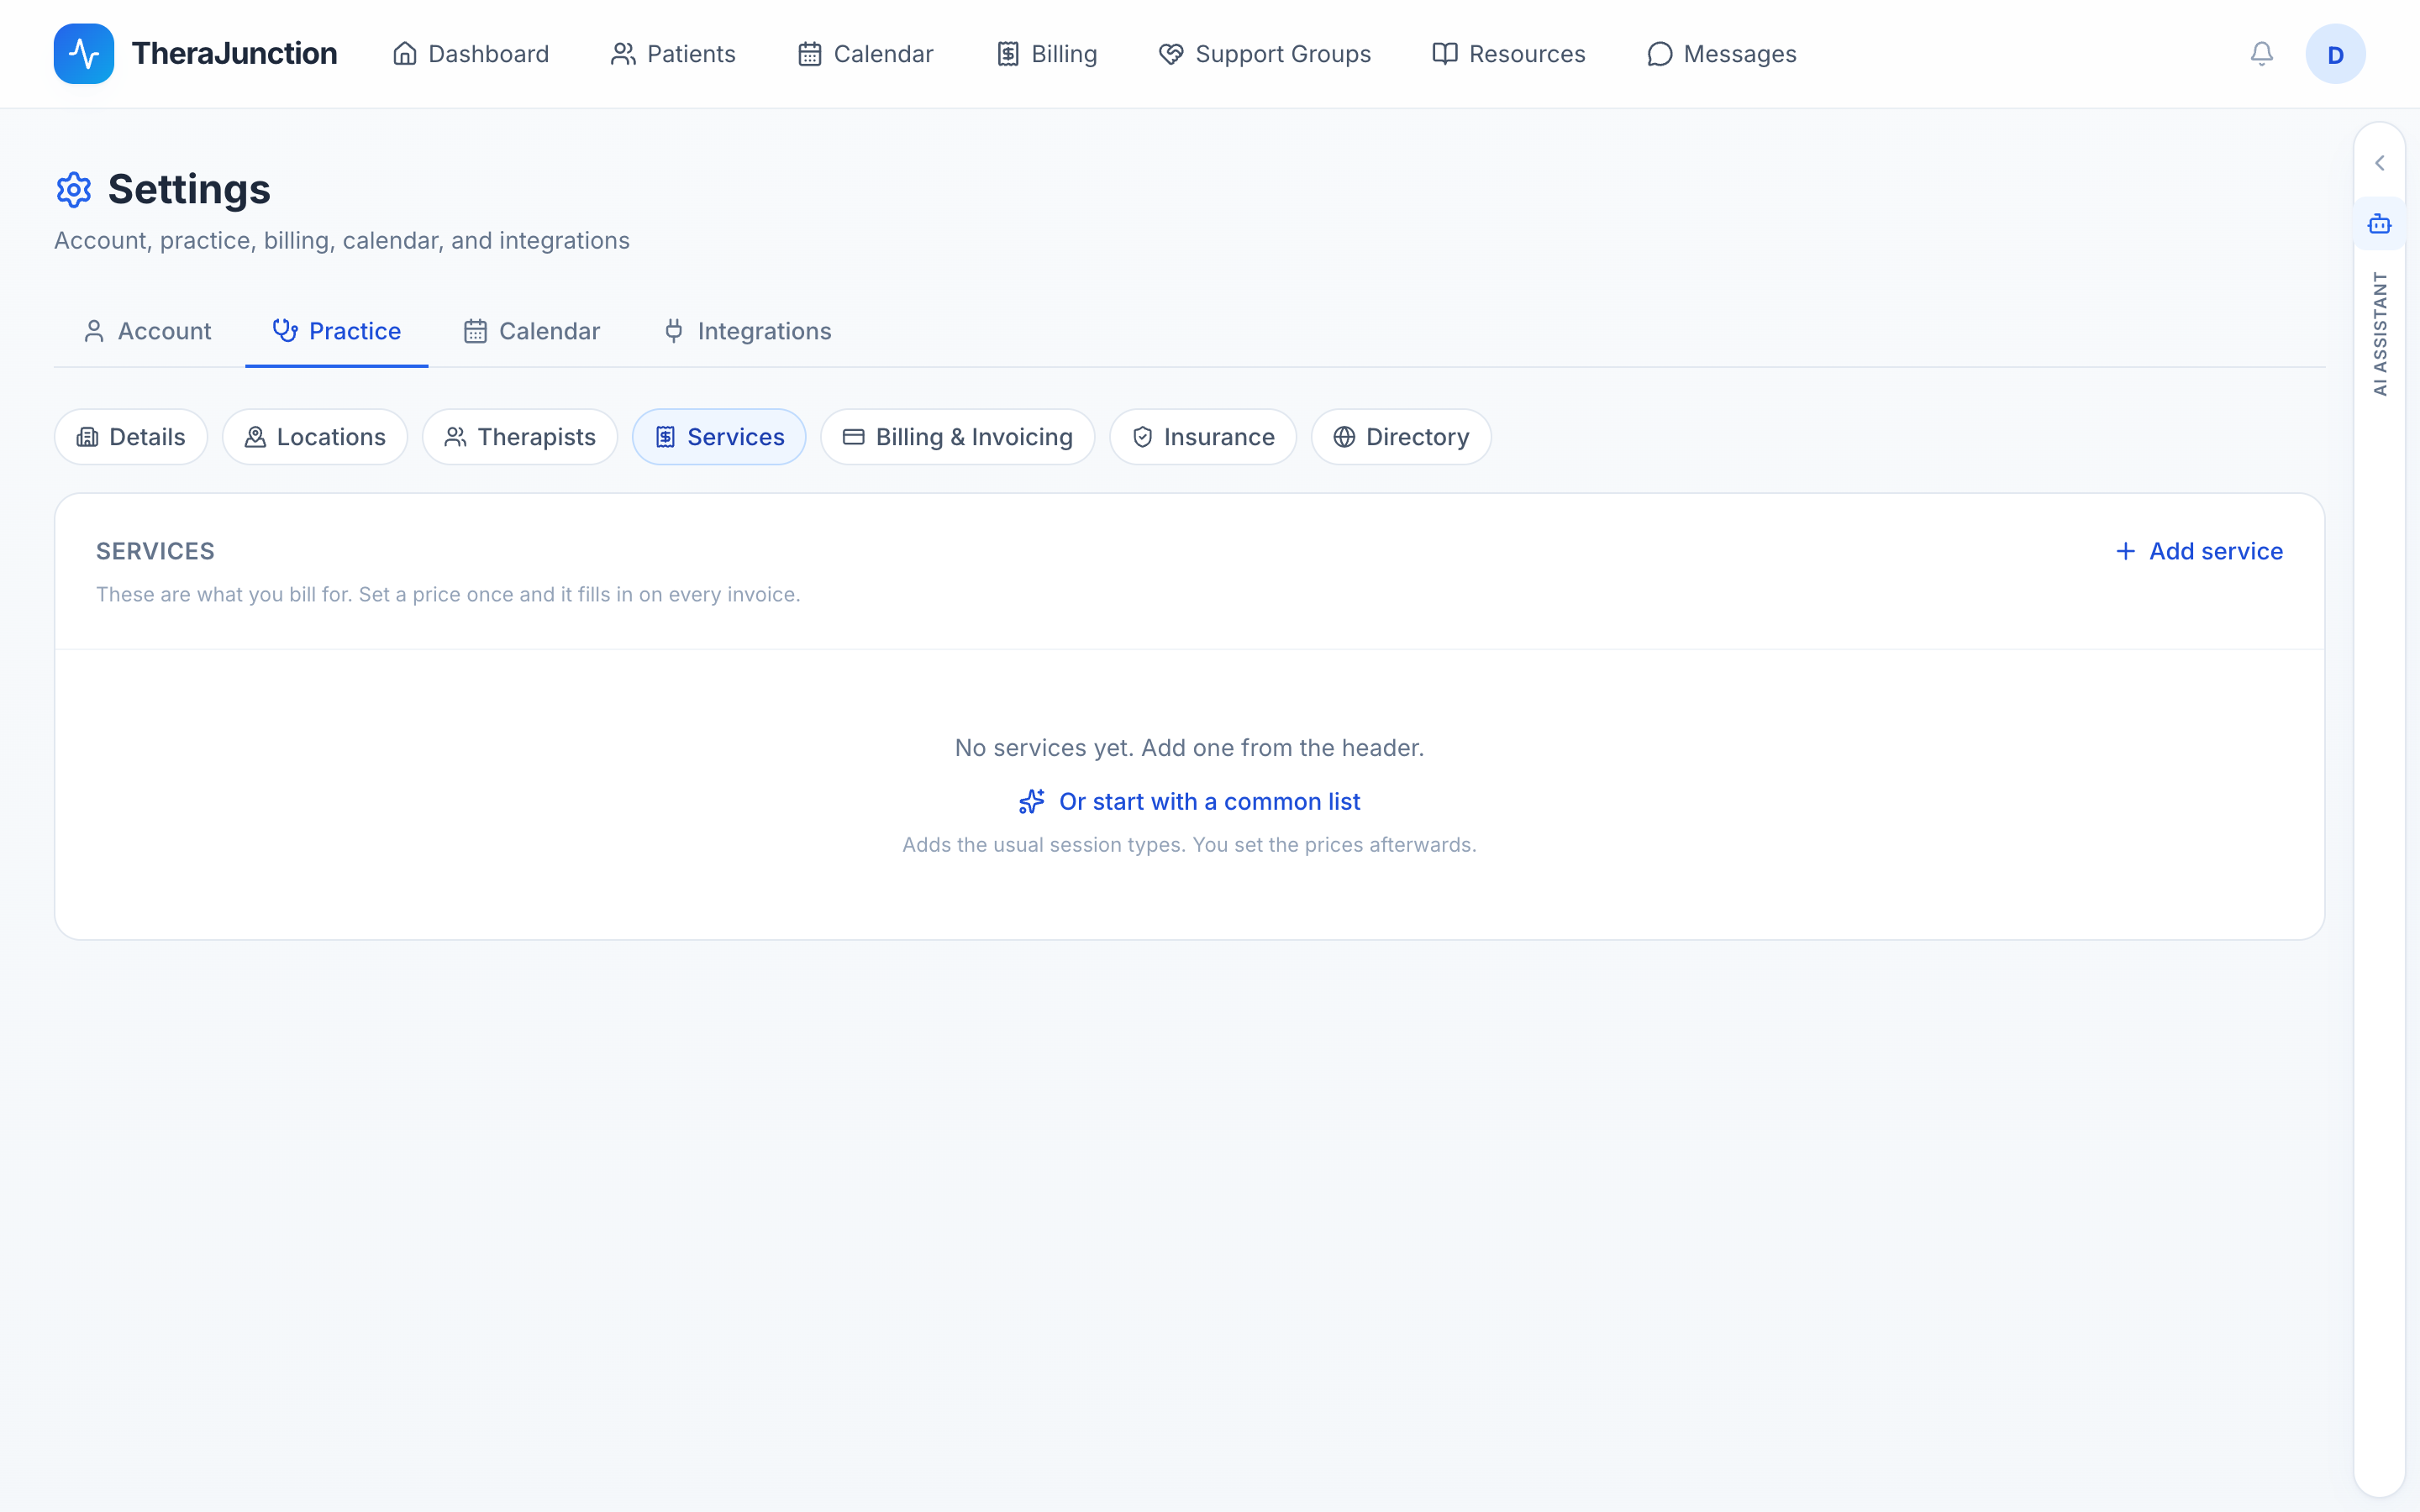
Click Start with a common list to populate the catalog with standard SLP procedure codes:
| CPT Code | Description | Standard Duration |
|---|---|---|
| 92507 | Treatment of speech, language, voice, or communication | 30 to 45 min |
| 92508 | Group treatment of speech, language, or communication | 45 to 60 min |
| 92521 | Evaluation of speech fluency (stuttering, cluttering) | 60 min |
| 92522 | Evaluation of speech sound production (articulation, apraxia) | 60 min |
| 92523 | Evaluation of speech sound production and language comprehension | 60 to 90 min |
| 92524 | Behavioral and qualitative analysis of voice and resonance | 45 to 60 min |
| 92526 | Treatment of swallowing dysfunction and/or oral feeding | 30 to 45 min |
| 92607 | Evaluation for prescription of AAC device, first hour | 60 min |
| 92608 | Evaluation for prescription of AAC device, each additional 30 min | 30 min |
| 92609 | Therapeutic services for use of speech-generating AAC device | 30 to 45 min |
Standard fees default to zero so you can enter your practice's exact fee schedule before issuing invoices or generating claims. Modify services at any time under Settings → Practice → Services.
3.8 Availability
Configure your recurring weekly availability under Settings → Practice → Therapists by expanding your clinician record. Add weekly time slots for each day of the week (such as Monday through Thursday, 9:00 AM to 5:00 PM).
Under Settings → Calendar, set calendar display preferences: start of the week (Sunday or Monday), default appointment slot length (15, 30, 45, or 60 minutes), and scheduling buffers between appointments.
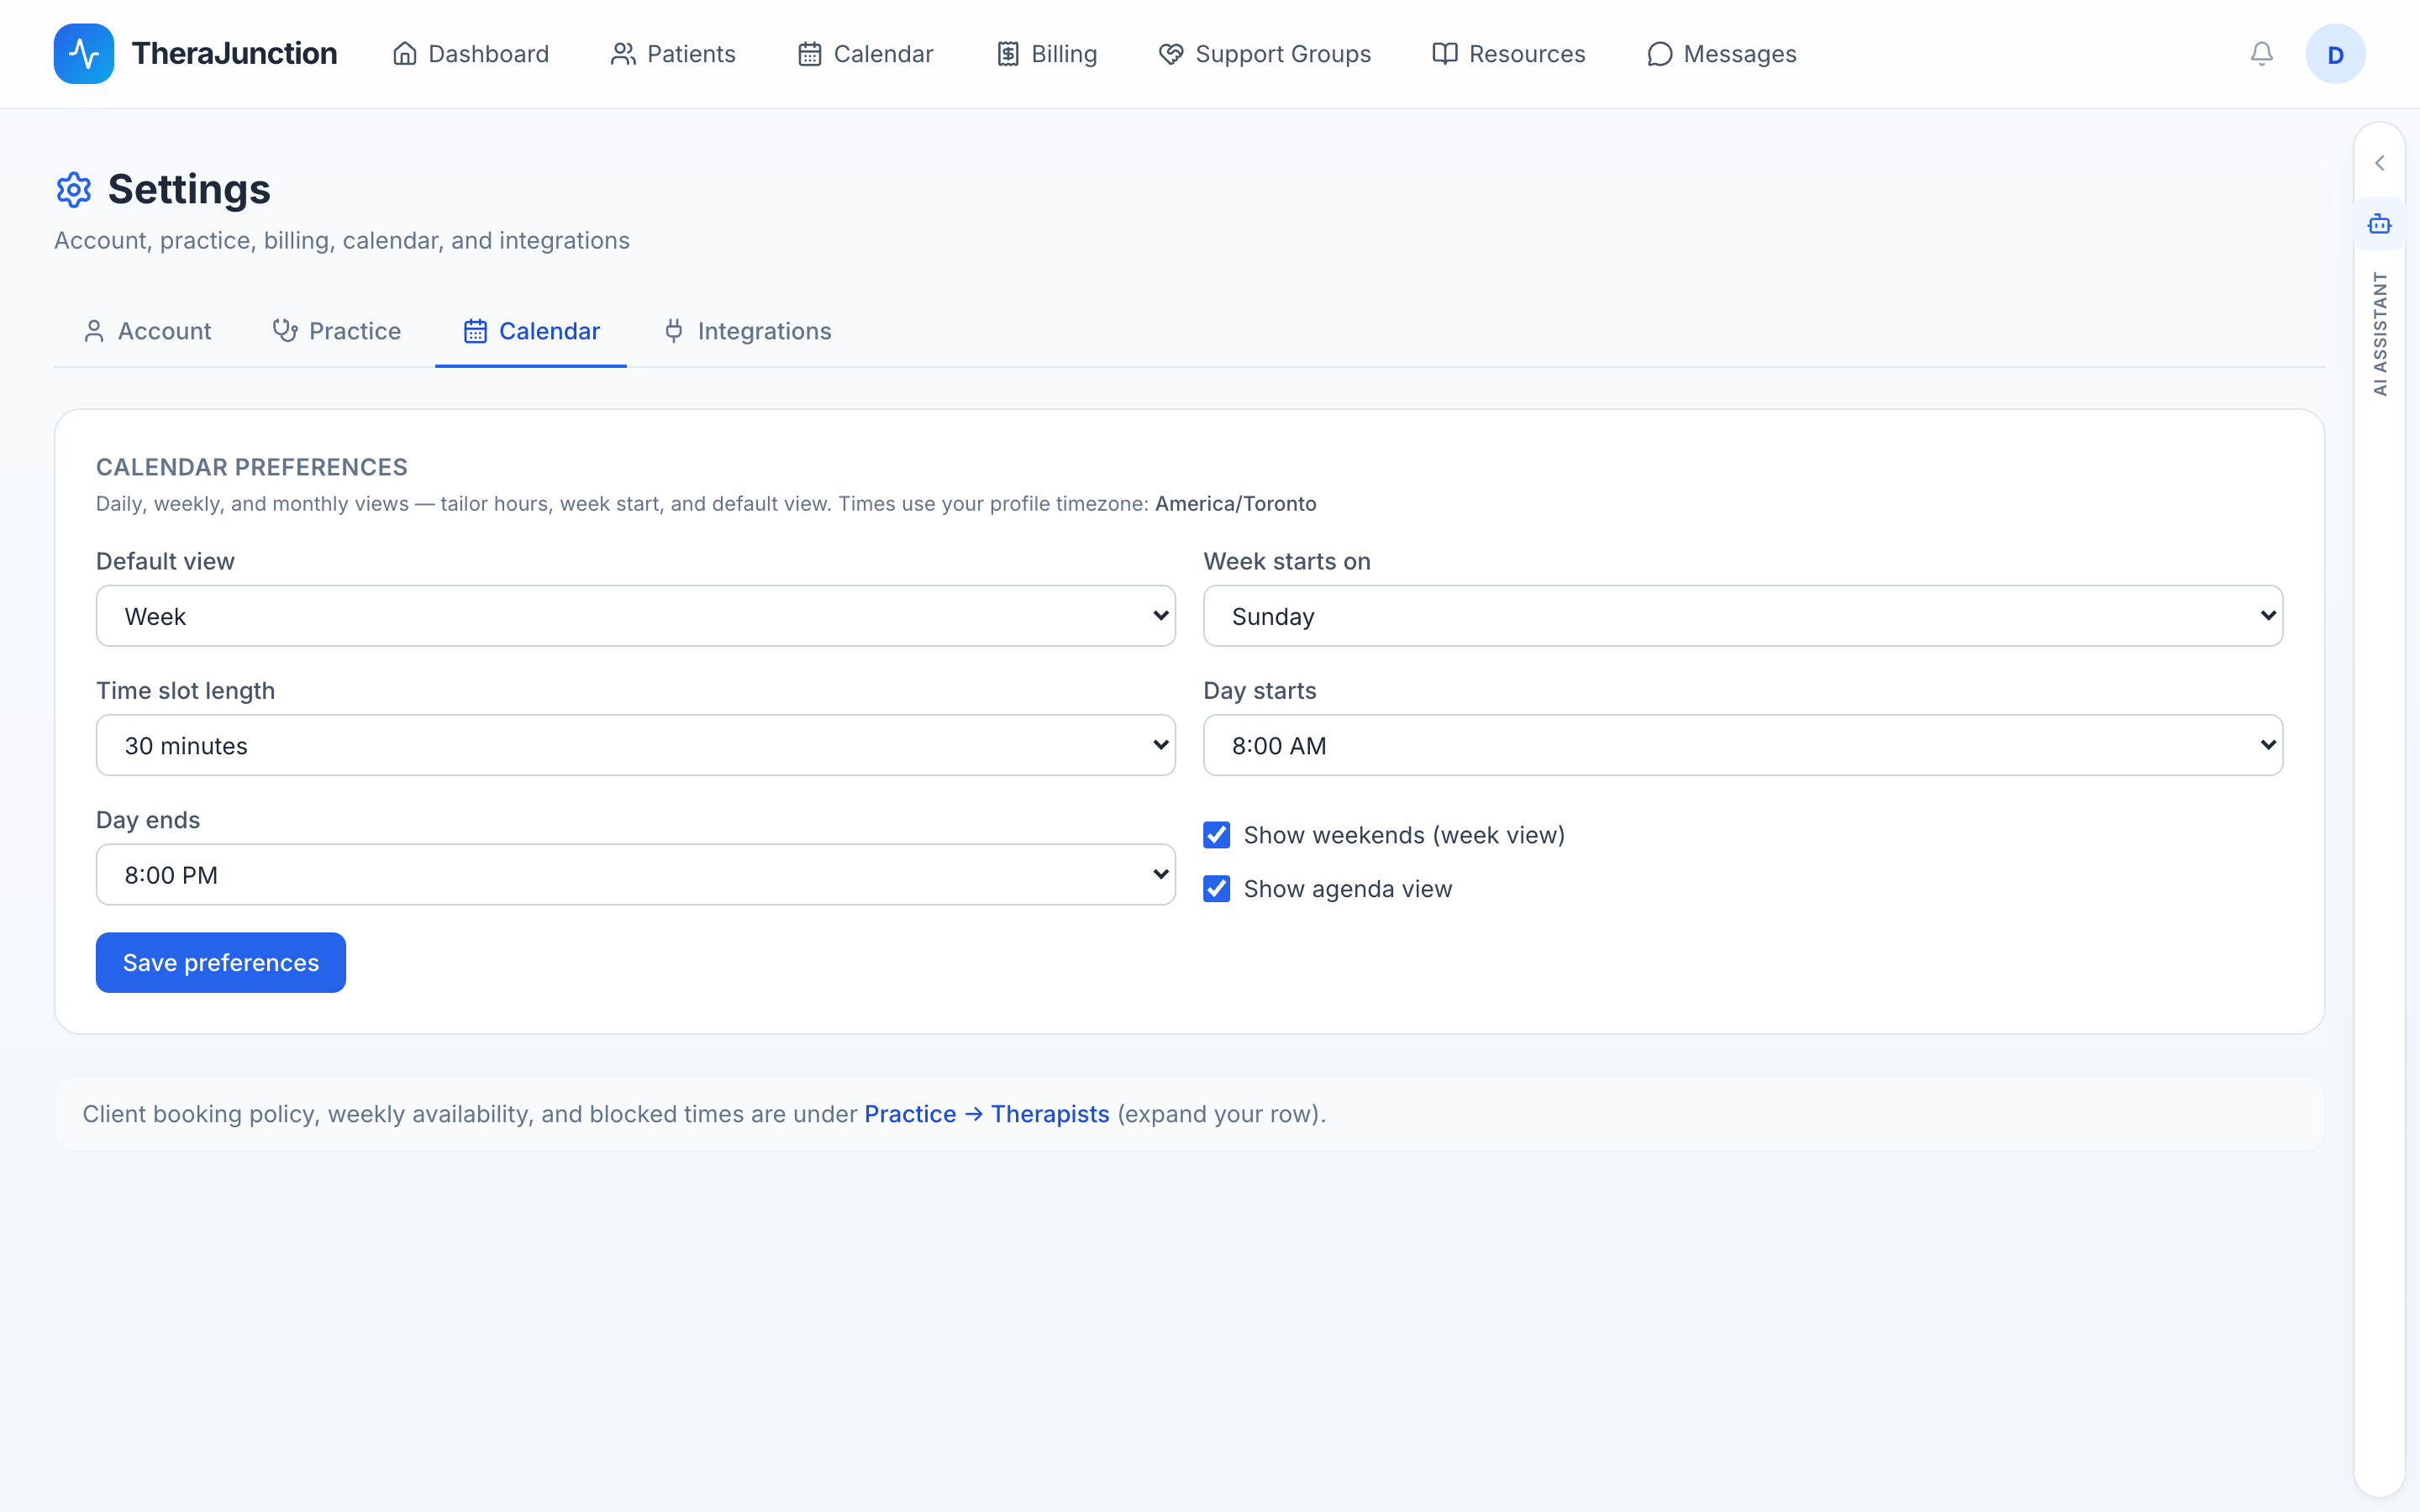
Availability is required for online booking. Clients browsing the public directory cannot request an appointment until your calendar has at least one active availability block.
3.9 Directory listing
At the final step of setup, decide whether to list your practice on the public directory at therajunction.com/speech-therapists.
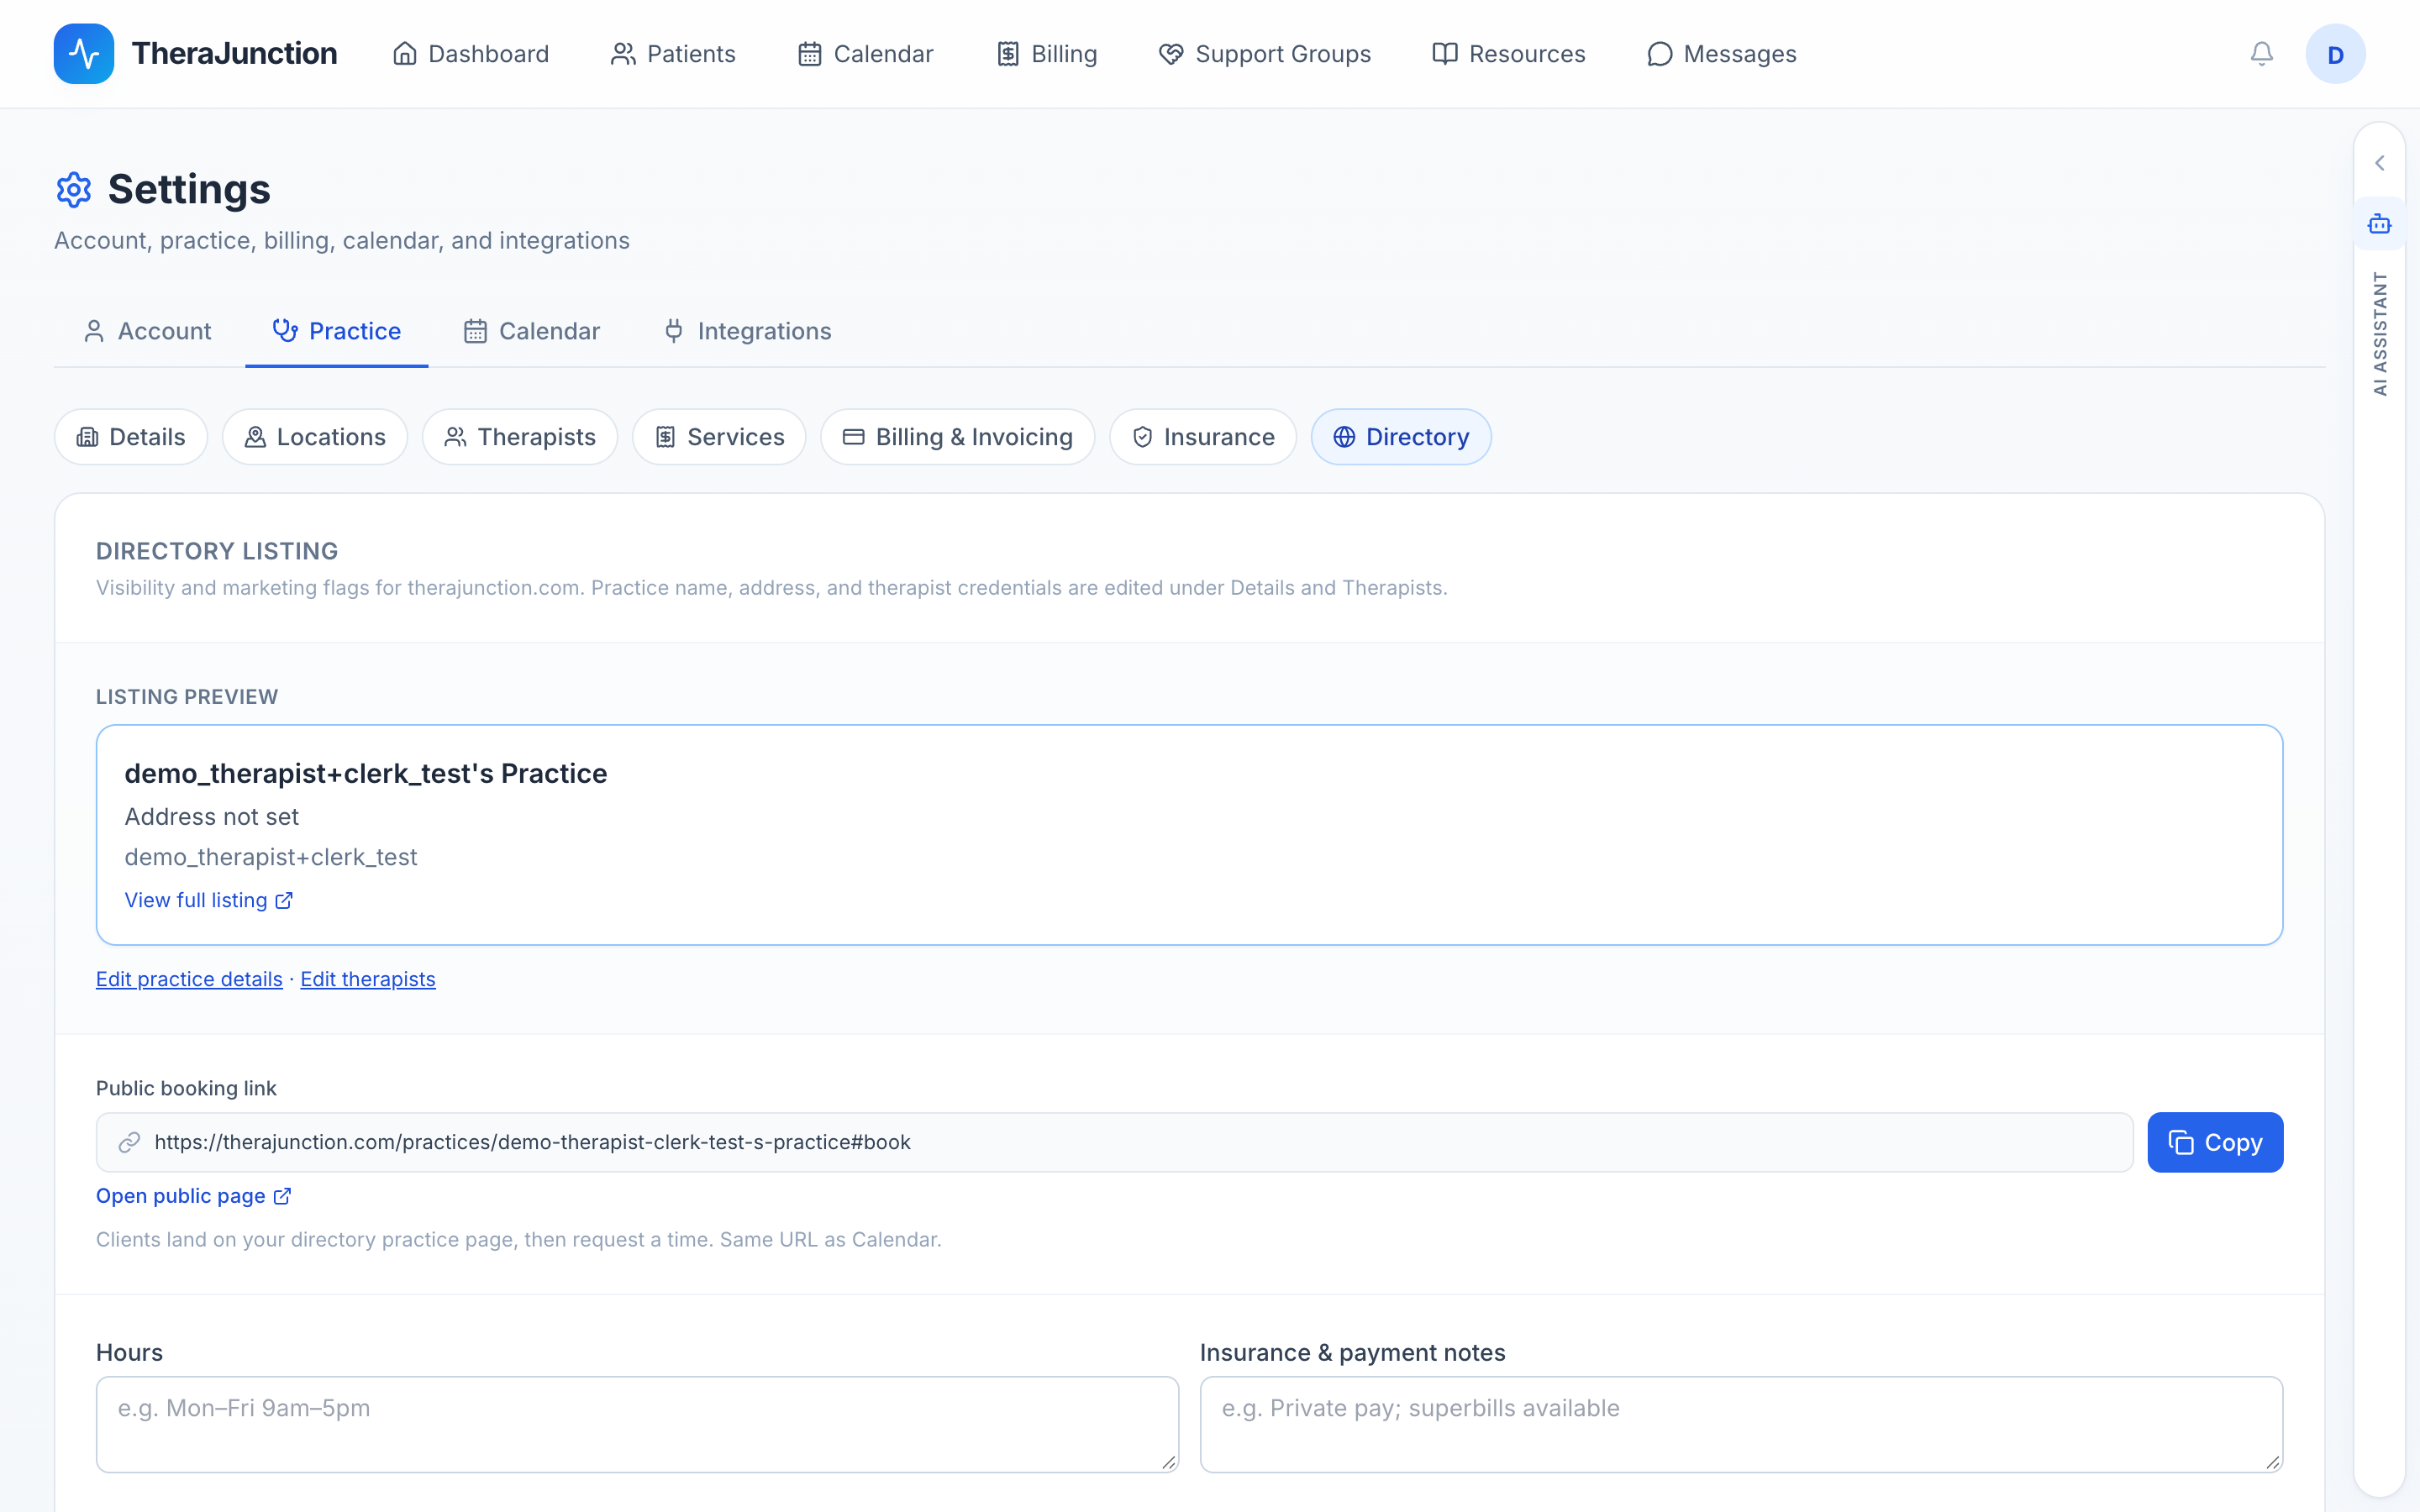
You can customize your listing preview, copy your direct public booking link, specify public business hours, and add accepted insurance details. You can toggle directory visibility on or off at any time under Settings → Practice → Directory.
4. Finish your profile
If your personal clinician profile requires additional information, a notification banner appears on your dashboard. Clinician display name, mobile phone number, and local timezone are mandatory.
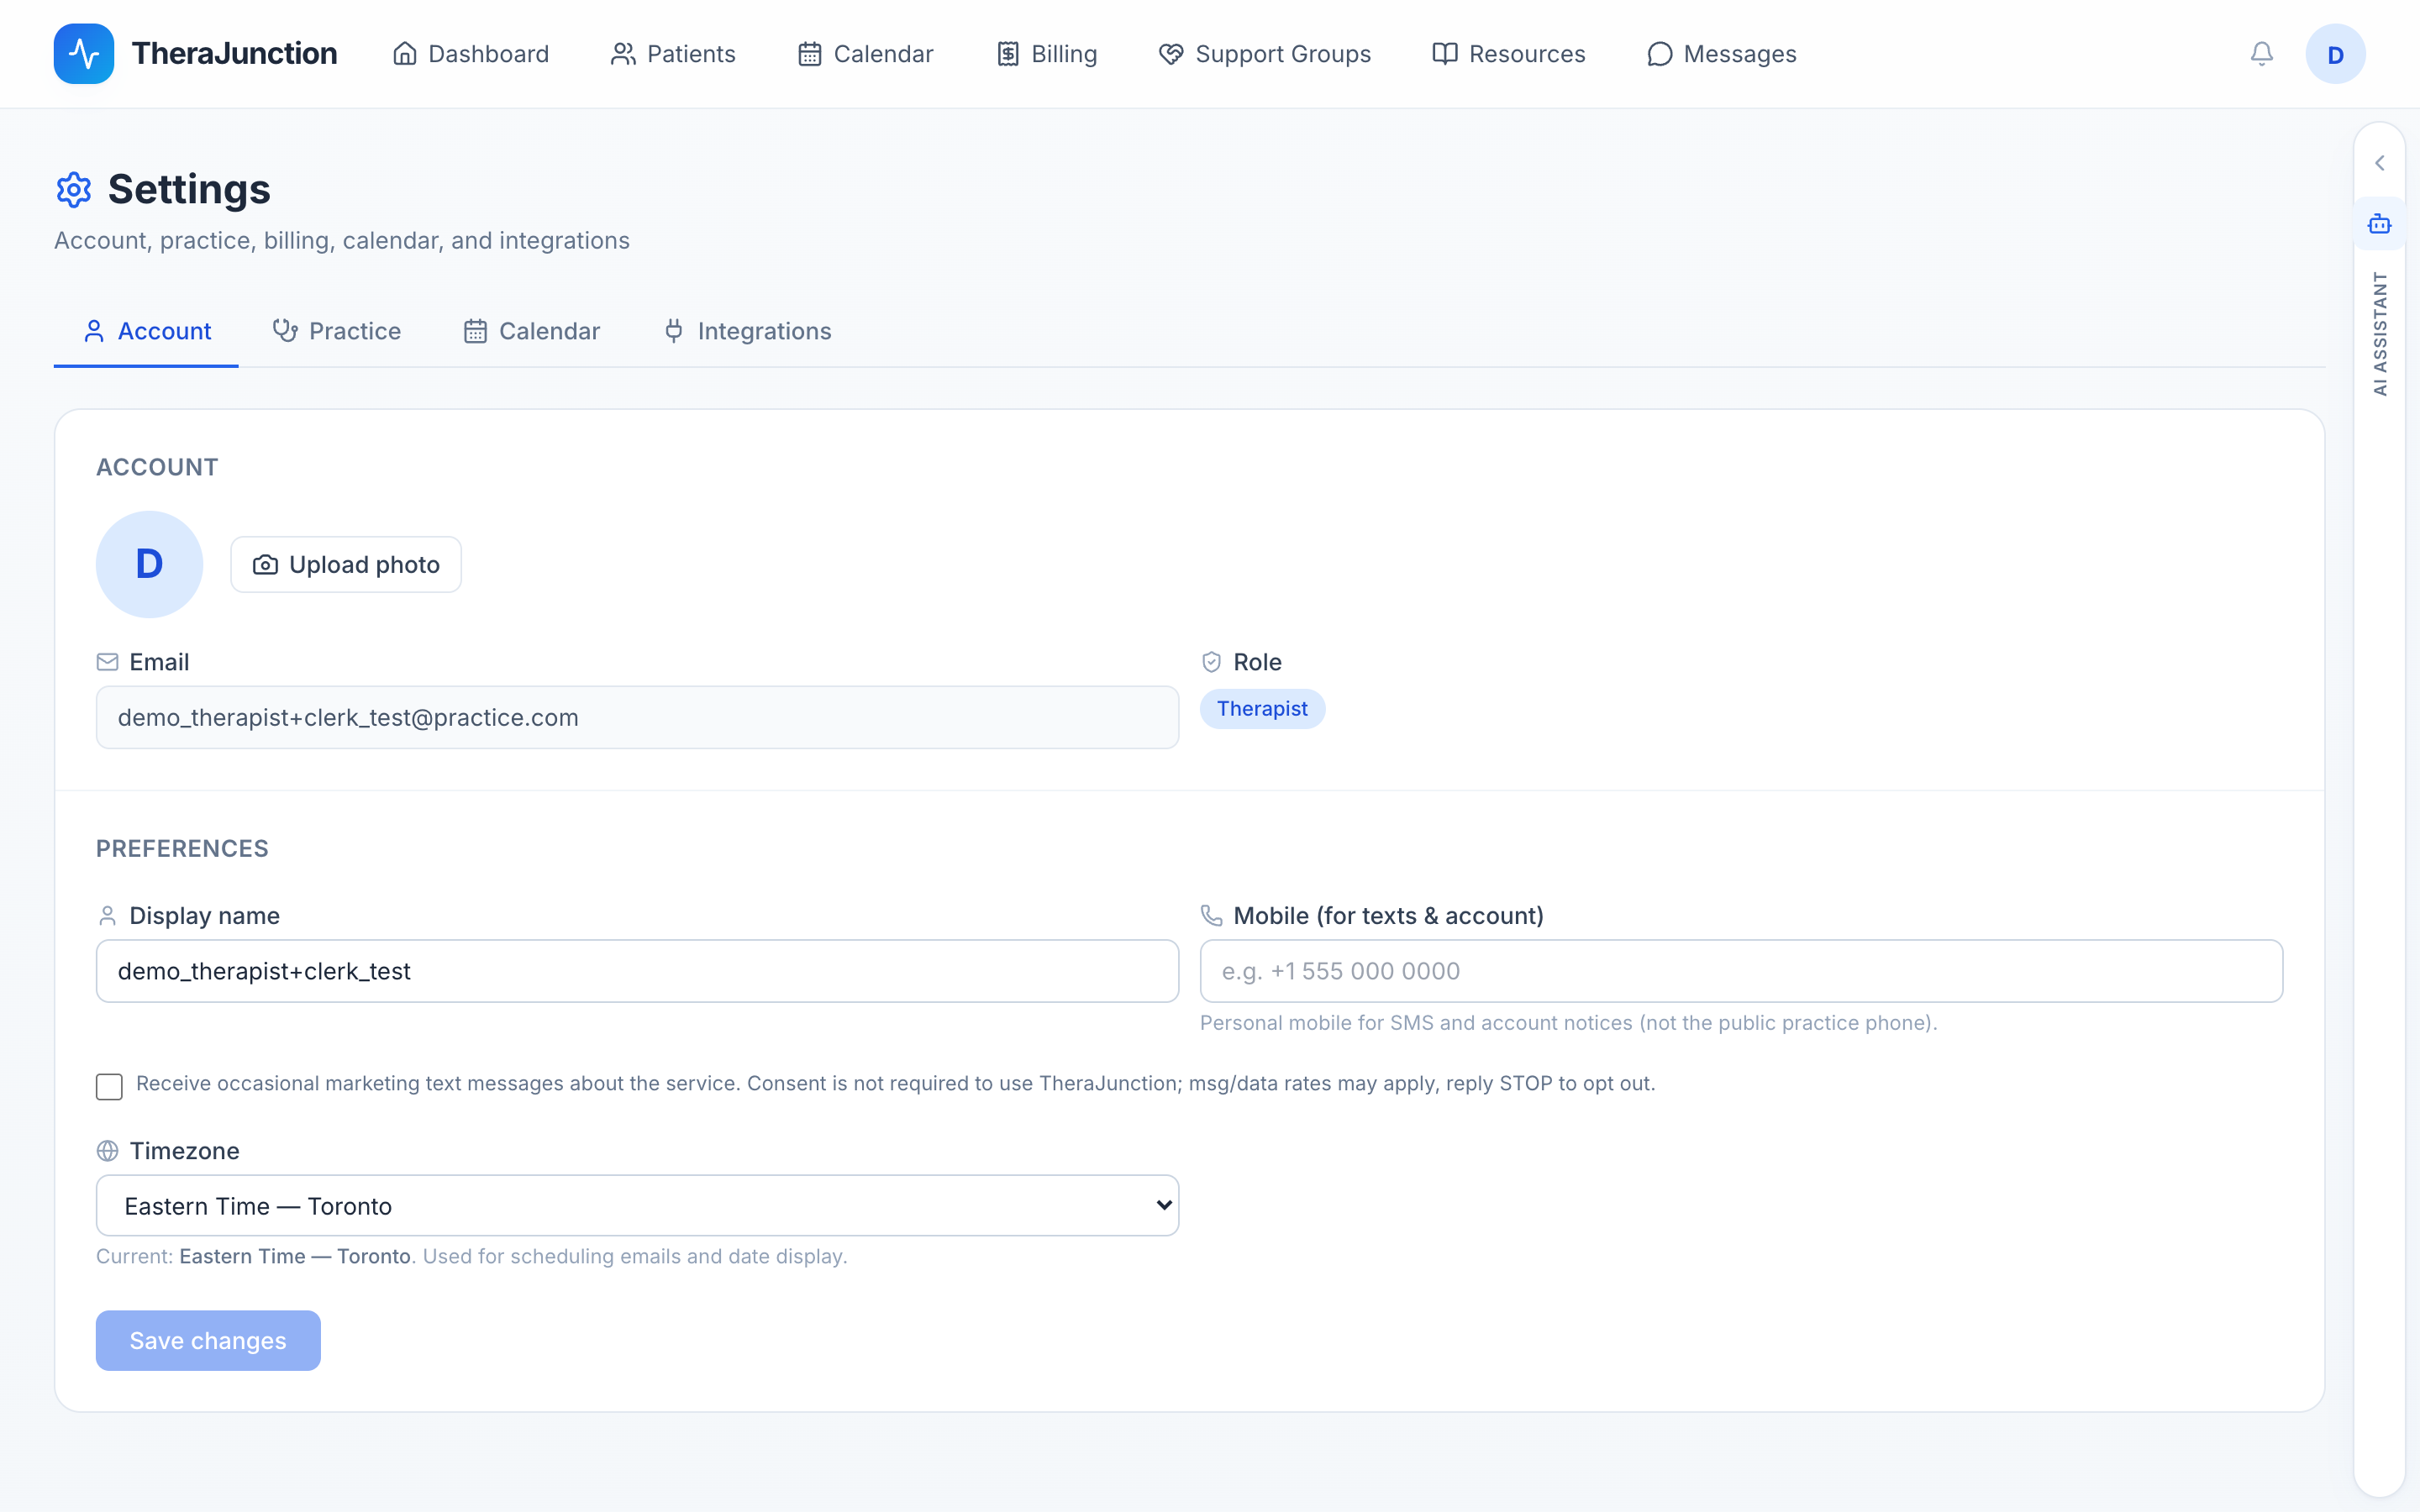
Appointment booking, reminder notifications, and calendar sync depend on accurate timezone and contact records. You can update these fields at any time under Settings → Account.
5. Connect Stripe
To accept patient credit card and debit card payments, connect your practice Stripe account from the dashboard card or under Settings → Practice → Billing & Invoicing.
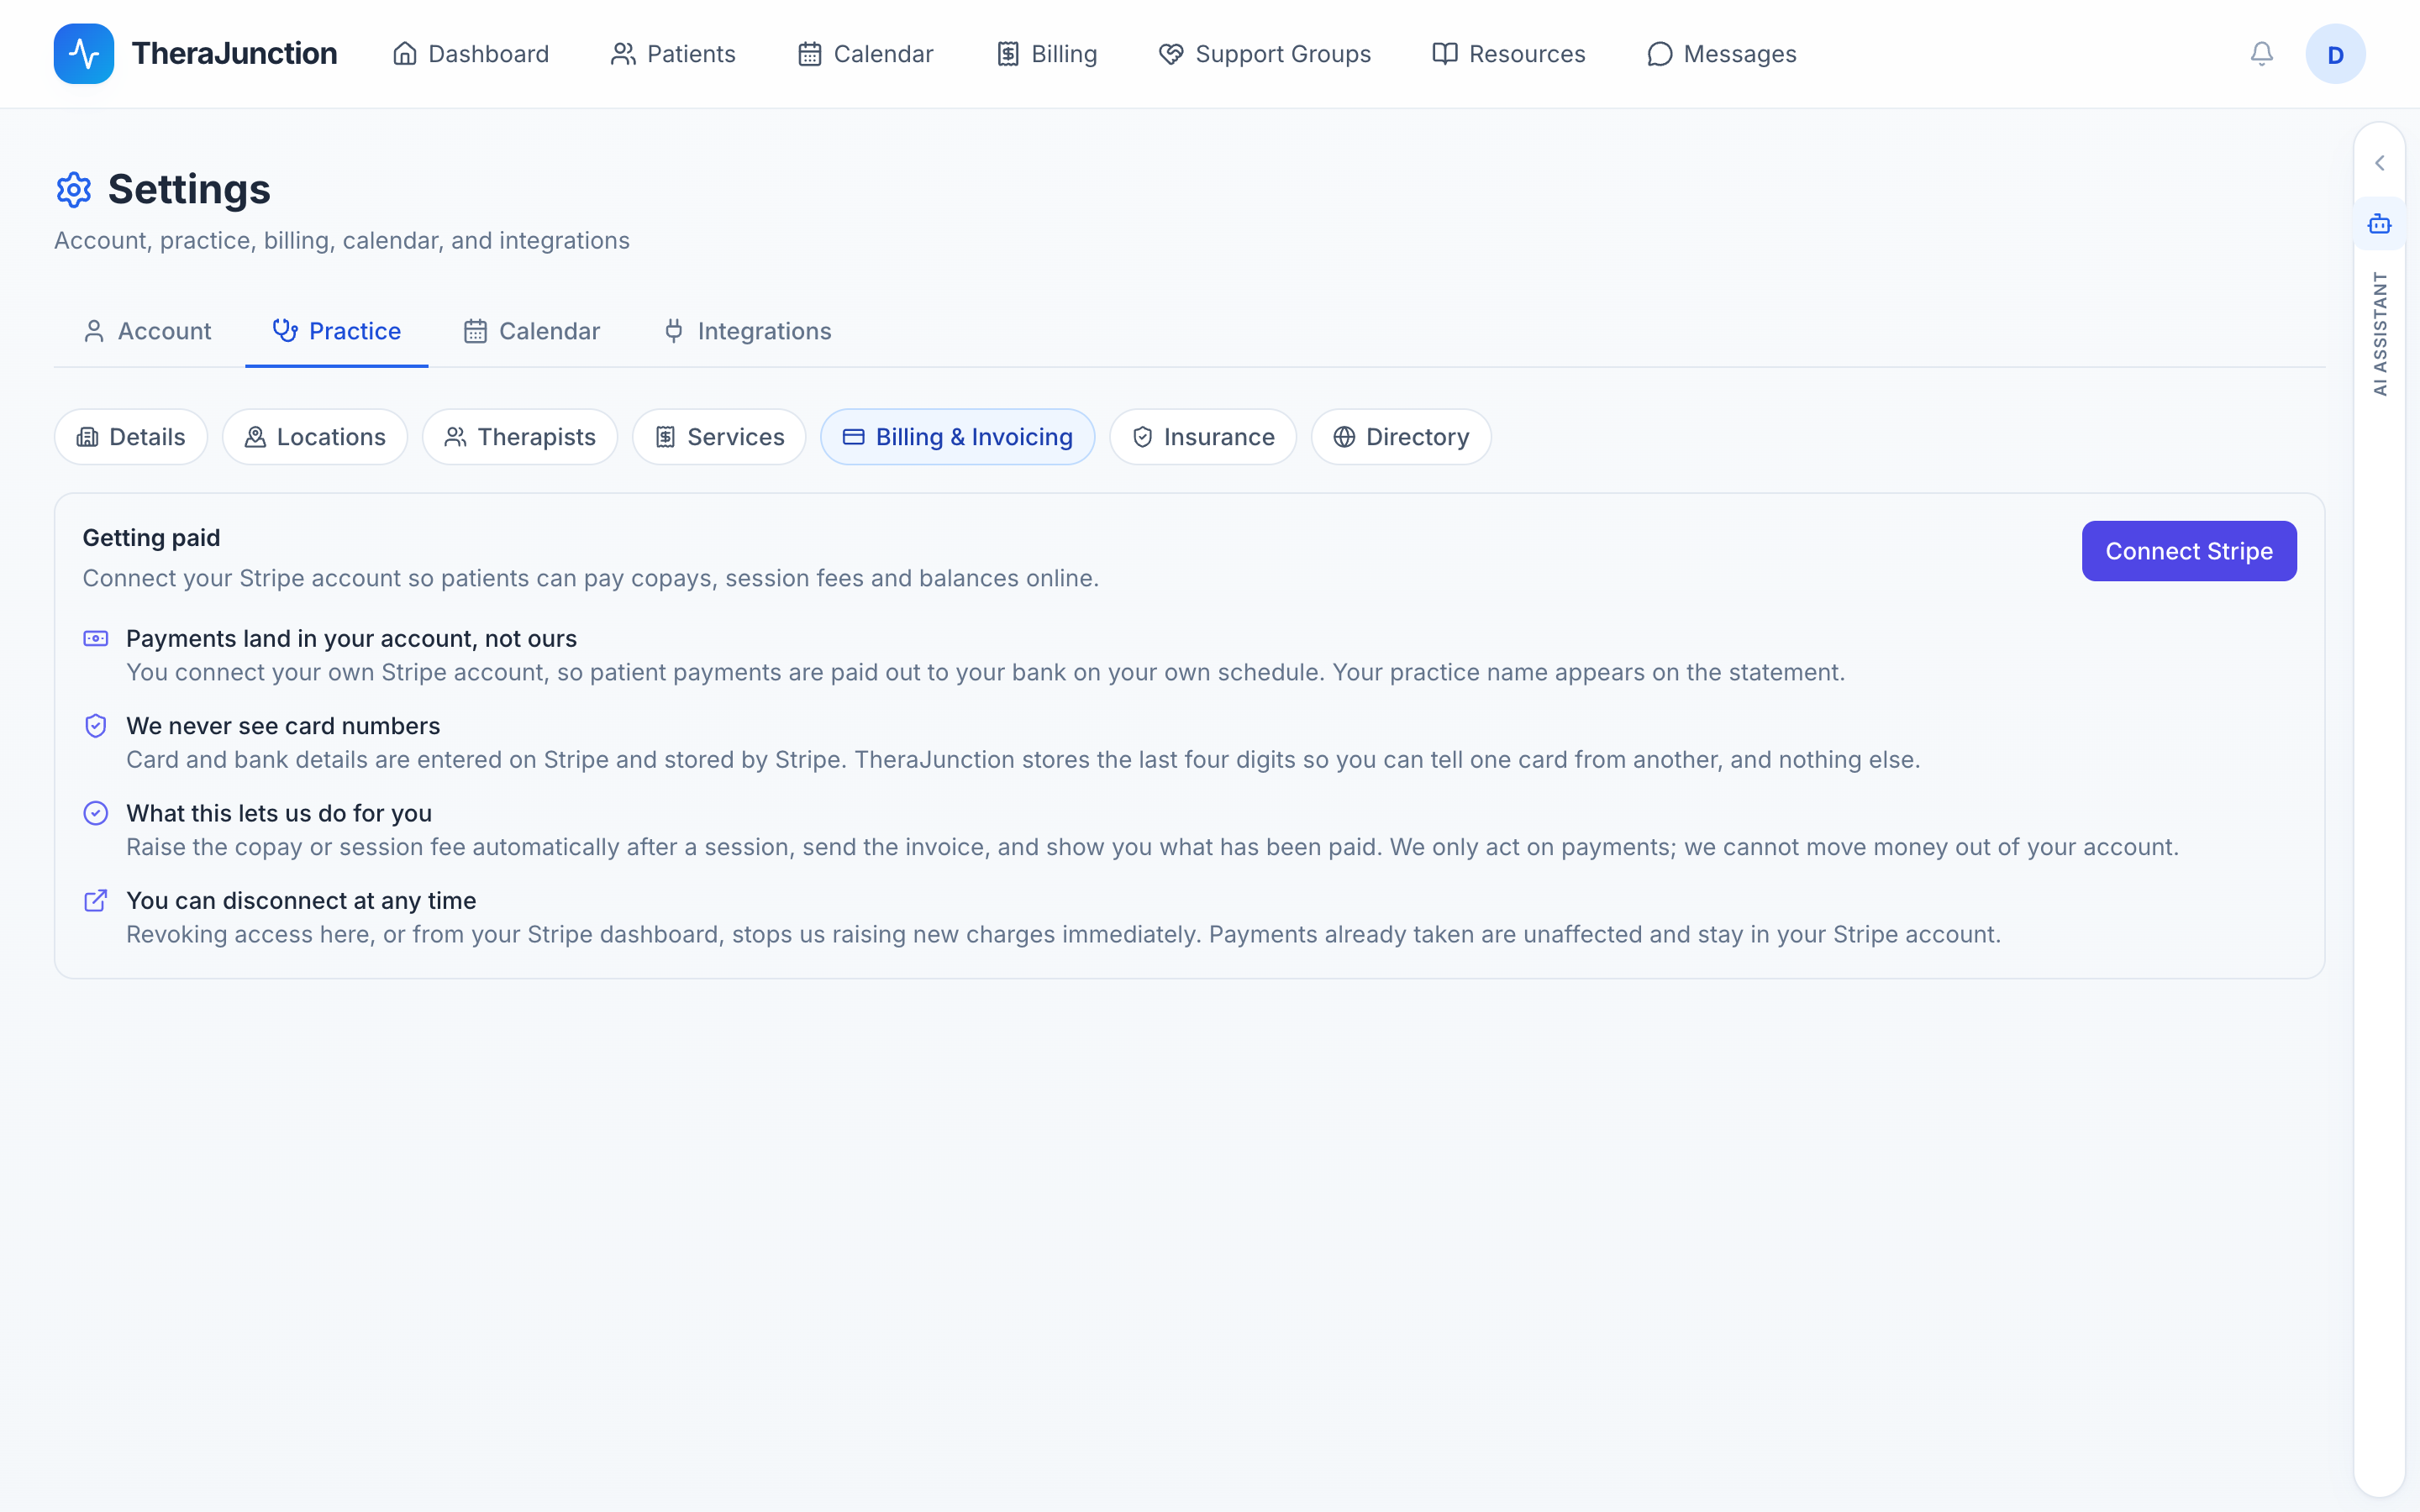
TheraJunction uses Stripe Connect Standard. Patient payments flow directly from the client into your own practice Stripe account and are paid out to your bank on your configured payout schedule. Your legal practice name appears on the patient's bank and credit card statements.
- Click Connect Stripe.
- Stripe prompts you to log into an existing Stripe account or register a new merchant entity.
- Authorize TheraJunction to create charges on your behalf.
- You are redirected back to TheraJunction with your merchant account connection stored.
What Stripe Connect Standard means for your practice:
- Direct funds transfer: Client payments deposit into your Stripe account and your linked bank account. TheraJunction never holds or routes patient funds.
- Merchant of record: Your practice is the merchant of record. Refunds, disputed charges, chargebacks, and annual IRS Form 1099-K tax reporting are managed directly by you in your Stripe dashboard.
- Strict permission scope: TheraJunction can create charges for patient invoices and inspect charge status. It cannot withdraw money or alter bank payout destinations.
- Disconnect anytime: You can revoke the connection at any time from TheraJunction or from your Stripe dashboard.
Connected status versus ready status: Stripe verifies the business identity of all new merchant accounts. Until Stripe completes review, your billing status displays "In review" and patient credit card charges cannot be processed. Click Check again once you have completed any verification steps requested by Stripe.
| Status | Meaning | Credit Card Processing |
|---|---|---|
| Not connected | Stripe onboarding has not been initiated | Disabled |
| In review | Stripe is reviewing identity or banking documents | Disabled |
| Ready | Merchant account is active and verified | Enabled |
Creating invoices, printing itemized PDF bills, and emailing statements can be done before Stripe is connected. Live credit card processing begins as soon as the status changes to Ready.
6. Find your way around
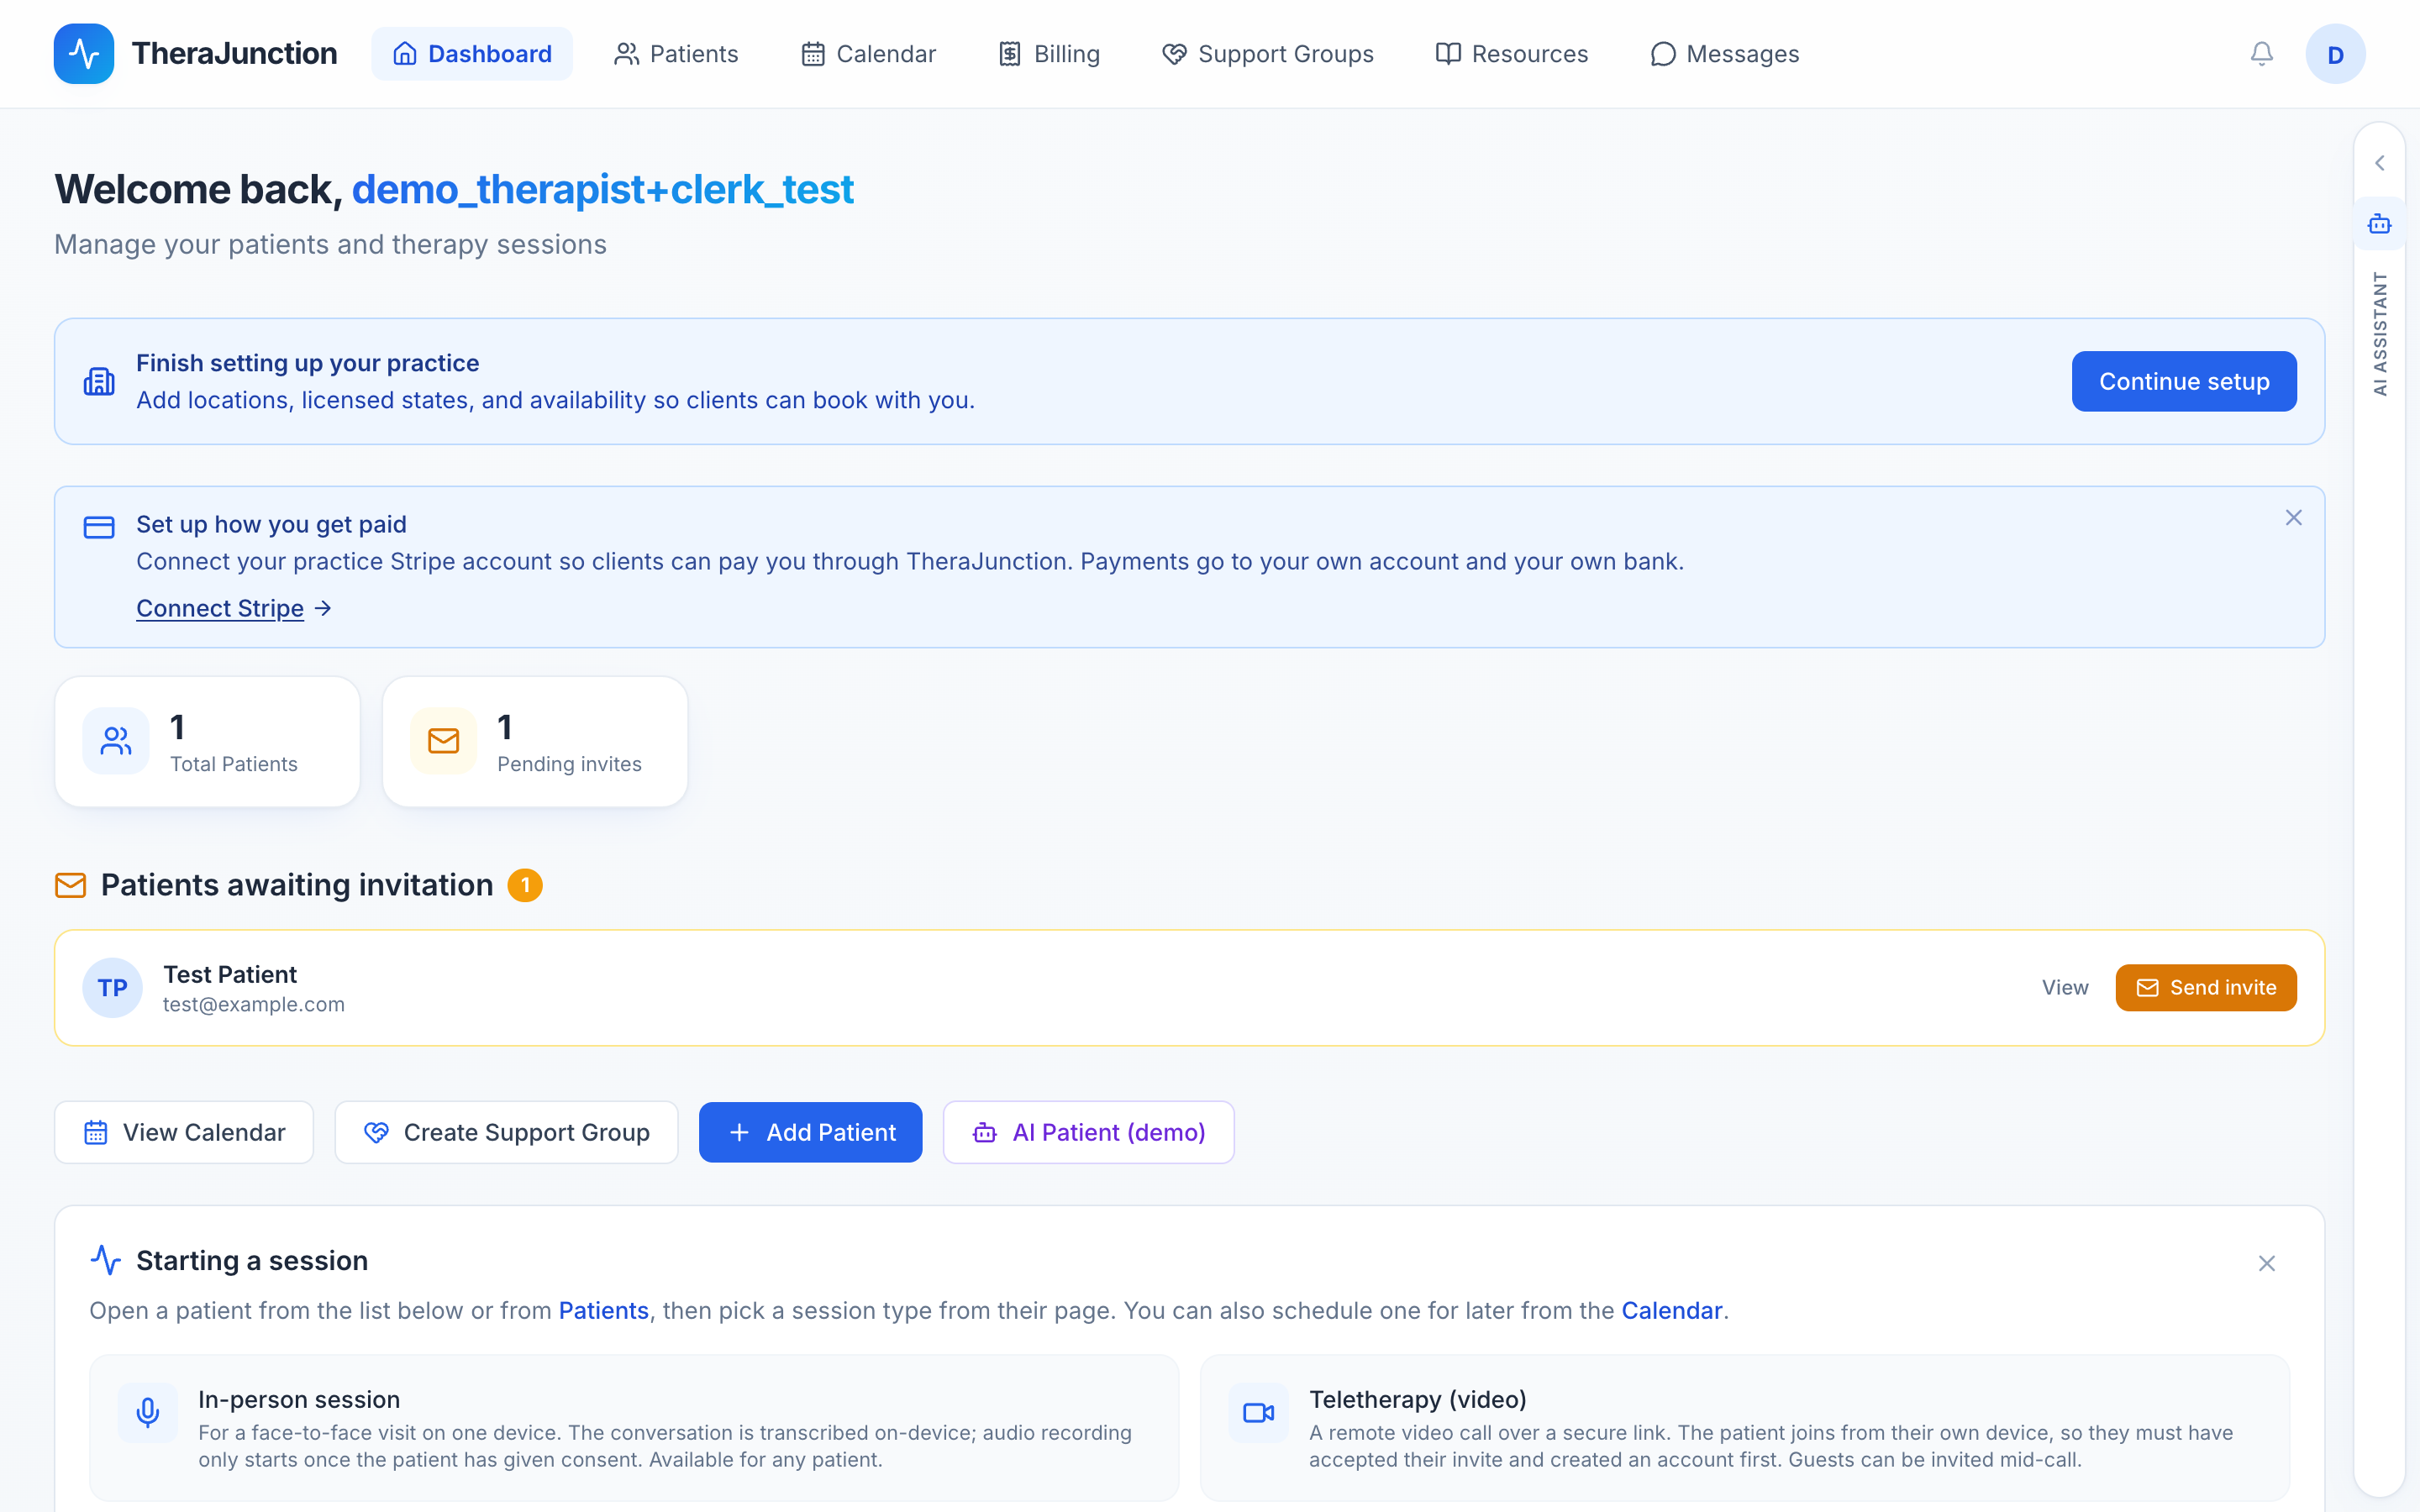
The primary navigation bar provides access to each area of the workspace:
- Dashboard: Operational center displaying pending billing tasks, active onboarding alerts, daily appointment schedules, and session launchers.
- Patients: Full client caseload. Search by name, filter by active or archived status, and access individual clinical charts.
- Calendar: Interactive schedule displaying booked appointments, open availability slots, and cancelled visits. Launch video or in-person sessions directly from appointment cards.
- Billing: Comprehensive billing hub containing the Overview task queue, the Invoices ledger, and electronic Claims tracking.
- Messages: Secure, HIPAA-compliant asynchronous communication thread between your practice and clients or their authorized caregivers.
- AI Assistant: Clinical side panel available across your workspace for chart review, session note drafting, coding lookups, and parent communication.
- Support Groups and Resources: Patient and caregiver support communities with in-person, virtual, and hybrid session hosting, alongside a categorized speech therapy materials library.
- Settings: Accessed from your profile avatar in the upper right. Configure practice details, locations, staff rosters, service catalogs, insurance payers, billing integrations, and personal account settings.
7. Get your first patient
7.1 Add a patient yourself
To open a chart manually, click Add Patient from the Patients view. Enter the client's first name, last name, email address, phone number, date of birth, and biological sex.
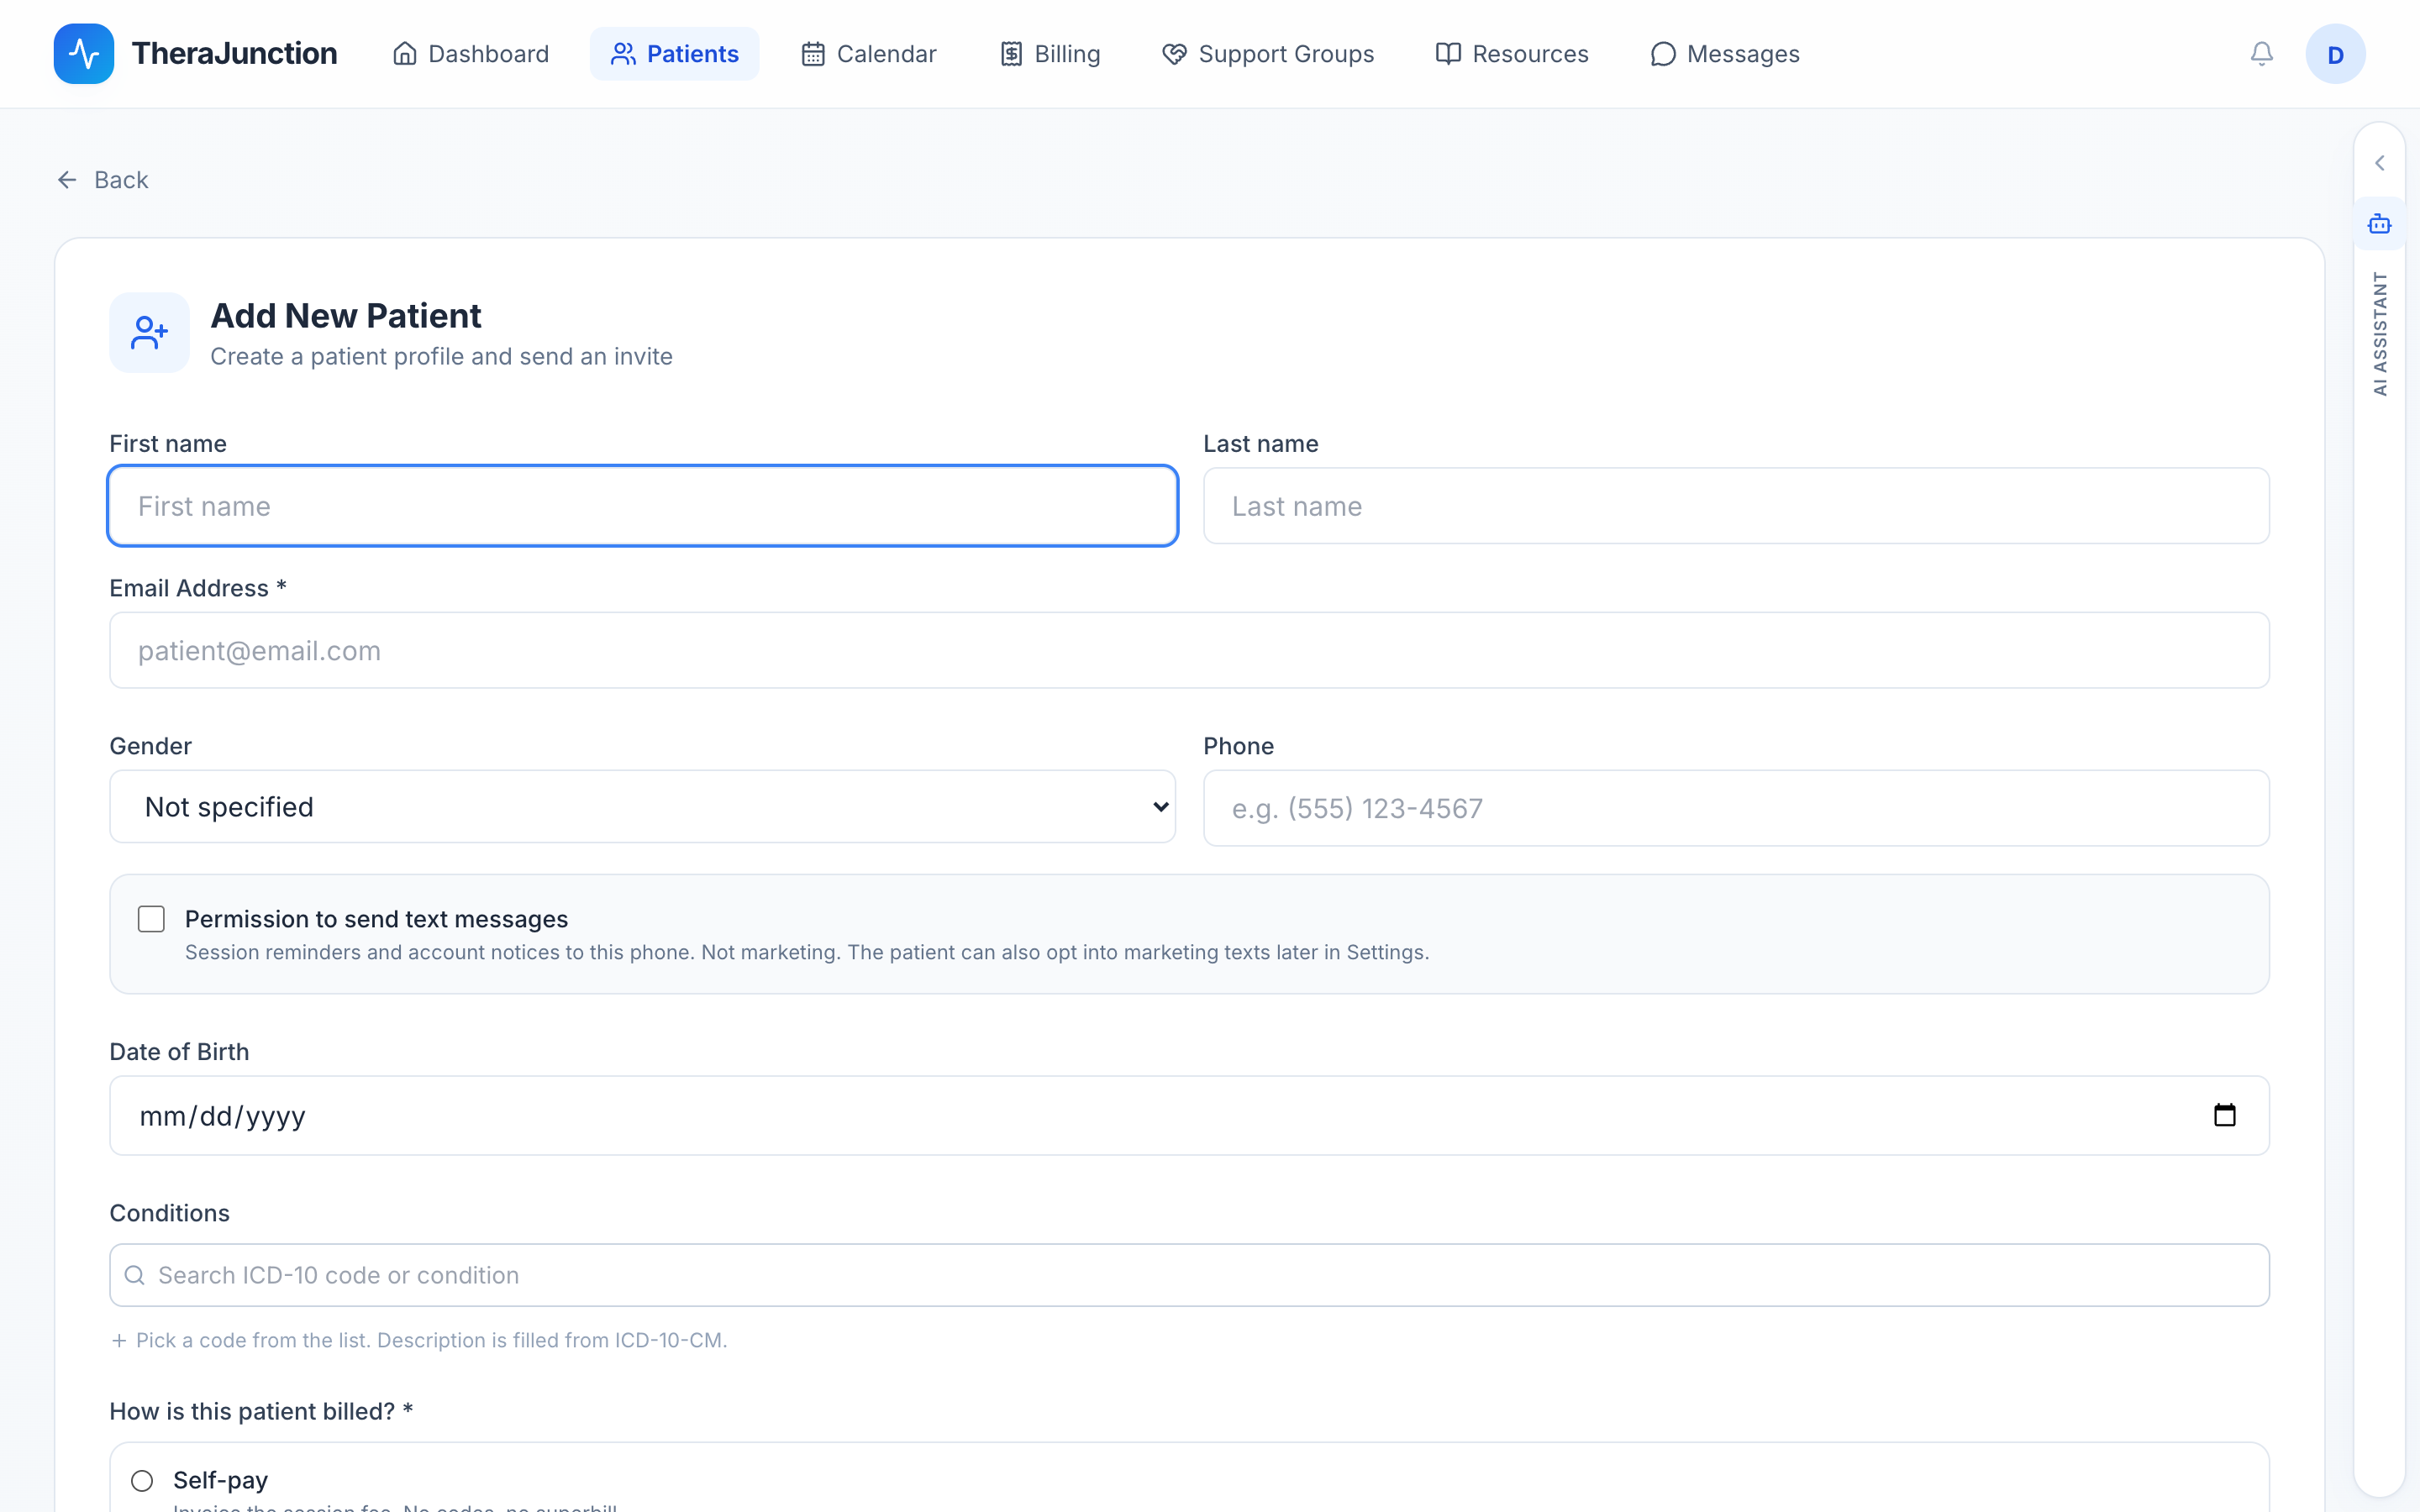
Specify the chart's Client billing method:
- In-network: The practice bills the client's insurance payer via an electronic 837P claim. The patient is charged only their verified copay or coinsurance.
- Out-of-network: The client pays the full session fee directly to the practice. The platform issues a superbill that the client can submit to their insurer for reimbursement.
- Self-pay: The client pays the full private-practice fee out of pocket. Invoices are issued directly; no insurance claims or superbills are created.
Adding a patient creates the medical chart immediately. The client does not yet have a portal login.
To practice without adding a real person, click AI Patient (demo) instead. This opens a configuration form to set up a simulated test chart pre-authorized for video recording, live transcription, and AI note generation (see Practice with the AI patient).
7.2 Send the invite
From the newly created chart, click Send Invite. TheraJunction sends an email invitation with a secure link allowing the client or caregiver to create their portal account. The chart header features a five-stage Family onboarding checklist that tracks client progress:
- Invite Sent: Invitation email has been delivered.
- Account Created: Client or caregiver has completed password registration.
- Consent On File: Electronic Telehealth and Audio Recording Consent has been signed.
- Intake Completed: Clinical intake questionnaire has been submitted.
- Teletherapy Ready: Device permissions and connectivity checks have been verified.
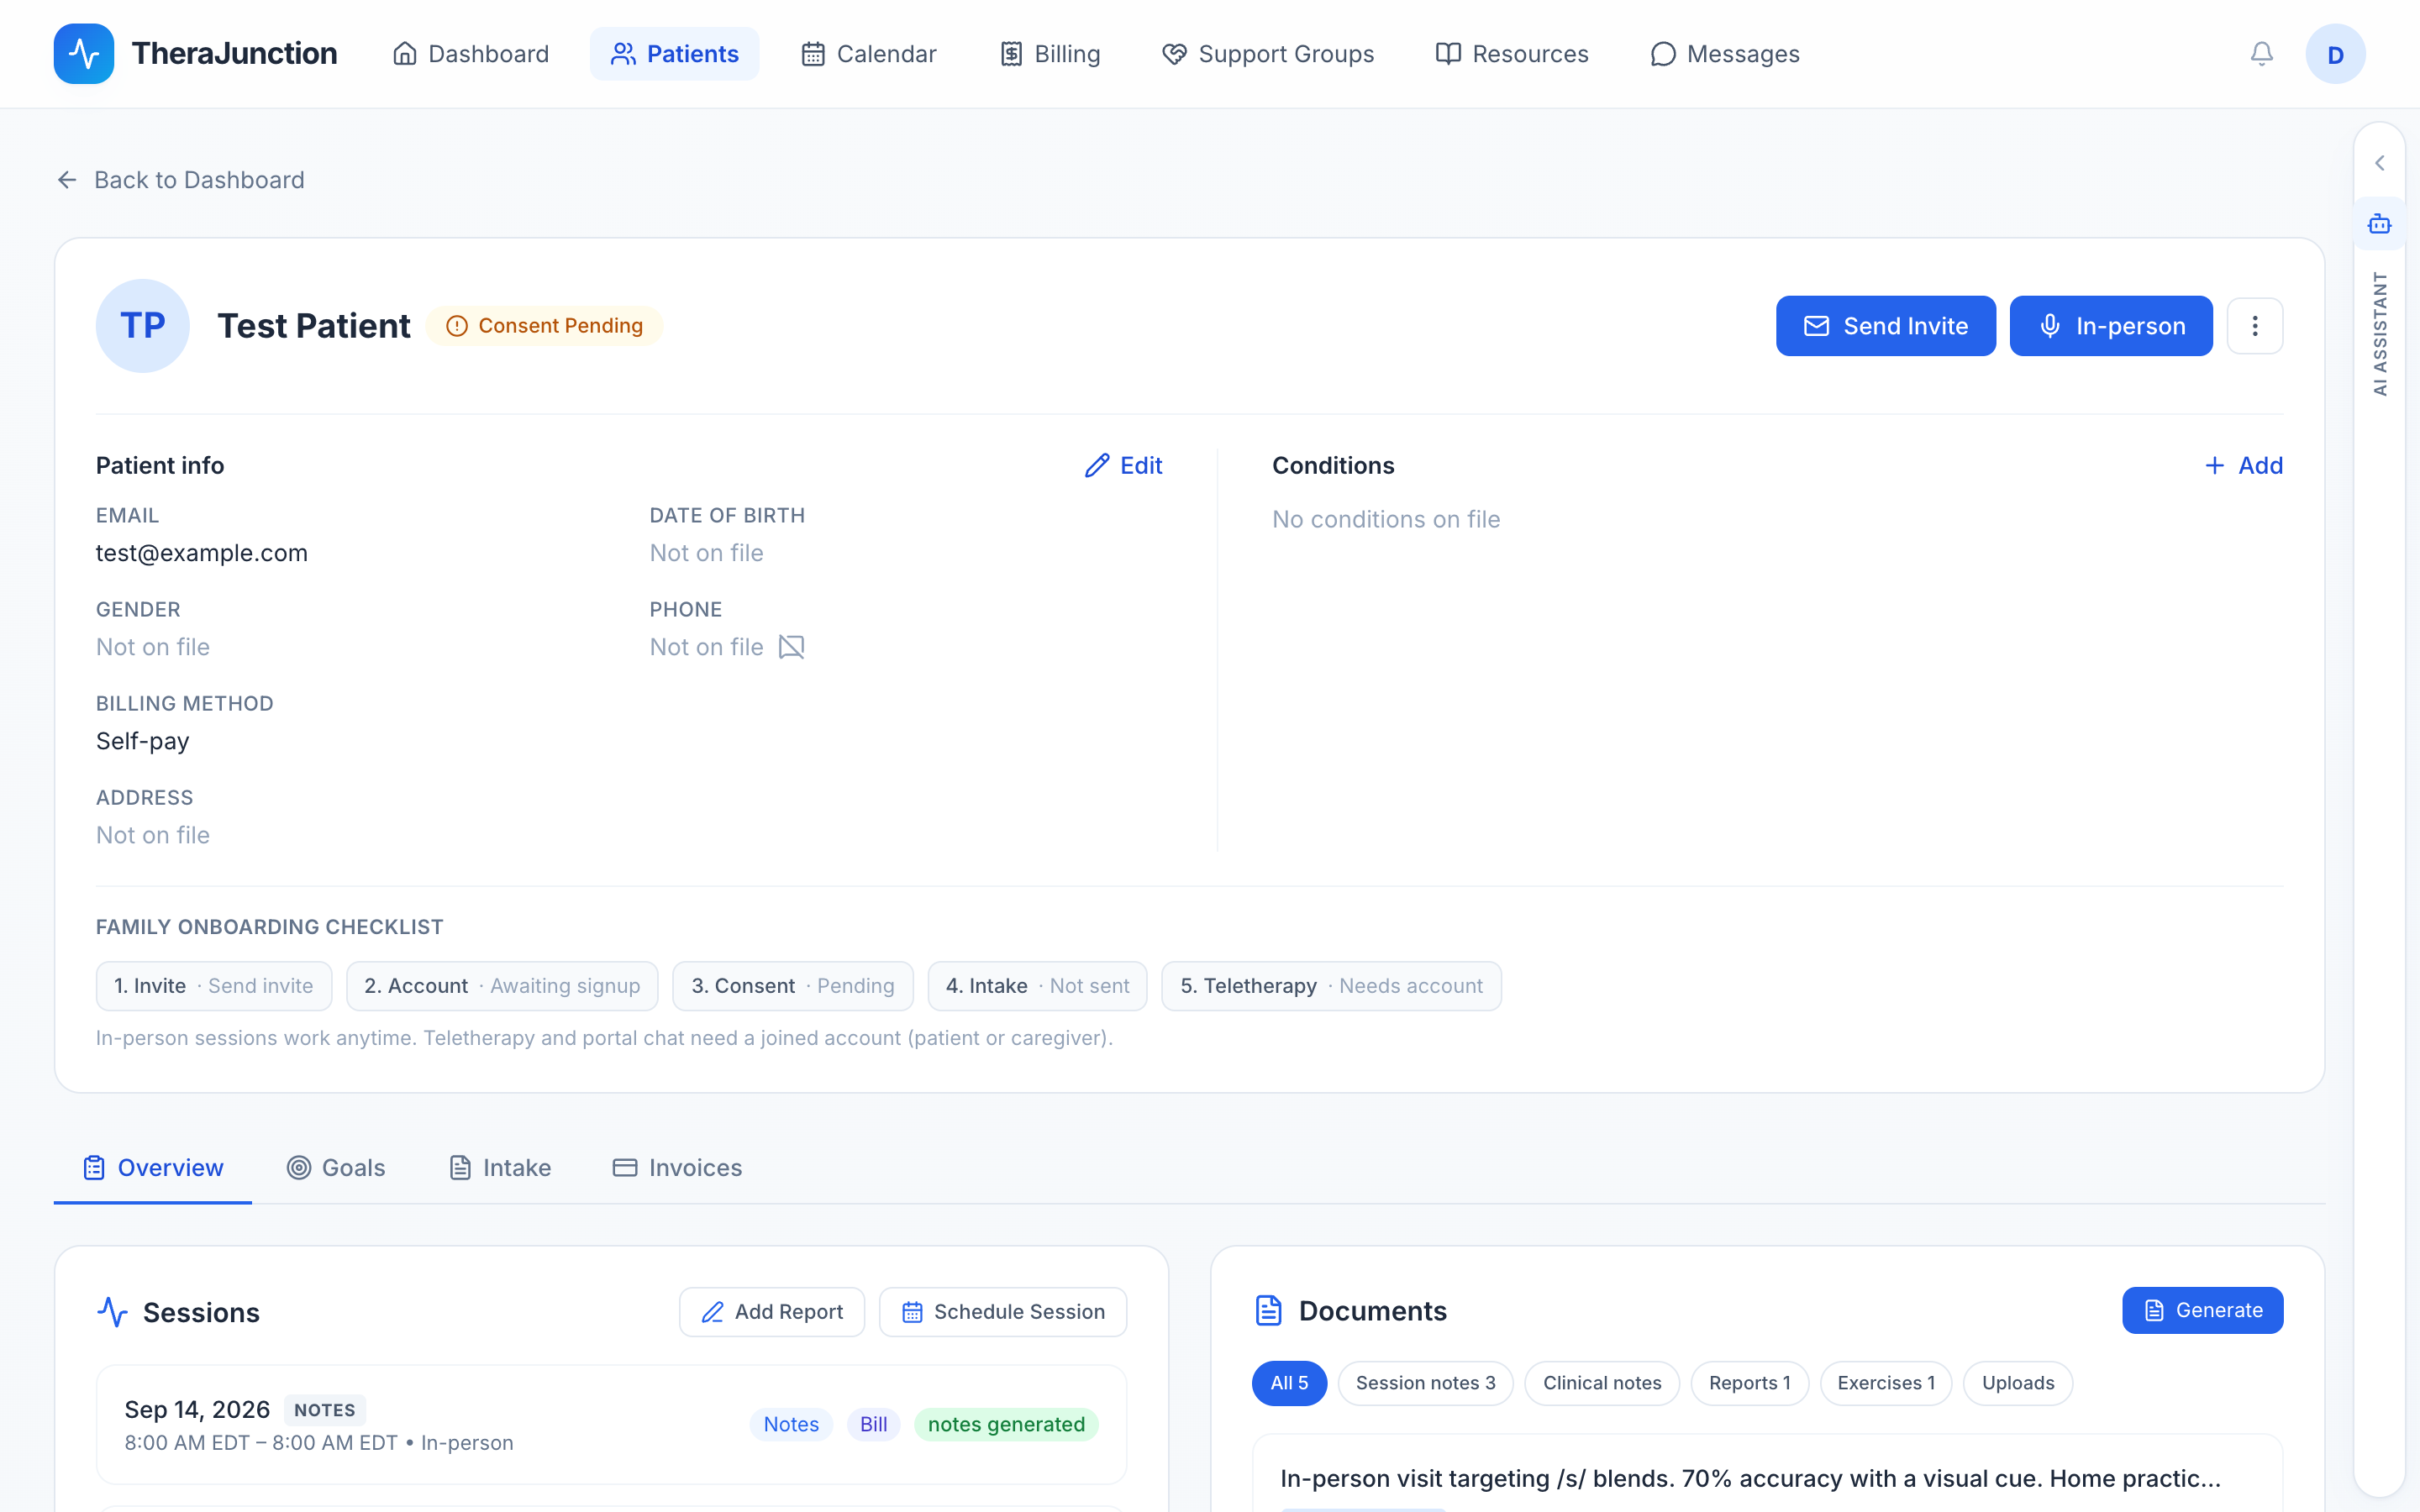
Clients can also complete a standalone intake questionnaire through a direct link prior to creating their portal account.
7.3 Accept a request from the directory
When prospective clients find your practice on the public directory, they can submit an appointment request. New requests appear directly on your dashboard. Review the client's preferred appointment times, reported concerns, and insurance details before clicking Accept.
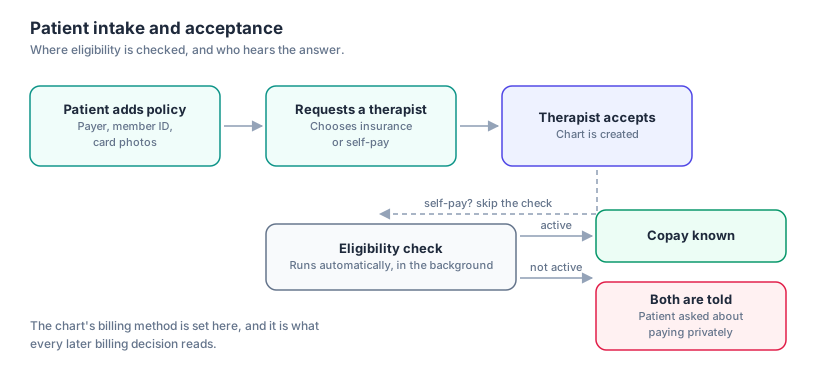
When accepting an insured client, TheraJunction automatically launches a background eligibility check with the payer. Accepting a request seeds the client's chart billing method based on their insurance coverage and your practice's in-network or out-of-network status.
7.4 Intake
When a client or caregiver submits their intake form, the responses appear on the chart's Intake tab.
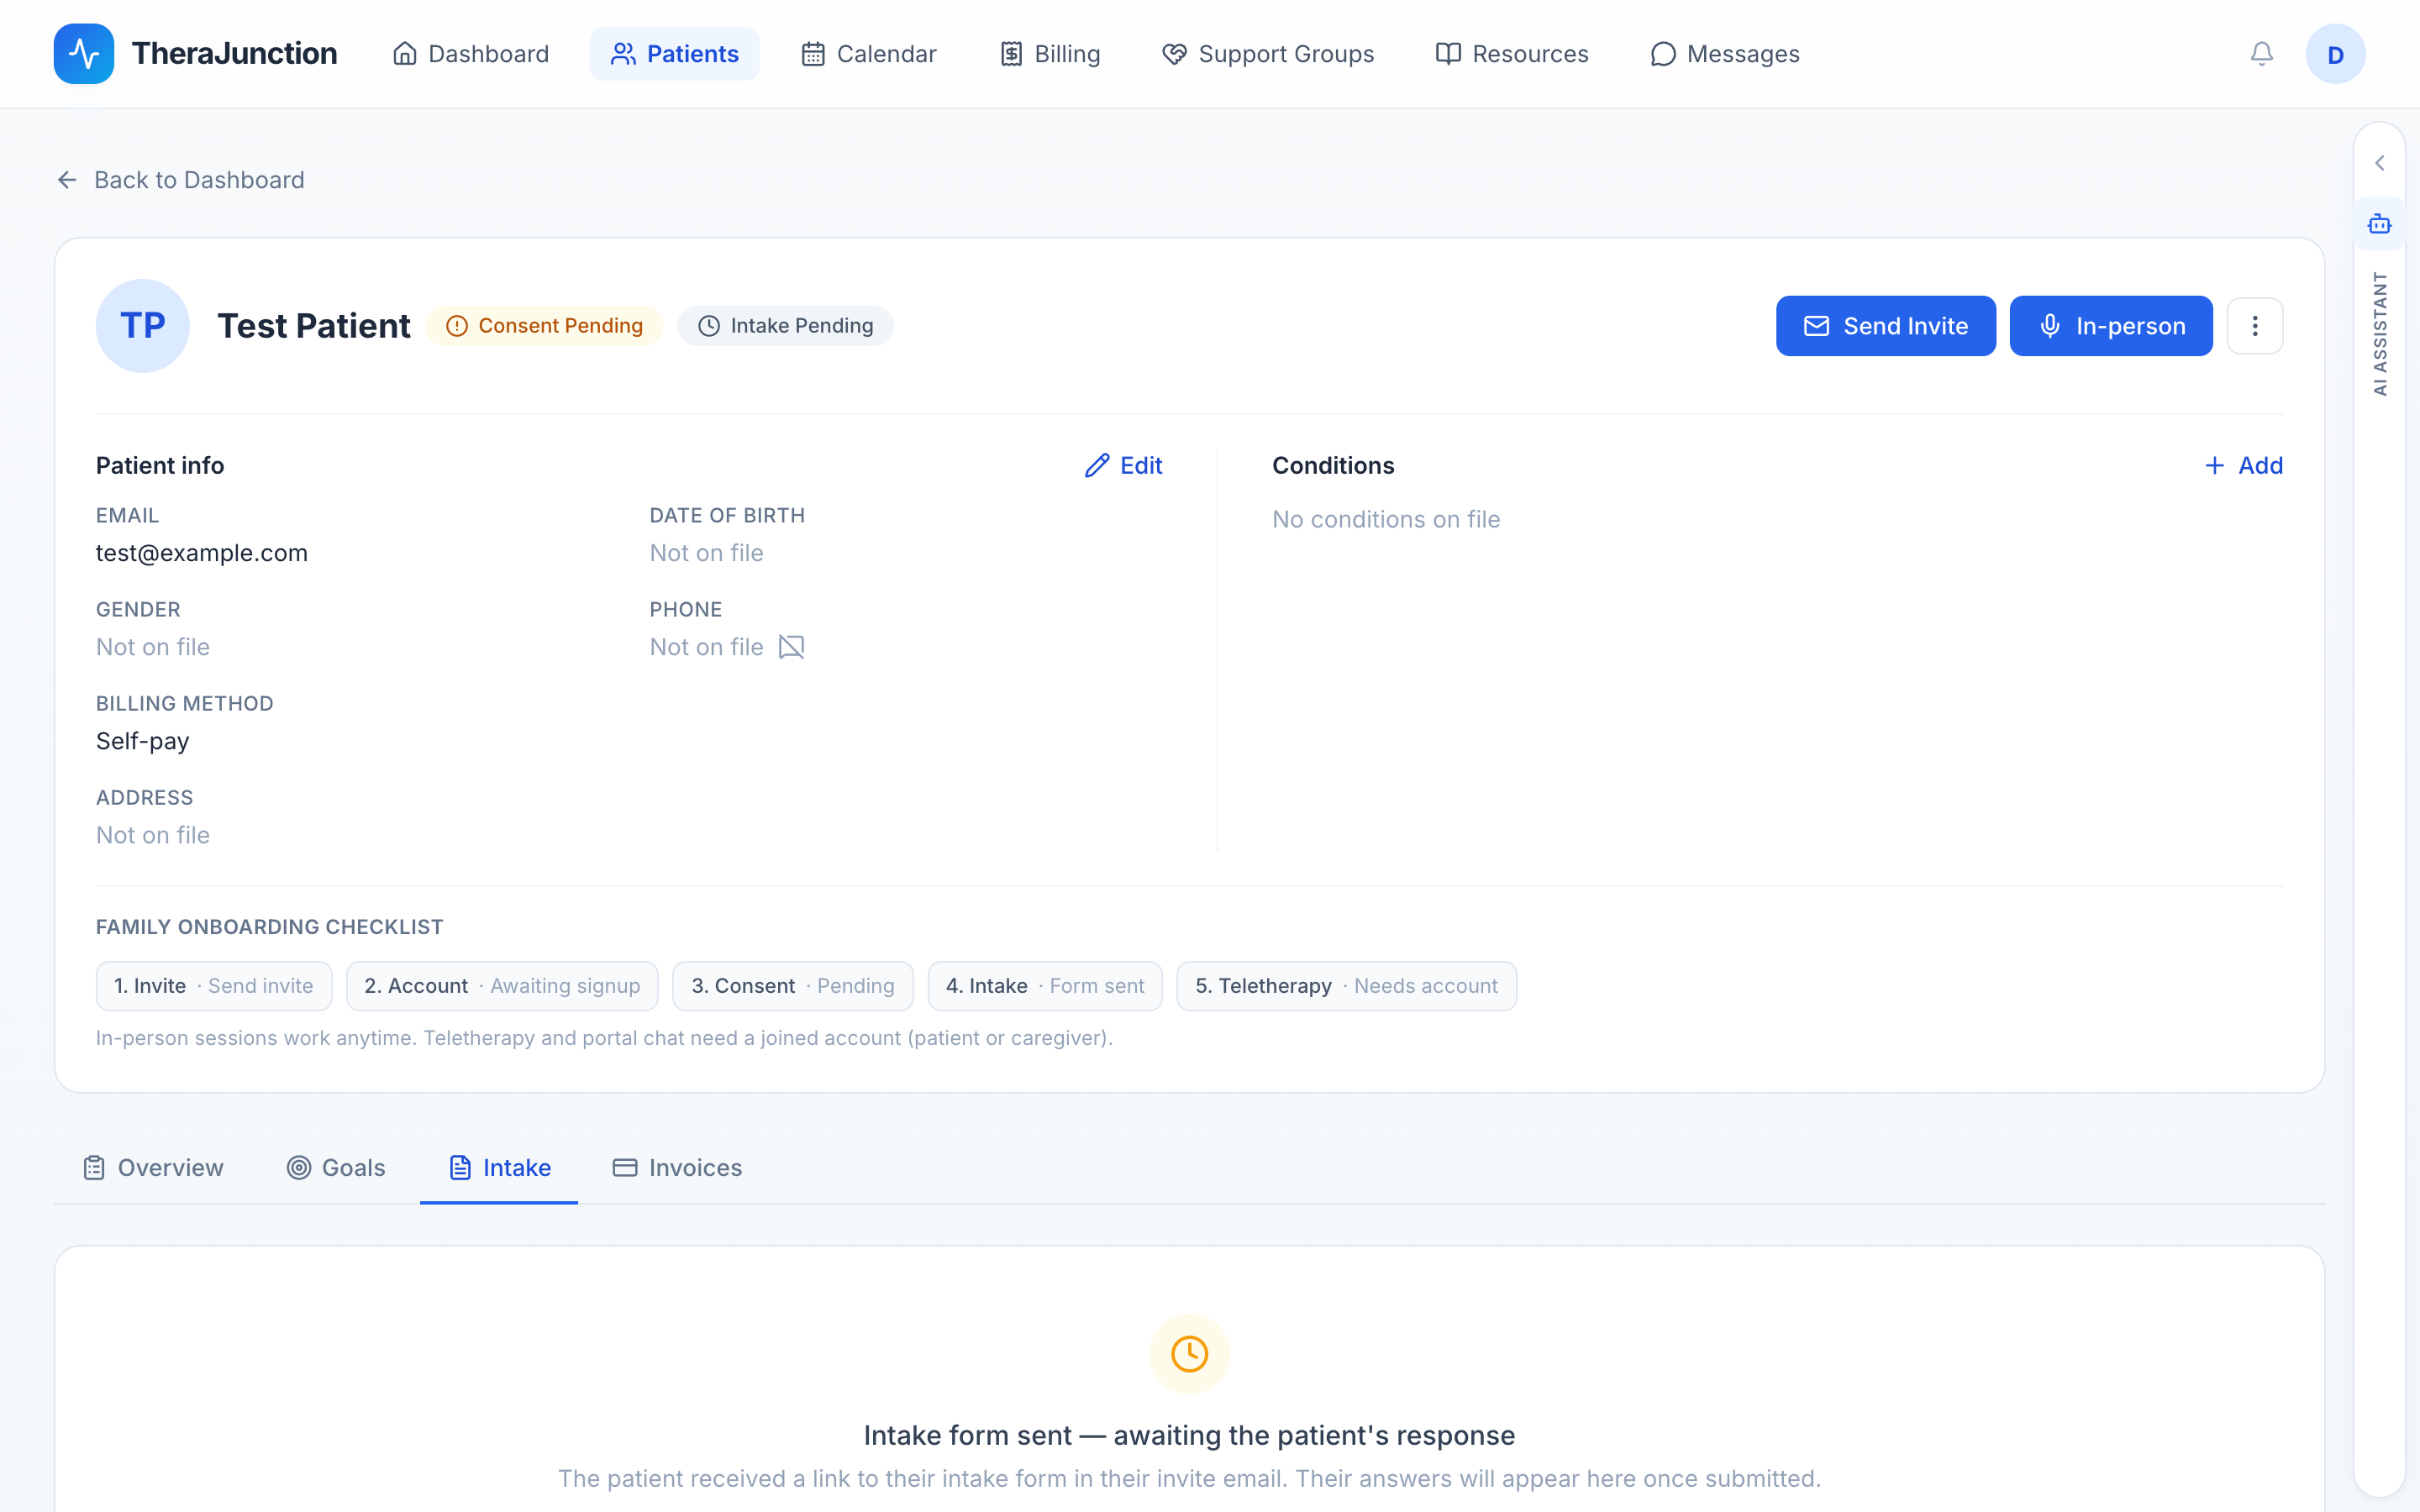
Intake captures medical history, developmental milestones, primary communication concerns, previous speech therapy interventions, school or early intervention plans, and emergency contacts. Until submitted, the badge displays Intake Pending.
7.5 Recording consent
Federal HIPAA regulations and state two-party consent wiretap statutes require explicit written consent before clinical encounters can be audio-recorded or transcribed by automated systems.
Clients or caregivers sign the Telehealth and Audio Recording Consent electronically in their portal. Until signed, the chart displays Consent Pending. You can still conduct teletherapy video sessions while consent is pending, but live microphone recording, automated audio transcription, and AI note drafting remain locked until consent is confirmed.
7.6 Caregivers
For pediatric patients or adult dependents, invite parents, legal guardians, or family caregivers from the Caregivers section at the bottom of the chart.
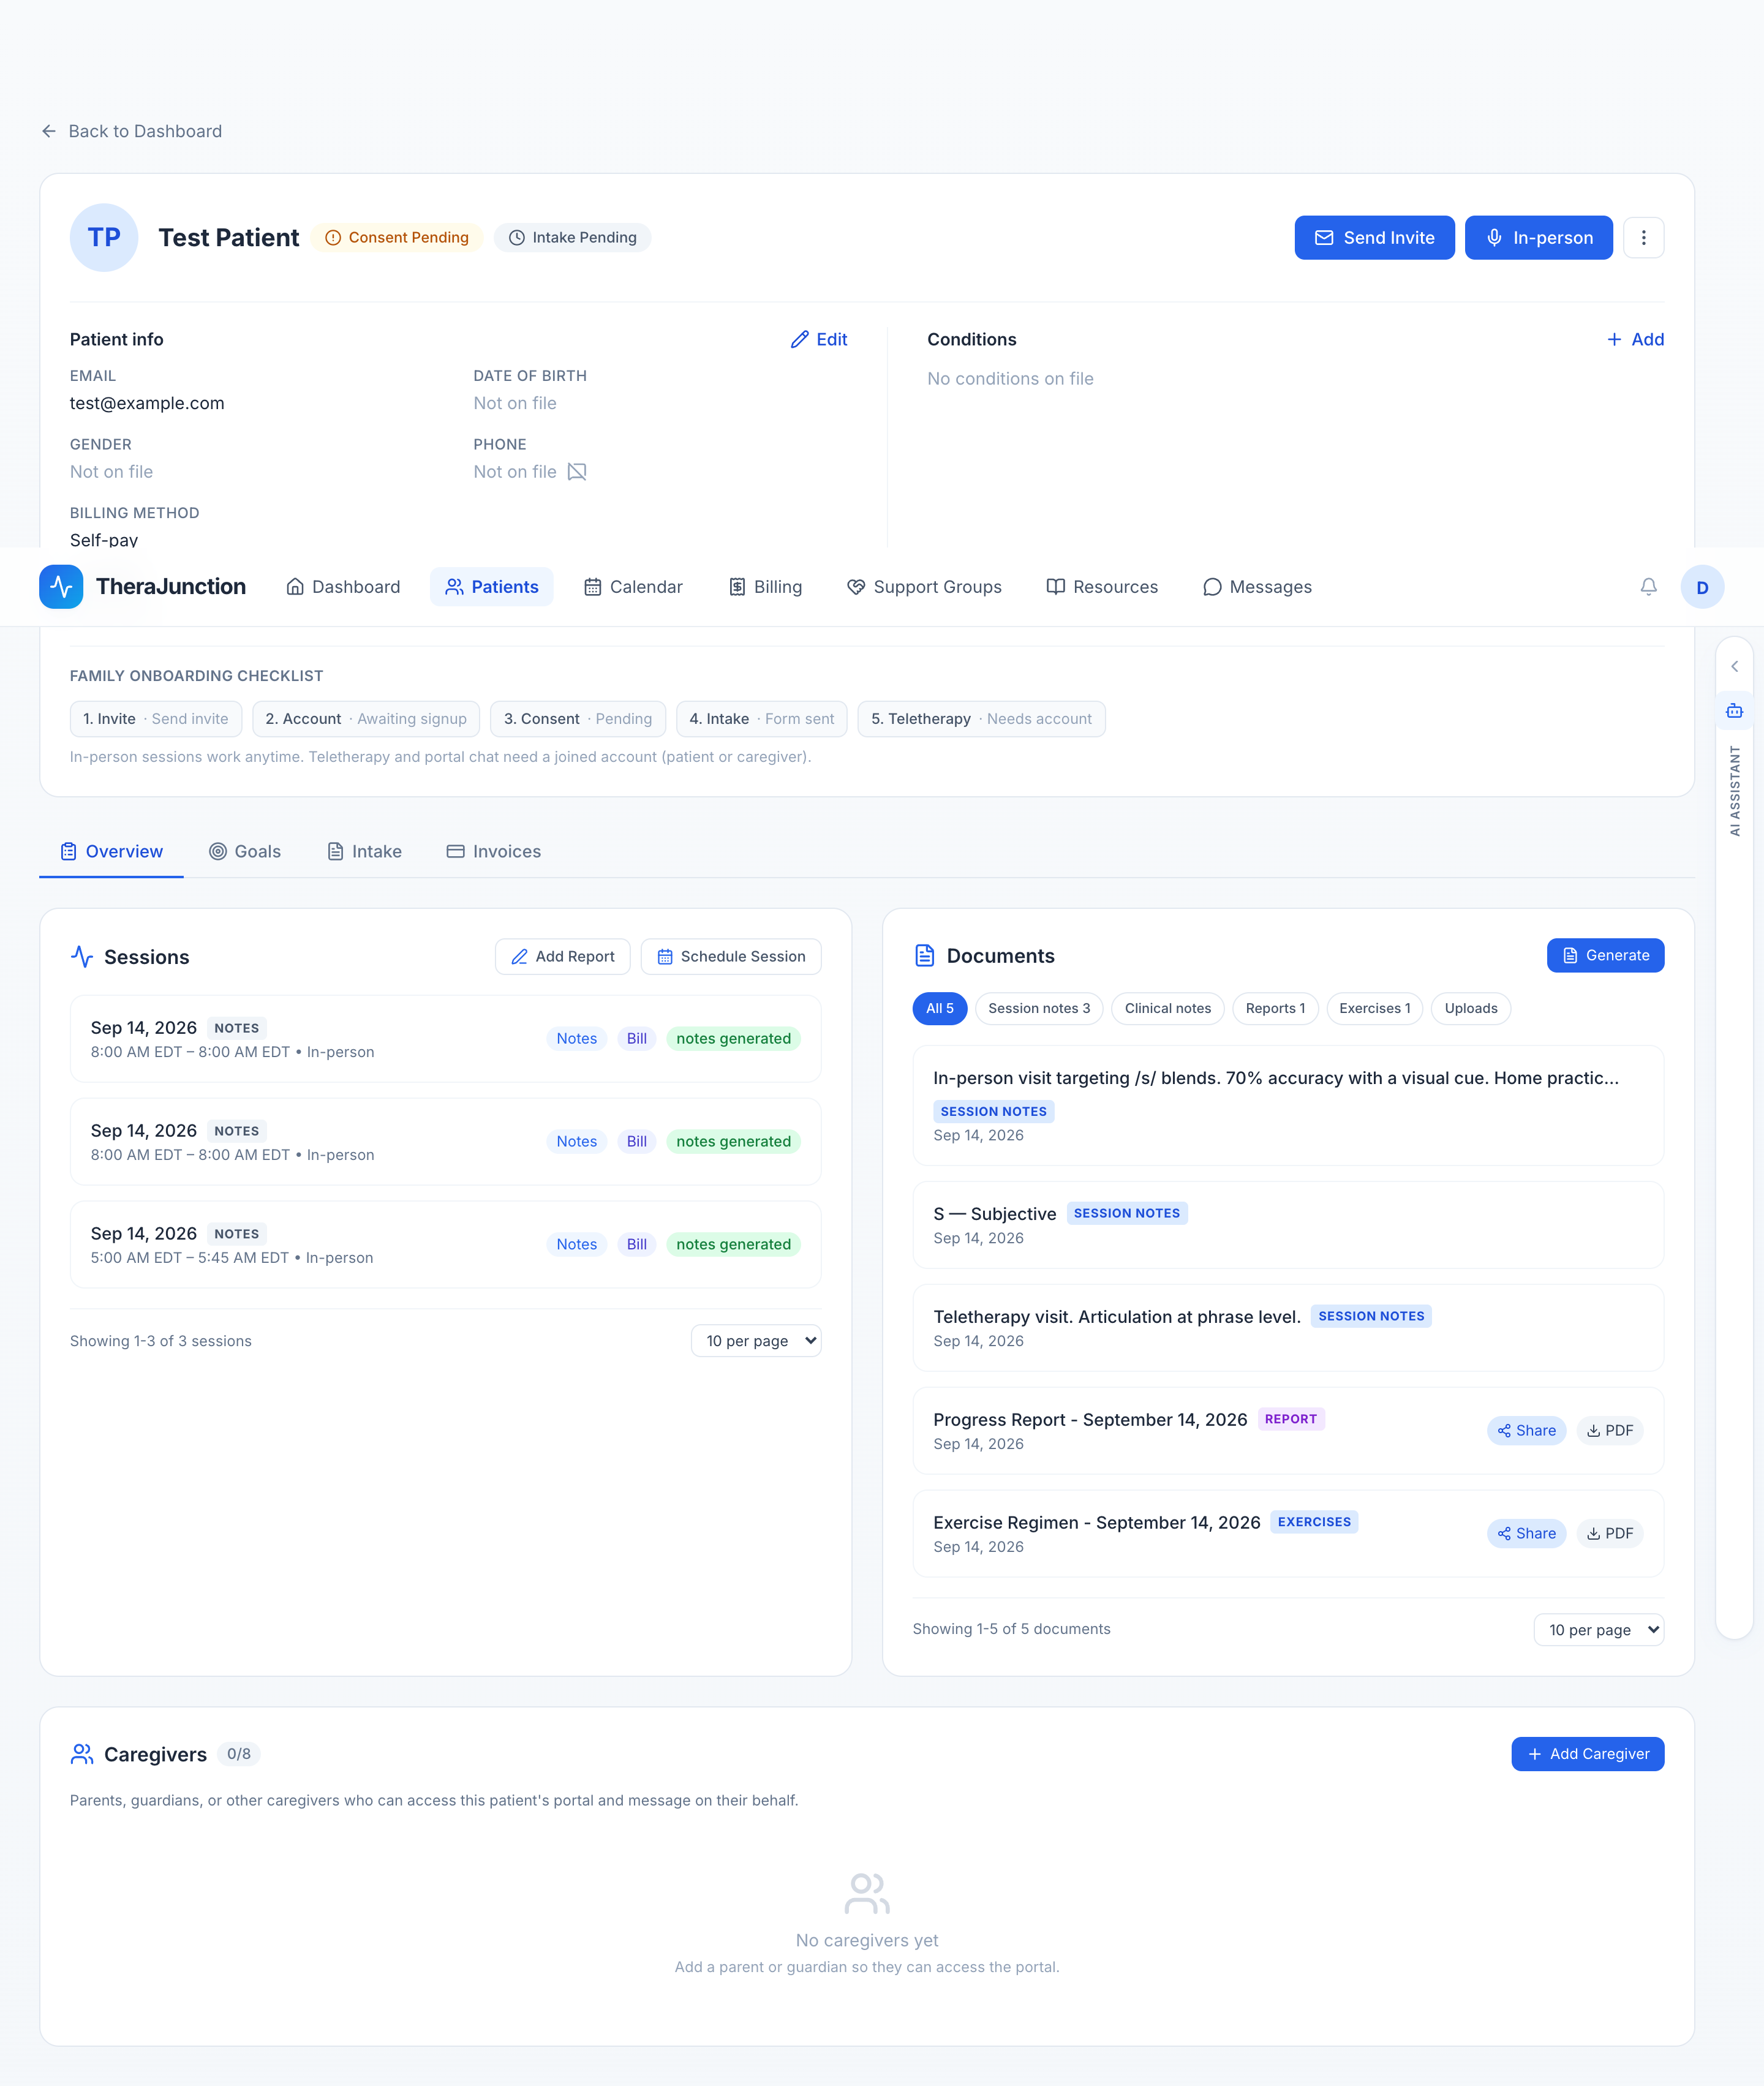
Caregivers receive their own portal accounts linked to the patient's record. Caregivers can complete intake questionnaires, sign recording and financial consents, communicate through secure messaging, review shared clinical exercises, download superbills, and pay invoices.
8. Run your first session
8.1 In person
To begin an in-person session, open the patient's chart or click the visit on your calendar, then select In-person. Choose Start Session to begin immediately, or Schedule for Later to create a calendar appointment.
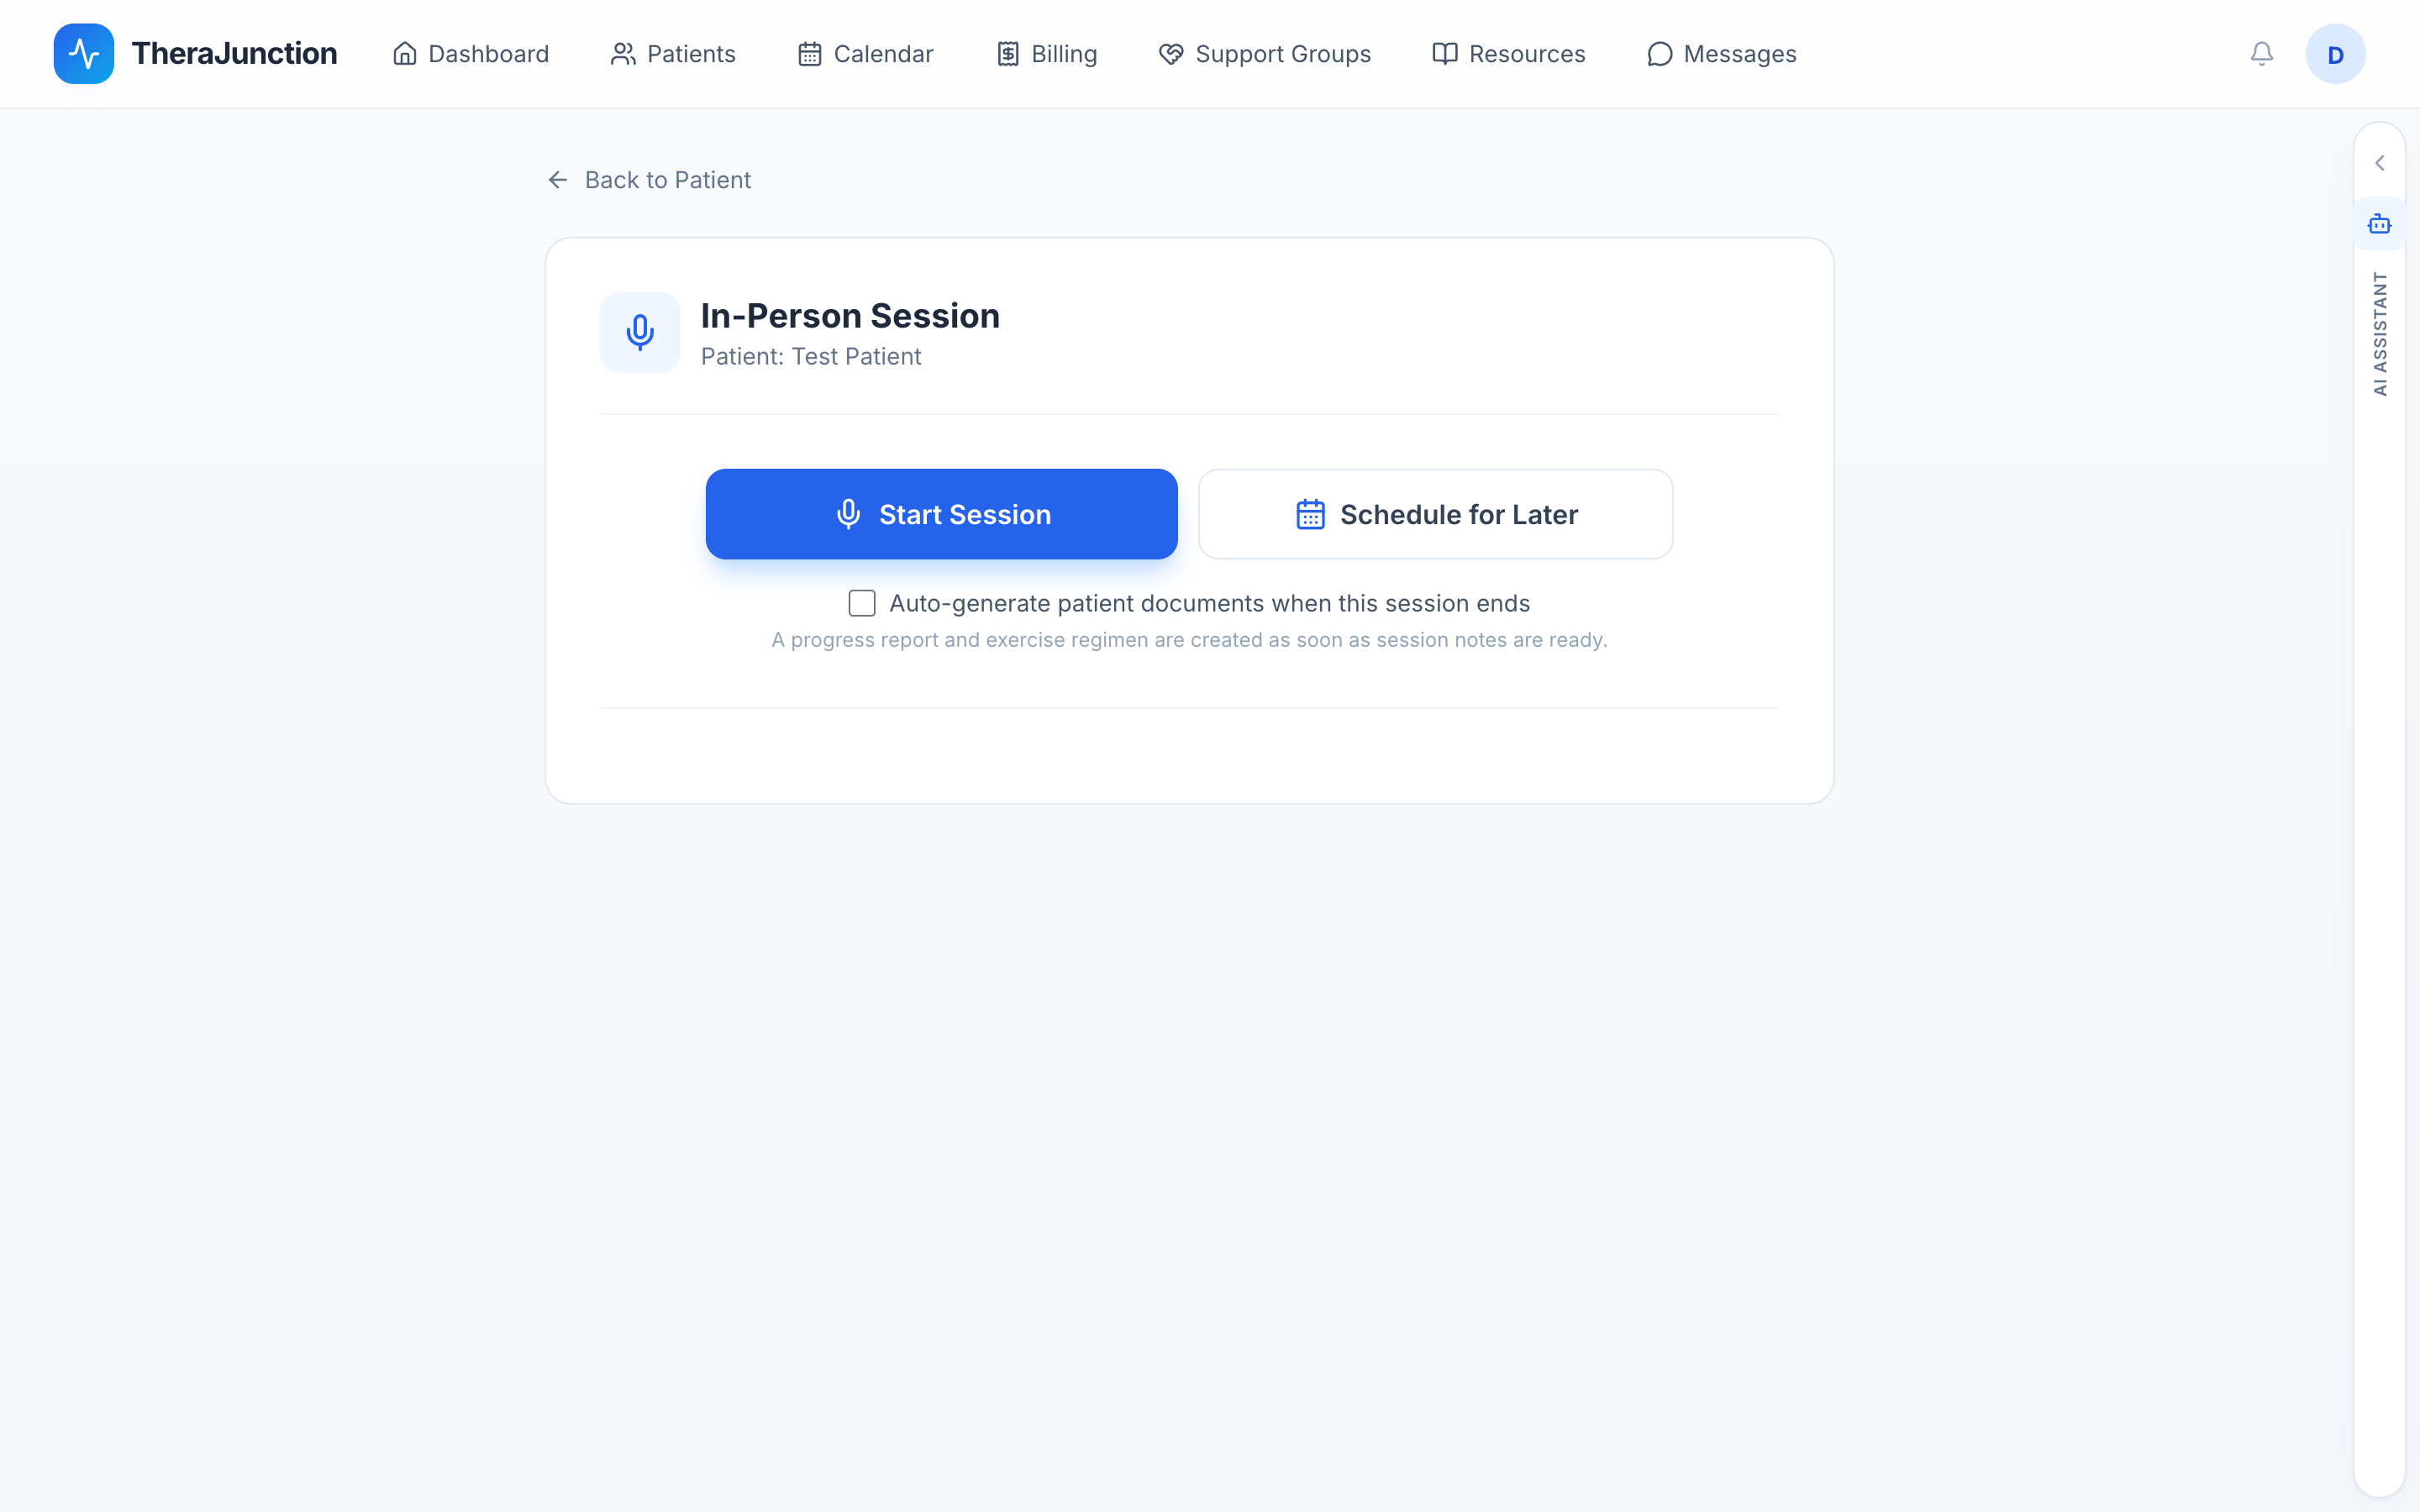
During an active session, the live speech recognition engine captures clinical dialogue and displays a real-time audio waveform. You can pause recording during clinical testing or breaks and resume at any time.
Audio recording only starts if the client has an active recording consent on file. When the encounter ends, click End Session. Audio processing runs securely, generates the full session transcript, and prepares the encounter for SOAP note drafting and billing.
8.2 Teletherapy
Teletherapy runs directly in the browser using HIPAA-compliant WebRTC technology. Neither you nor the client needs to download external video applications.
To start teletherapy, the patient or caregiver must have accepted their portal invite and created an account. Launch the session from the patient chart or calendar by clicking Start Video Call. The teletherapy room provides:
- Encrypted high-definition video and audio.
- Interactive screen sharing for digital therapy games, visual schedules, and articulation stimulus picture cards.
- Live audio transcription during the call (when consent is on file).
- In-call session duration timer.
Ending a teletherapy visit tags the session record with Place of Service 10 (Telehealth Provided in Patient's Home) so that subsequent electronic claims are coded correctly.
8.3 Add a report when you did not record
If you conducted an encounter off-platform, visited a school or client home, or experienced an unrecorded visit, click Add Report on the patient chart.
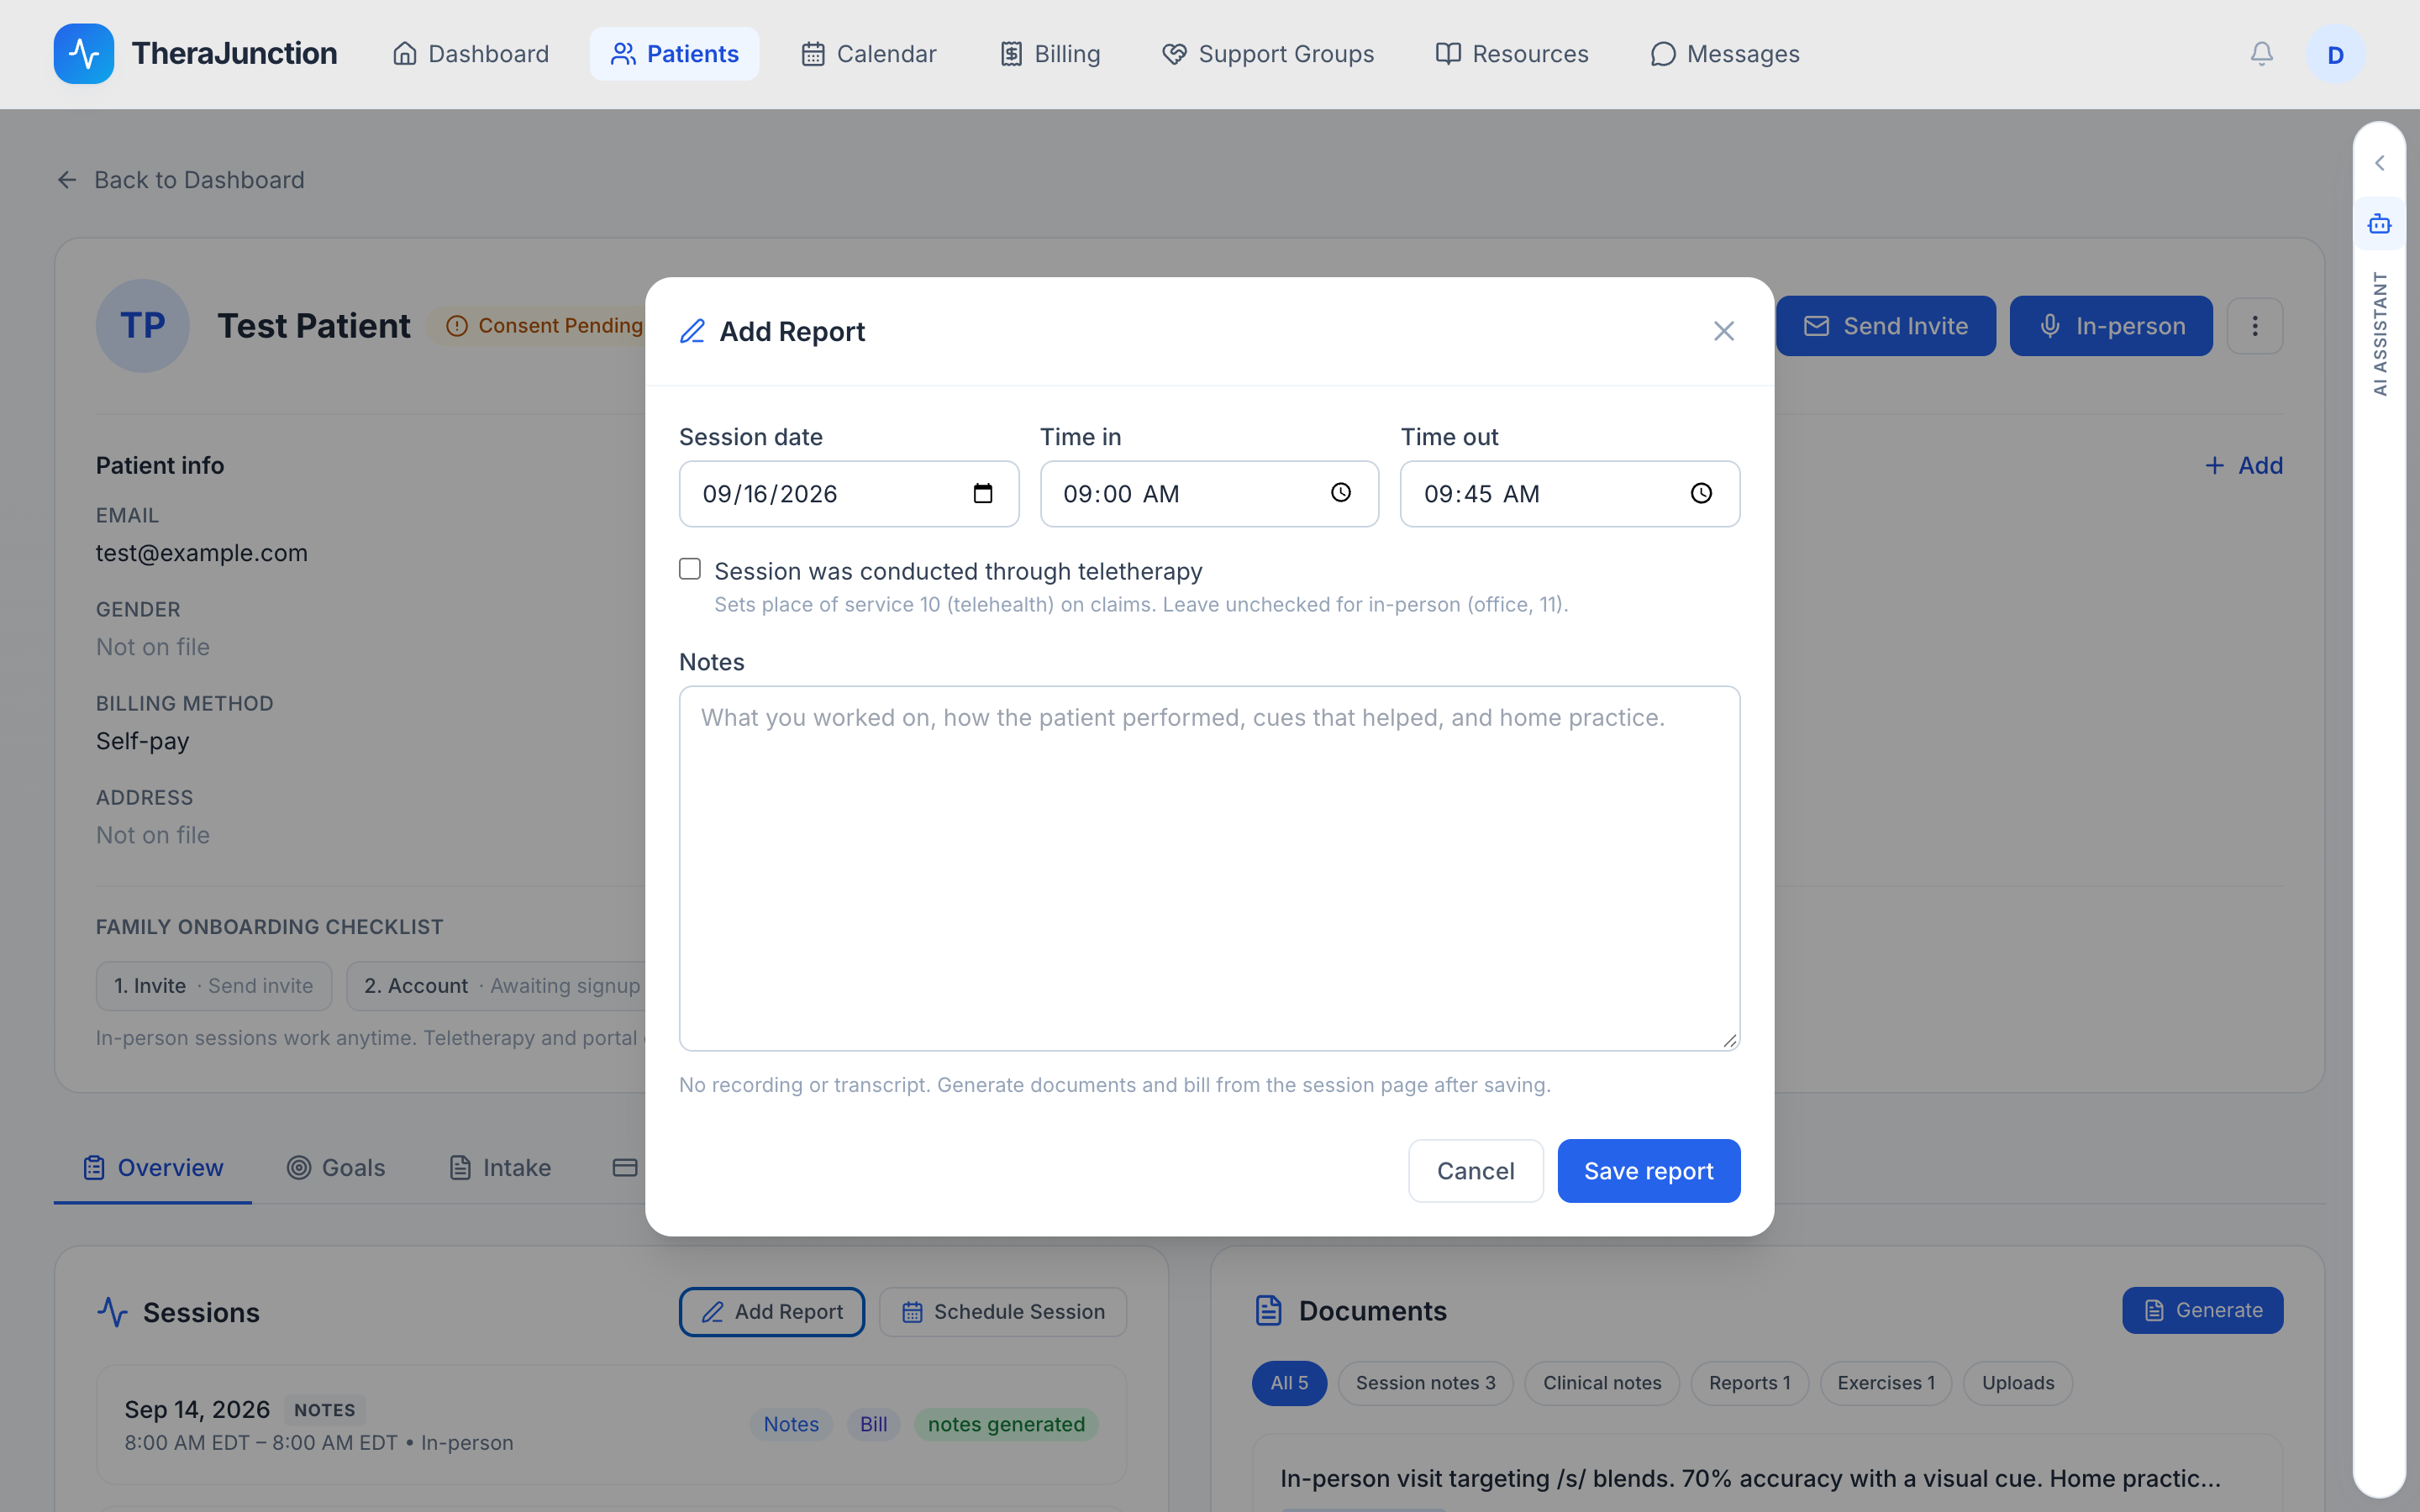
Enter the date of service, start time, end time, teletherapy indicator (yes or no), and your narrative clinical documentation. Encounters created via Add Report are fully billable and enter the same post-session billing workflow as live-recorded sessions.
8.4 Practice with the AI patient
TheraJunction includes an interactive, voice-enabled AI patient designed specifically for practice and rehearsal. Before you see your first real client over teletherapy or submit your first electronic claim, you can conduct realistic practice sessions with a simulated speech therapy client.
Clinical rationale for simulation
- Zero risk to real charts: The AI patient operates under a dedicated test
profile (
AI Patient) with pre-granted recording consent. Nothing touches a real person's protected health information (PHI). - Test video and audio equipment: Verify your microphone, camera, speaker, and browser WebRTC permissions in a live conversational environment before an actual patient joins.
- Rehearse clinical techniques: Practice diagnostic intake questions, prompt hierarchies, elicitation strategies, and therapeutic pacing for specific speech and language diagnoses.
- Test the automated documentation pipeline: Experience the end-to-end workflow from spoken conversation to diarized audio transcript, automated AI SOAP note generation, clinical goal tracking, and custom home exercise sheet creation.
- Dry-run the billing cycle: Familiarize yourself with the post-session billing flow (service coding, invoice creation, and sandbox claim drafting) without generating real financial charges.
Setting up the simulation scenario
To configure the AI client, click AI Patient (demo) from the Therapist Dashboard or from the Patients caseload view.
- Date of birth: Sets the simulated patient's developmental age. The AI adapts its persona, conversational vocabulary, utterance length, and vocal characteristics accordingly across pediatric, adolescent, and adult profiles: pediatric simulations feature age-appropriate vocabulary and shorter attention spans; adolescent simulations focus on peer and school communication; adult simulations focus on vocational speech demands or neurological rehabilitation.
- Presenting conditions and diagnoses: Select one or more target speech and language conditions (such as Childhood Apraxia of Speech, Speech Sound Disorder, Stuttering and Fluency, Language Impairment, or Adult Dysarthria). The agent adopts symptoms matching these conditions during conversation.
Singleton chart lifecycle: Each therapist has exactly one AI Patient test chart. If you enter the same date of birth and conditions, TheraJunction preserves your existing practice chart and past session history. If you change the date of birth or conditions, TheraJunction automatically deletes the old demo sessions, transcripts, and chat messages, then spins up a fresh slate. This ensures you can test completely different clinical profiles without accumulating obsolete demo data.
Conducting a teletherapy simulation
- Open the AI Patient chart and click Start Video Call (or launch from an appointment on your calendar).
- The teletherapy room initializes and automatically dispatches the AI persona agent into your room.
- The AI patient joins the call as an active participant with an audio tile in the video grid.
- The AI speaks in real time using conversational voice synthesis. It greets you in character, responds naturally to your questions, answers assessment prompts, and exhibits speech patterns consistent with the configured conditions.
- Practice your intervention: ask diagnostic questions, administer visual or verbal stimuli, and test your therapeutic cues.
- When finished, click End Session.
Reviewing documentation and billing after the visit
After you end the encounter, TheraJunction processes the recorded audio just like a live patient visit:
- Clinical transcript: Review the diarized dialogue between clinician and simulated client.
- AI SOAP note: Generate a structured SOAP note. Inspect how the AI synthesizes the Subjective, Objective, Assessment, and Plan sections based on the simulated encounter.
- Treatment goals: Add measurable speech goals and see how session trials link to ongoing progress metrics.
- Home exercises: Generate personalized home practice worksheets tailored to the simulated patient's target sounds or language goals.
- Sandbox billing: Practice creating an invoice, generating a superbill, or walking through the 837P claim prefill workflow in sandbox mode.
9. Notes, goals, and home practice
9.1 AI SOAP notes and documentation
Once a recorded session or report is completed, open the encounter to review the clinical transcript and generate documentation. TheraJunction analyzes the dialogue and drafts a structured clinical SOAP note:
- Subjective (S): Client demeanor, engagement level, parent updates, and reported symptoms.
- Objective (O): Measurable performance metrics, targeted phonemes or linguistic structures, trial counts, and prompt levels (independent, verbal, visual, physical).
- Assessment (A): Clinical analysis of progress against previous baselines, dynamic response to therapeutic scaffolding, and overall treatment trajectory.
- Plan (P): Recommended therapy frequency, target modifications for next session, and home practice assignments.
You can edit every section of the generated note. The therapist remains the author and clinical authority for all documentation. Click Save Note to finalize the clinical record.
9.2 Therapy goals and progress tracking
Manage individual treatment goals on the chart's Goals tab.
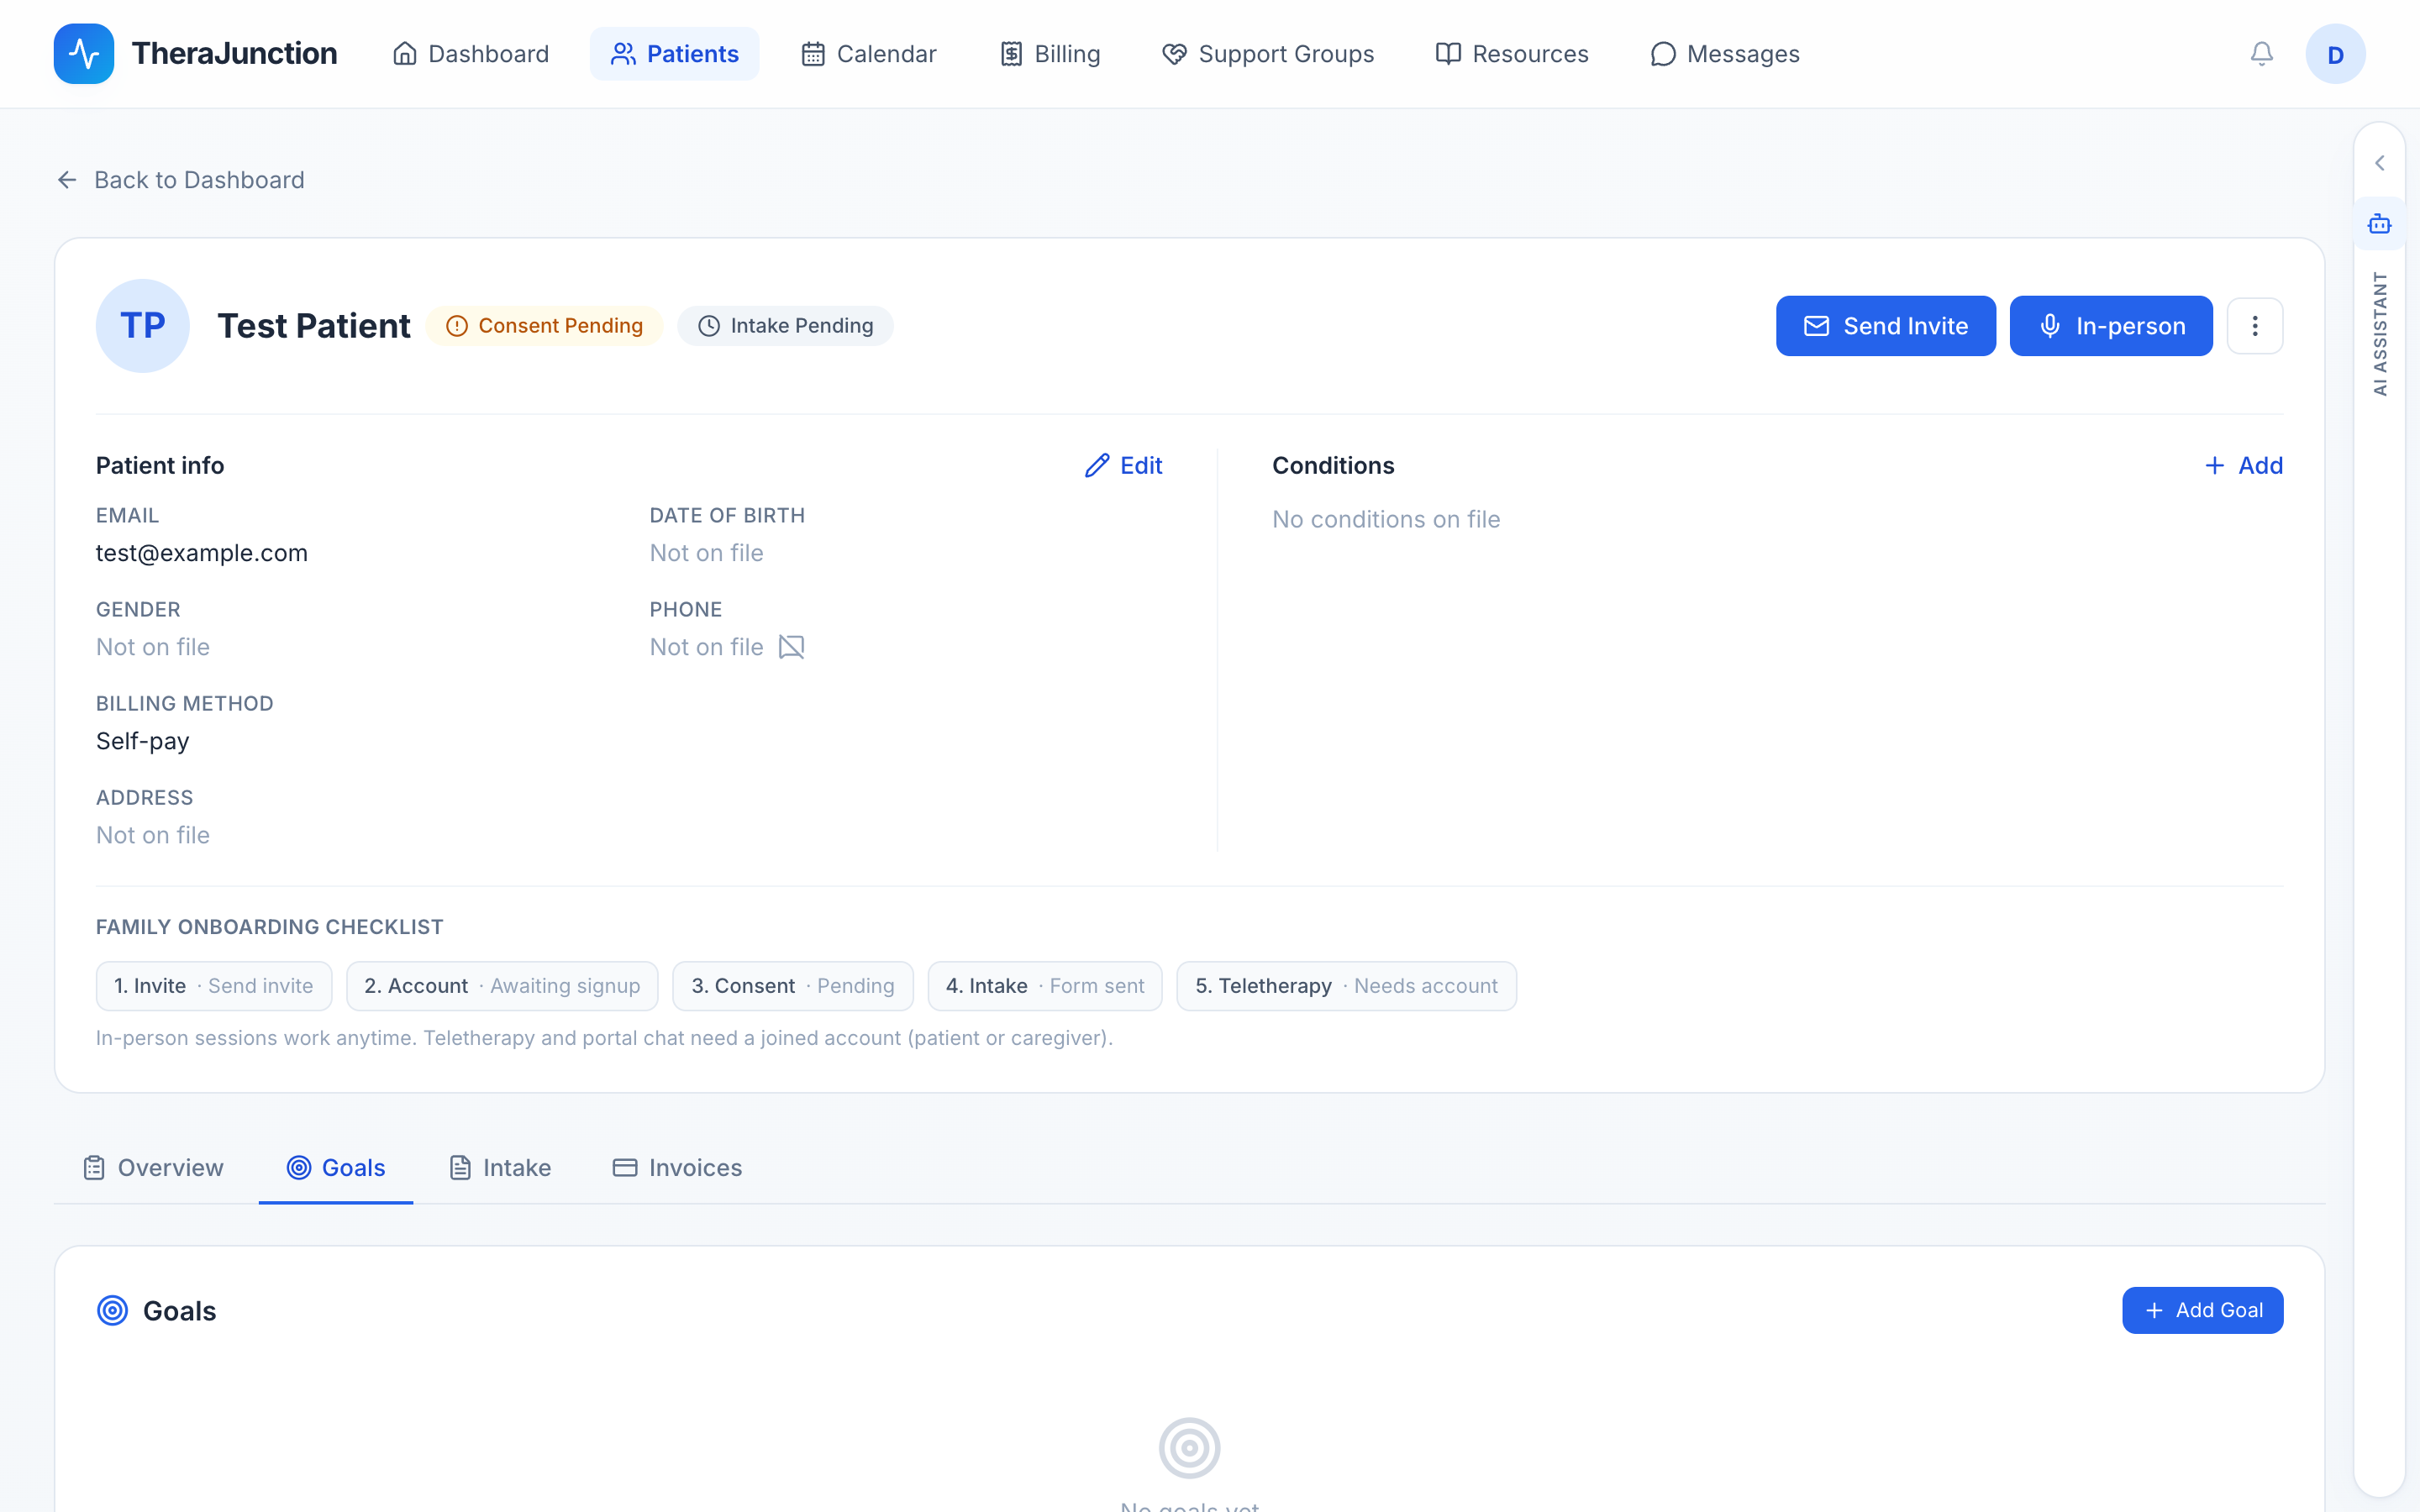
Click Add Goal to formulate measurable clinical targets (for example: "Client will produce /s/ in all word positions at the conversational level with 80% accuracy across 3 consecutive sessions"). Set baseline performance, target mastery percentage, and expected completion date. Goal statuses include Active, In Progress, Mastered, and Discontinued. Progress percentages update as you link session documentation to active goals.
9.3 Home practice and exercise generation
To reinforce therapy targets between clinic visits, navigate to Documents → Generate on the patient chart or click Generate Exercise from a completed session.
TheraJunction uses the session's documented targets, stimulus words, and prompting strategies to create a customized home practice worksheet. The system generates a clean, branded PDF document with step-by-step instructions for caregivers. Click Share with Patient to publish the PDF directly to the patient portal, where families can download and complete the exercises at home.
10. Everyday tools
10.1 Calendar
The calendar provides interactive scheduling across day and week views.
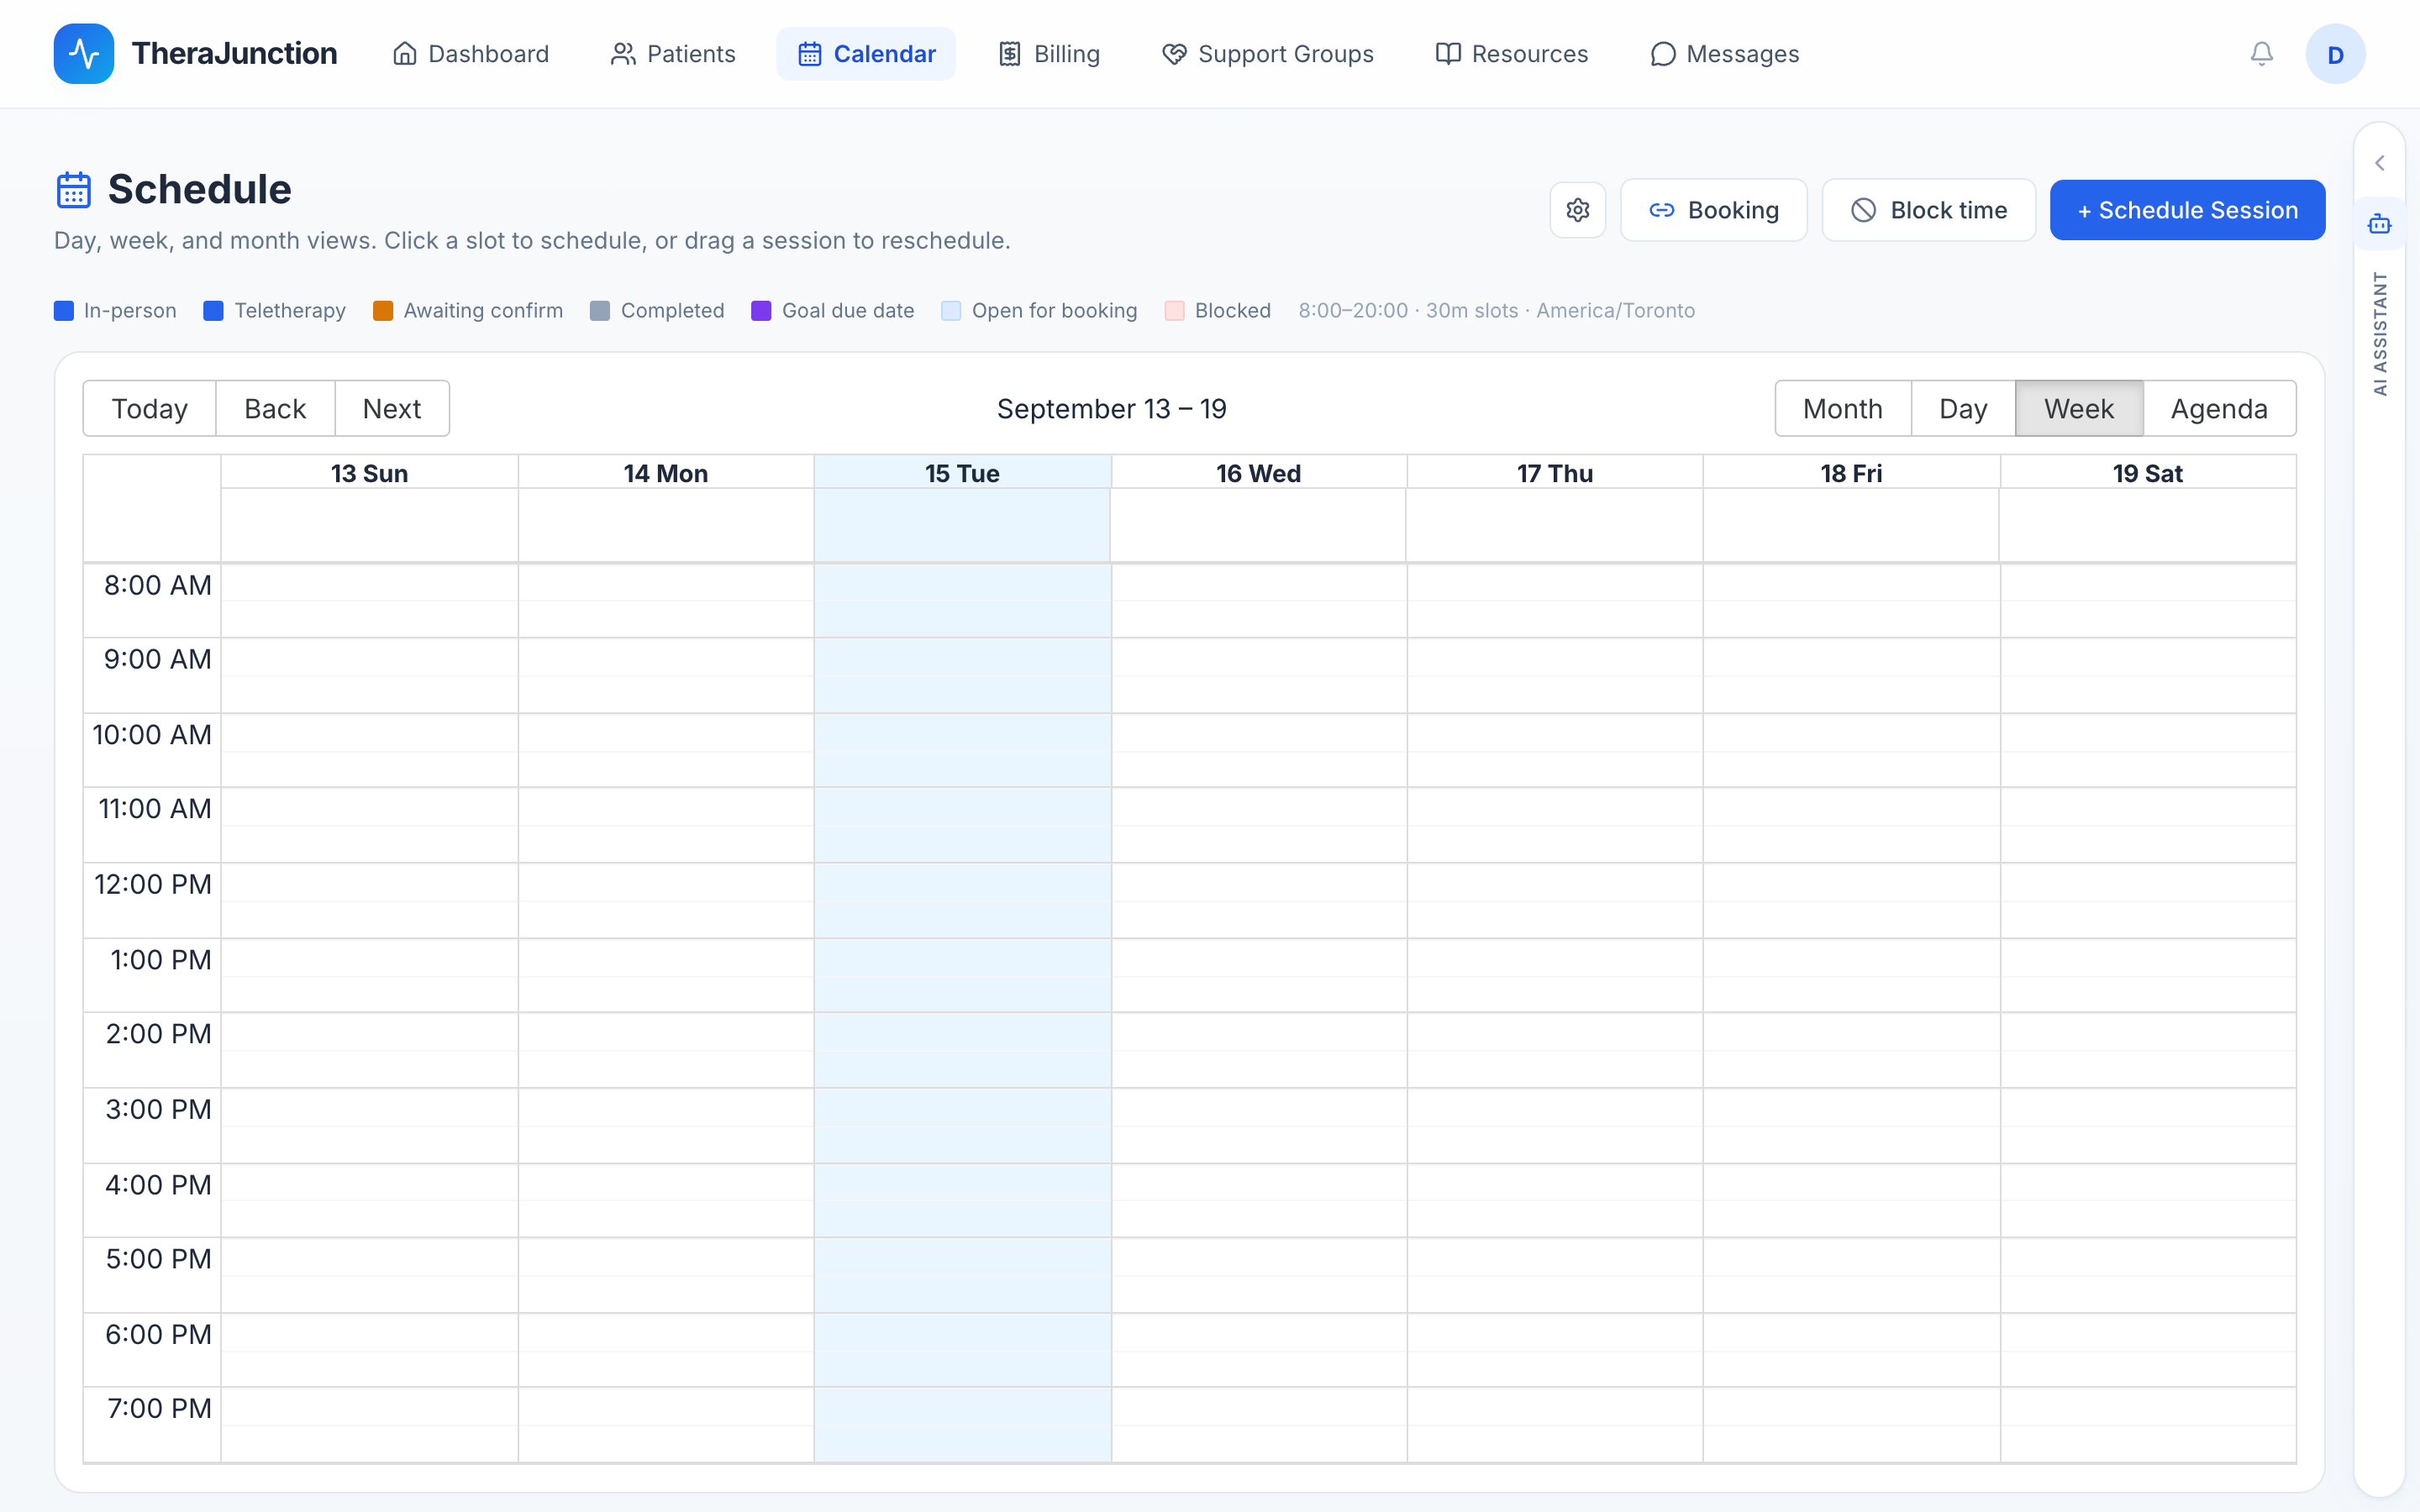
Click any time slot to schedule an appointment. You can specify the patient, attending clinician, location (office or teletherapy), service duration, and session recurrence (such as weekly or bi-weekly). Clicking an existing appointment opens the session modal, allowing you to edit appointment times, cancel visits, or launch the encounter directly.
10.2 Messages
The Messages tab provides end-to-end encrypted, HIPAA-compliant messaging between clinicians and patients or caregivers.
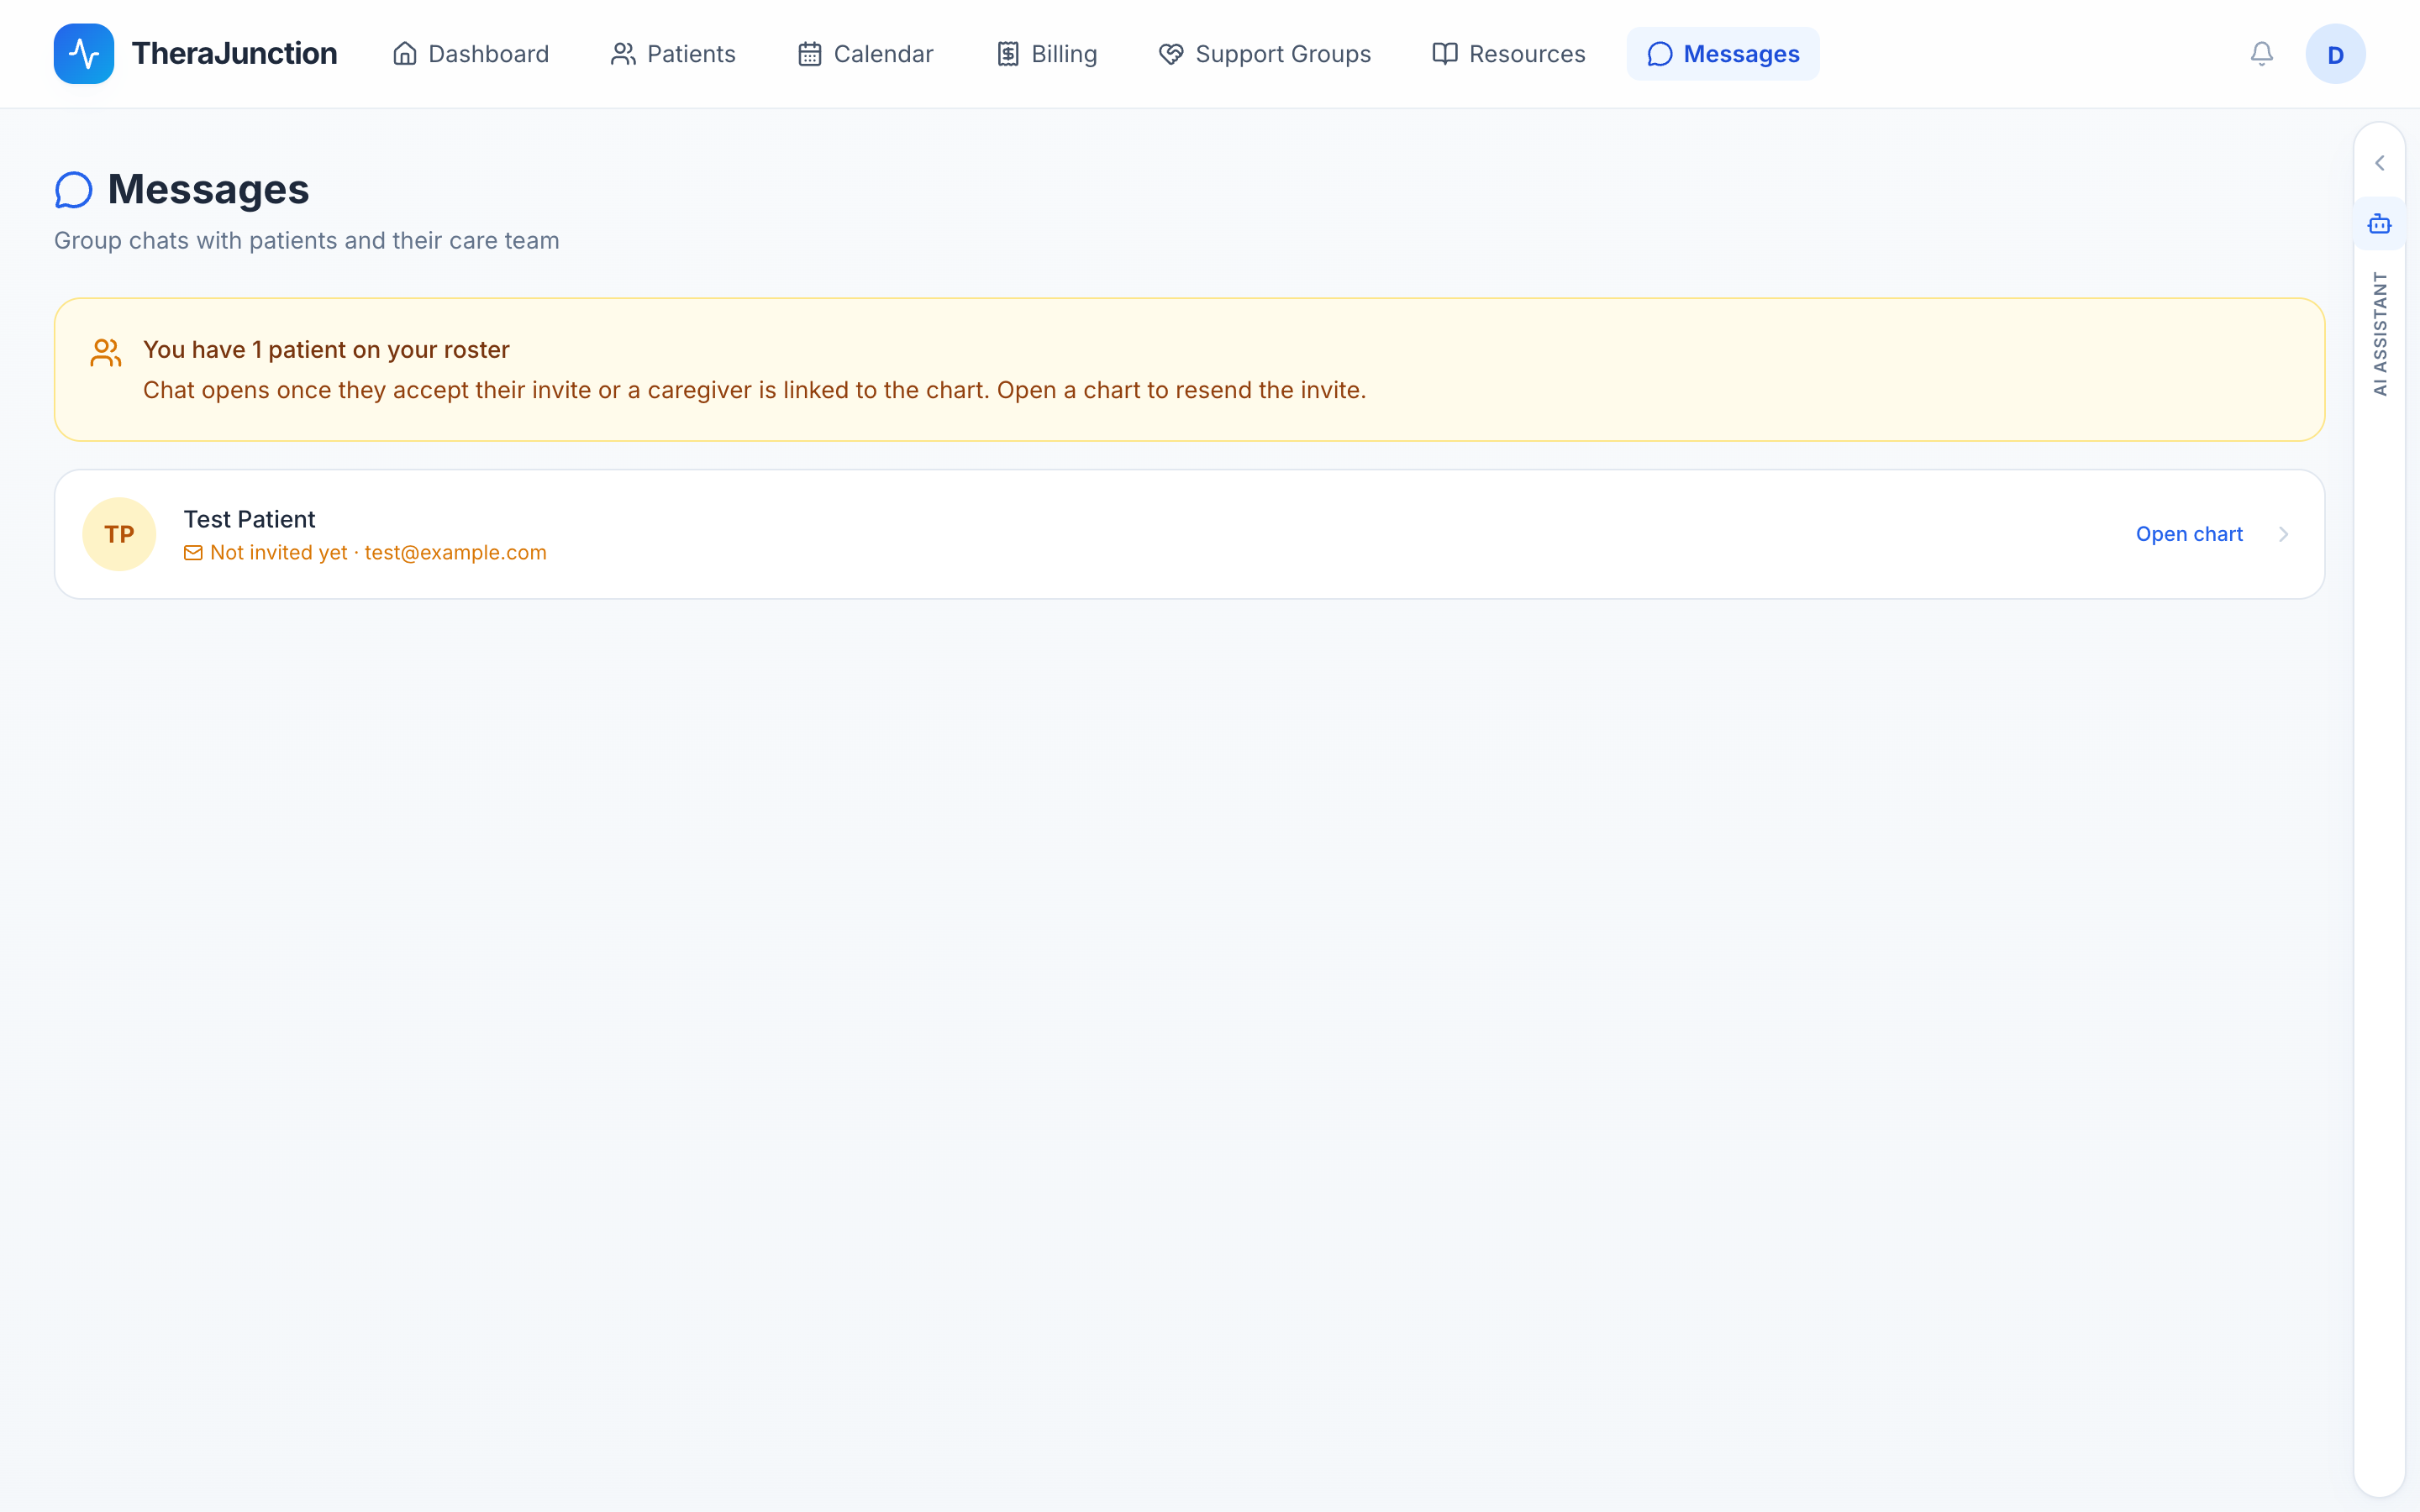
Conversations open automatically once a patient accepts their portal invitation or a caregiver is linked to the chart. You can exchange clinical updates, schedule reminders, and PDF attachments. Unread counters appear in the main navigation bar.
10.3 AI assistant
The AI Assistant is an interactive clinical drawer accessible from the right side of your workspace.
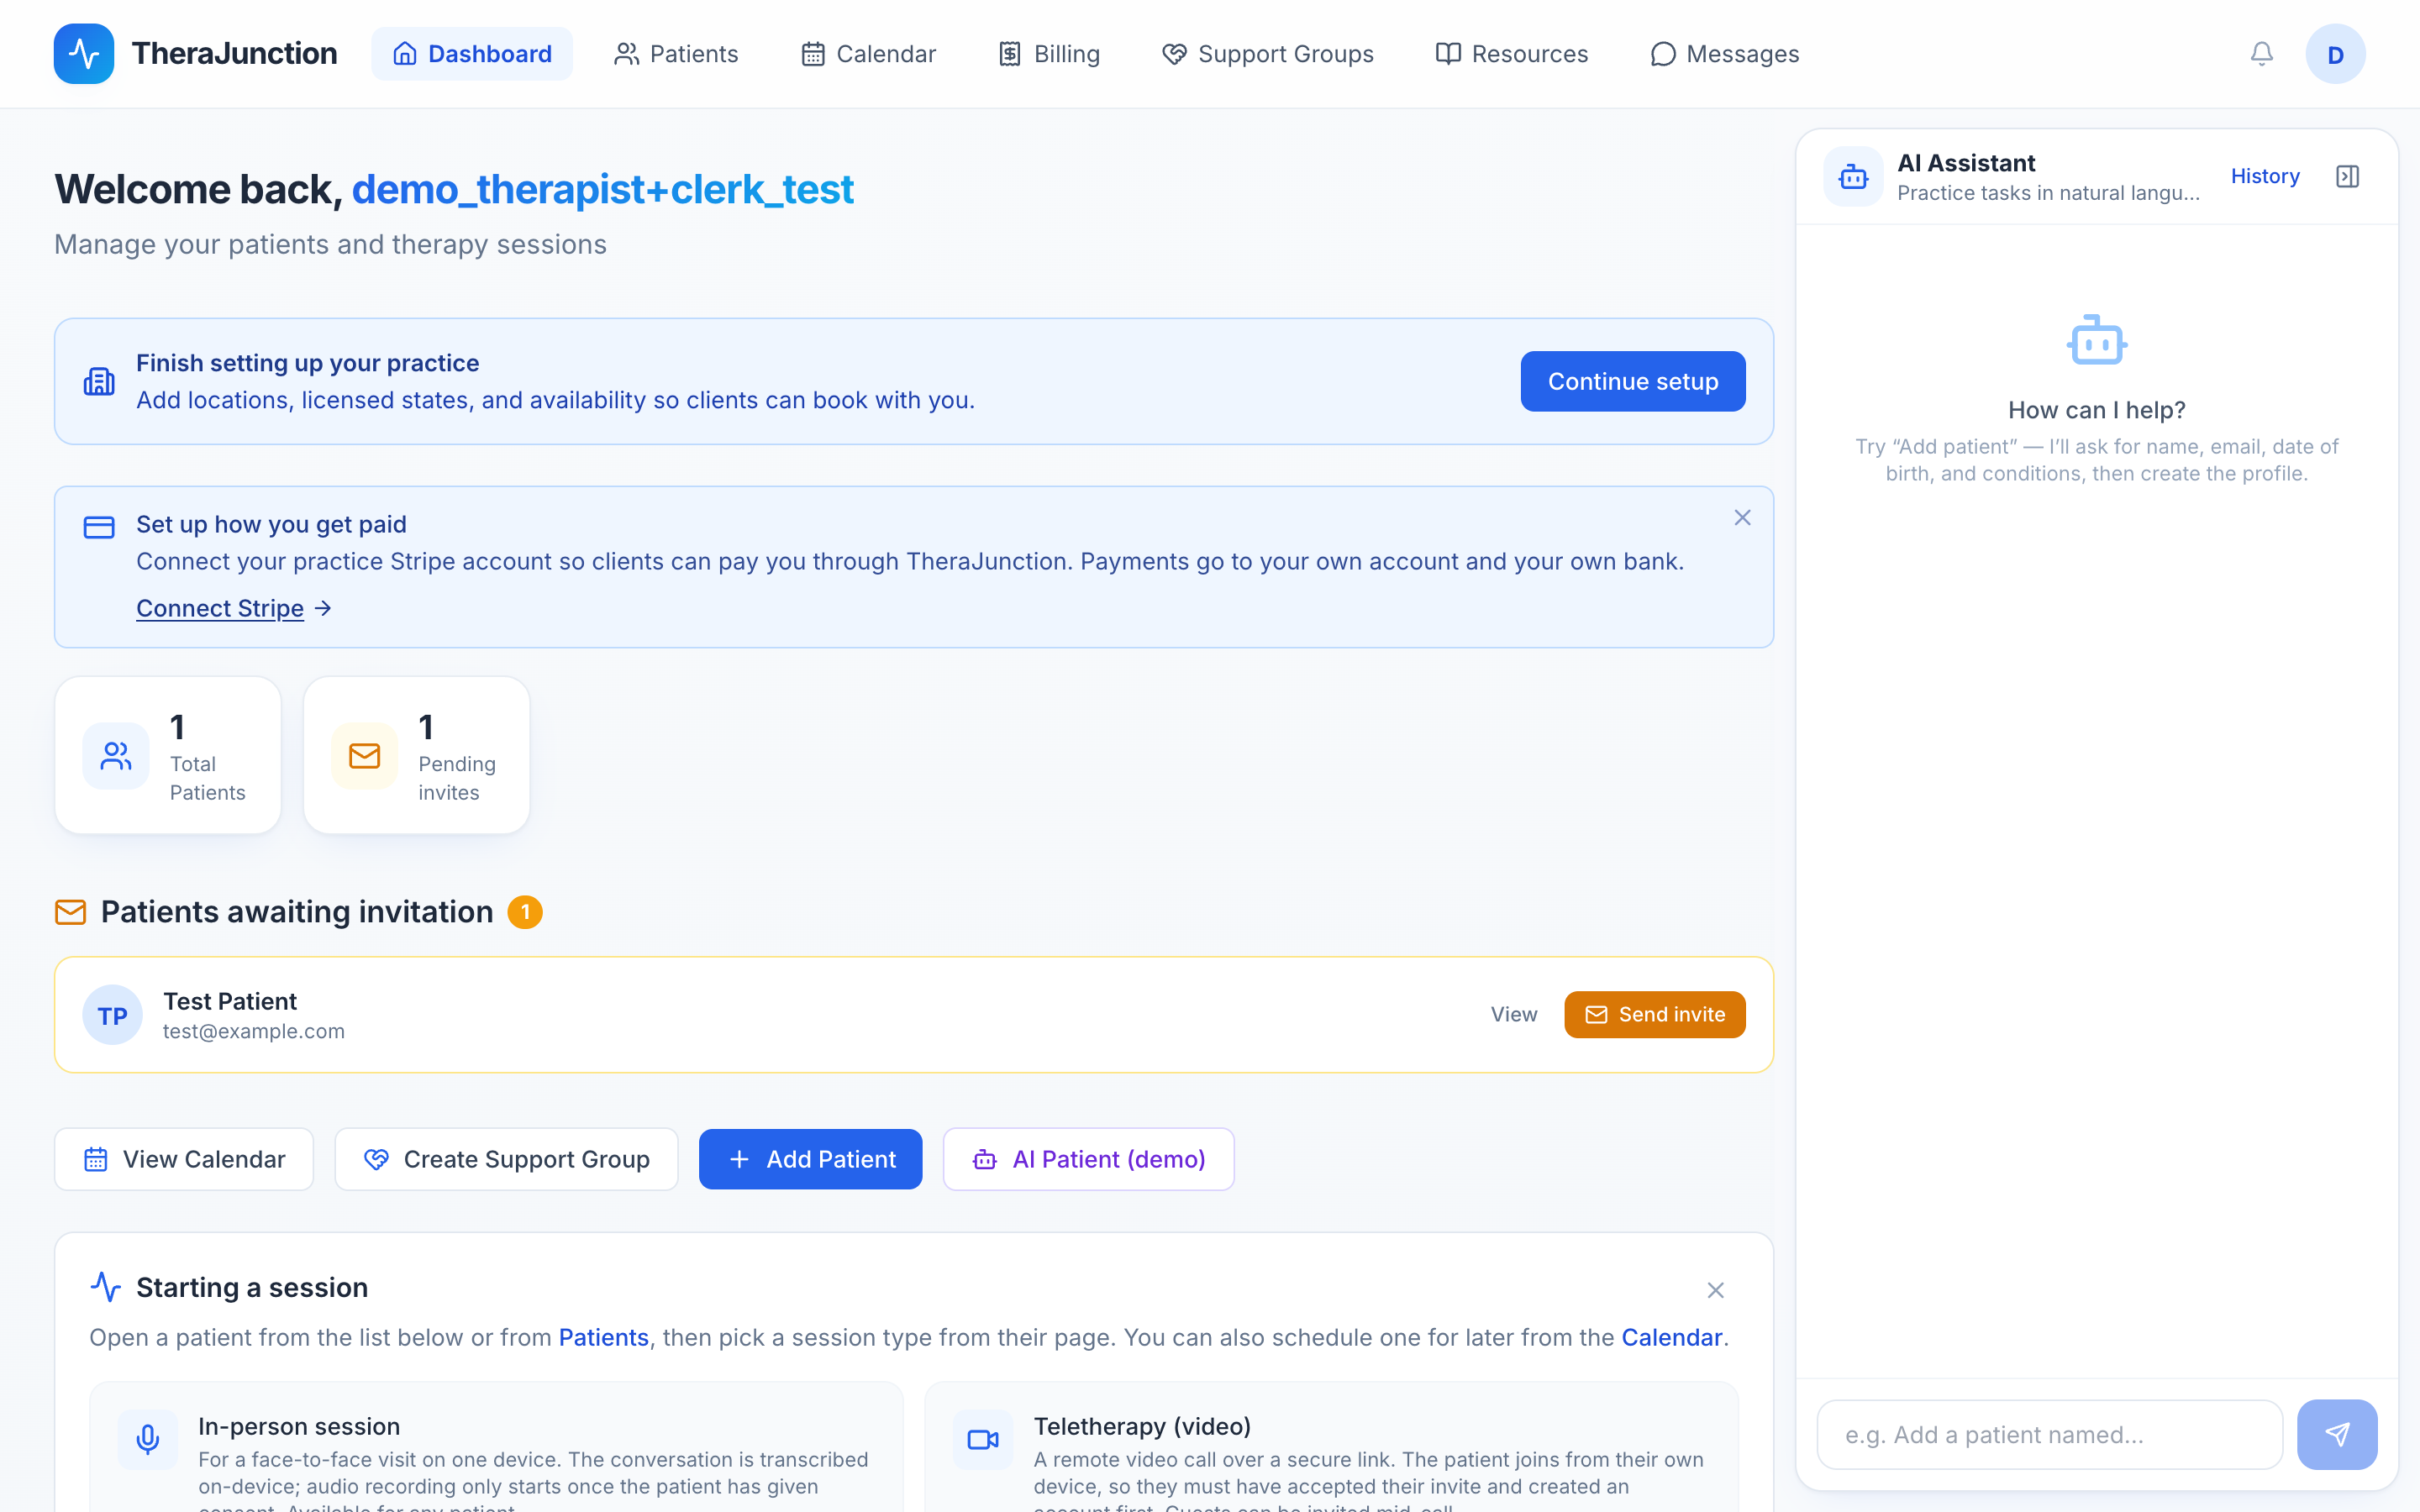
Use the assistant to search client chart histories, look up ICD-10 diagnosis codes or CPT codes, brainstorm targeted speech therapy word lists (such as multisyllabic words with vocalic /r/), and draft parent-friendly explanations of clinical terminology. The assistant assists with drafting; the clinician reviews and approves all output.
10.4 Support groups and resources
TheraJunction provides community support group hosting and a curated clinical materials library:
Patient and caregiver support groups
Support groups in TheraJunction are patient- and caregiver-facing communities. They provide a dedicated space for families, individuals, and caregivers to connect, share lived experiences, and navigate speech, language, voice, and swallowing conditions together.
Therapists can create new support groups or join existing ones to facilitate discussions, answer questions, provide clinical education, and guide members with expert guidance.
- Condition-focused communities: Groups are organized around specific SLP focus areas, such as Stuttering and Fluency, Adult Aphasia, Pediatric Speech and Language, Childhood Apraxia of Speech, Autism and Social Communication, and Caregiver Support circles.
- In-person session format: Hosted at your clinic or an accessible local community venue, with physical address details, directions, and meeting guidelines provided to members.
- Virtual session format: Hosted through integrated, browser-based Group Video Rooms (WebRTC). Members join via their computer or mobile browser with live video, audio, and screen-sharing controls.
- Hybrid session format: Combines a physical meeting venue with a concurrent virtual video room, enabling local families to attend in person while remote participants join virtually in real time.
- Directory and visibility: Public groups appear in the community directory so prospective patients and families can discover your practice's offerings. Groups can also be set to unlisted (join via private invitation link) or private.
- Membership and join requests: Therapists review and approve pending join requests, enforce community conduct guidelines, and manage member rosters.
- Discussion boards and bulletins: Members and facilitators post questions, updates, and encouragement in persistent threaded discussion forums.
- Session scheduling and RSVPs: Schedule one-off meetings or recurring session series. Members can RSVP to confirm attendance, and automated email reminders ensure strong engagement.
- Automated session summaries: When enabled, TheraJunction can generate AI discussion summaries from virtual meetings to share key takeaways and follow-up resources with participants.
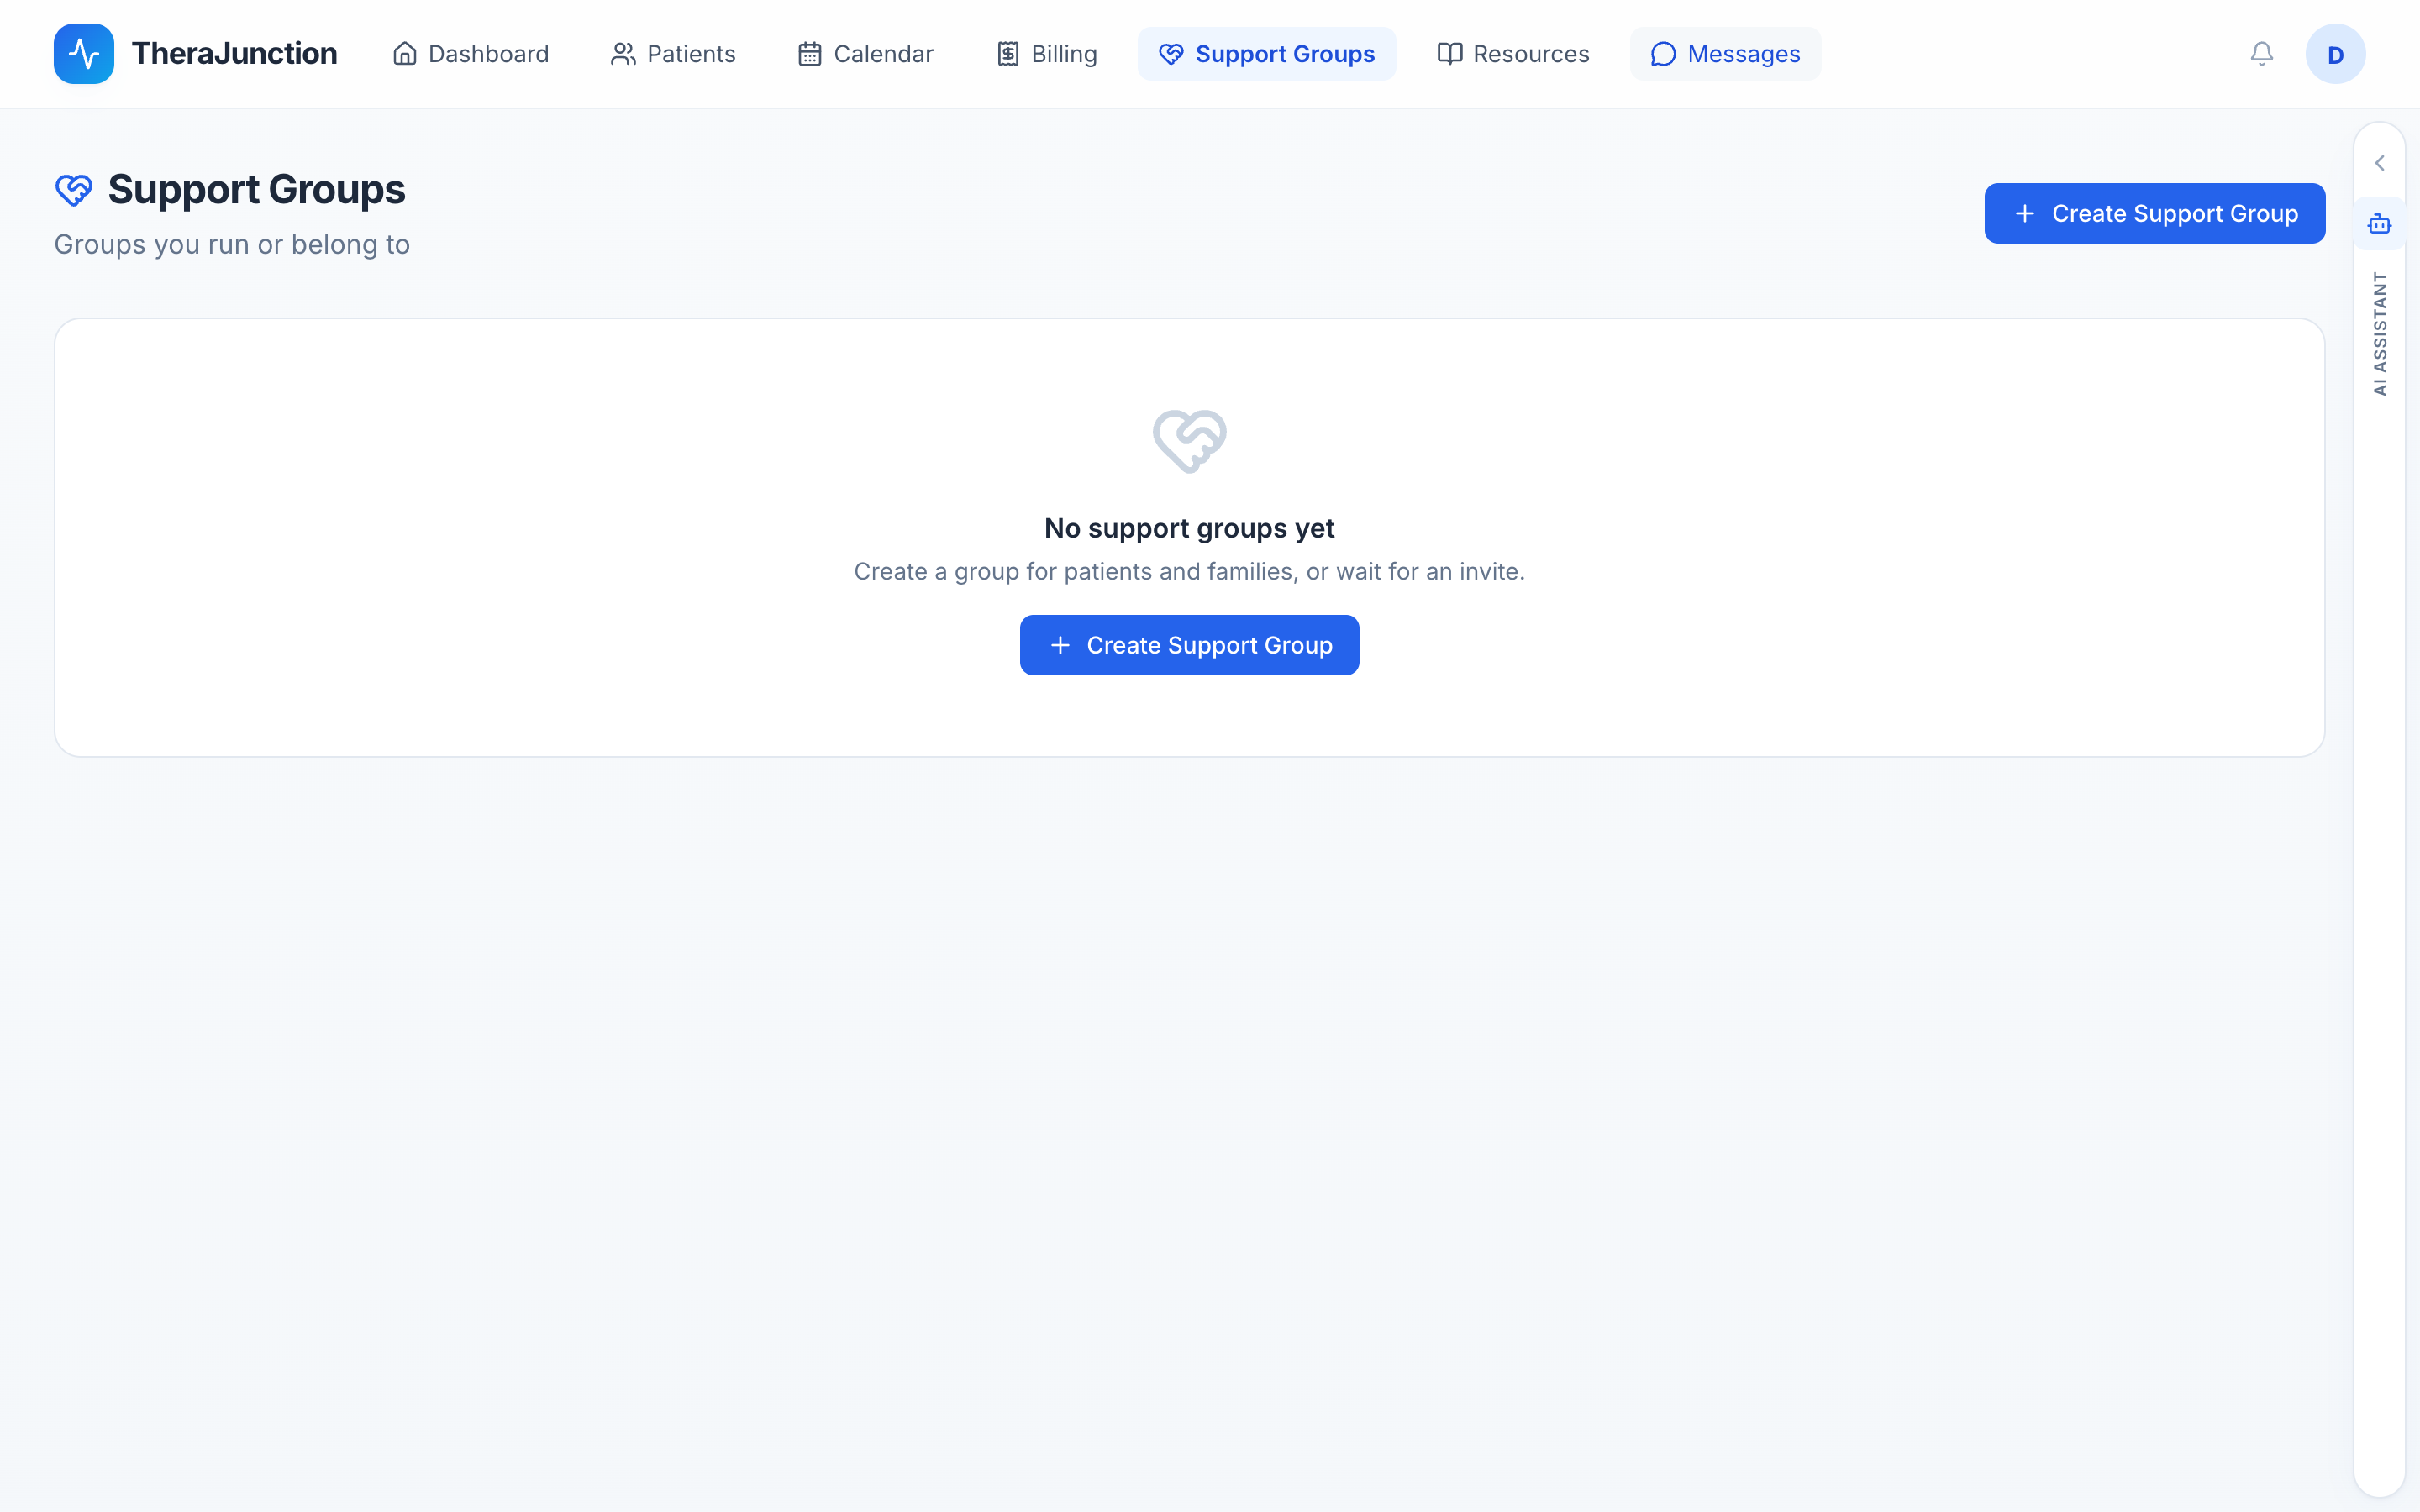
Clinical resources library
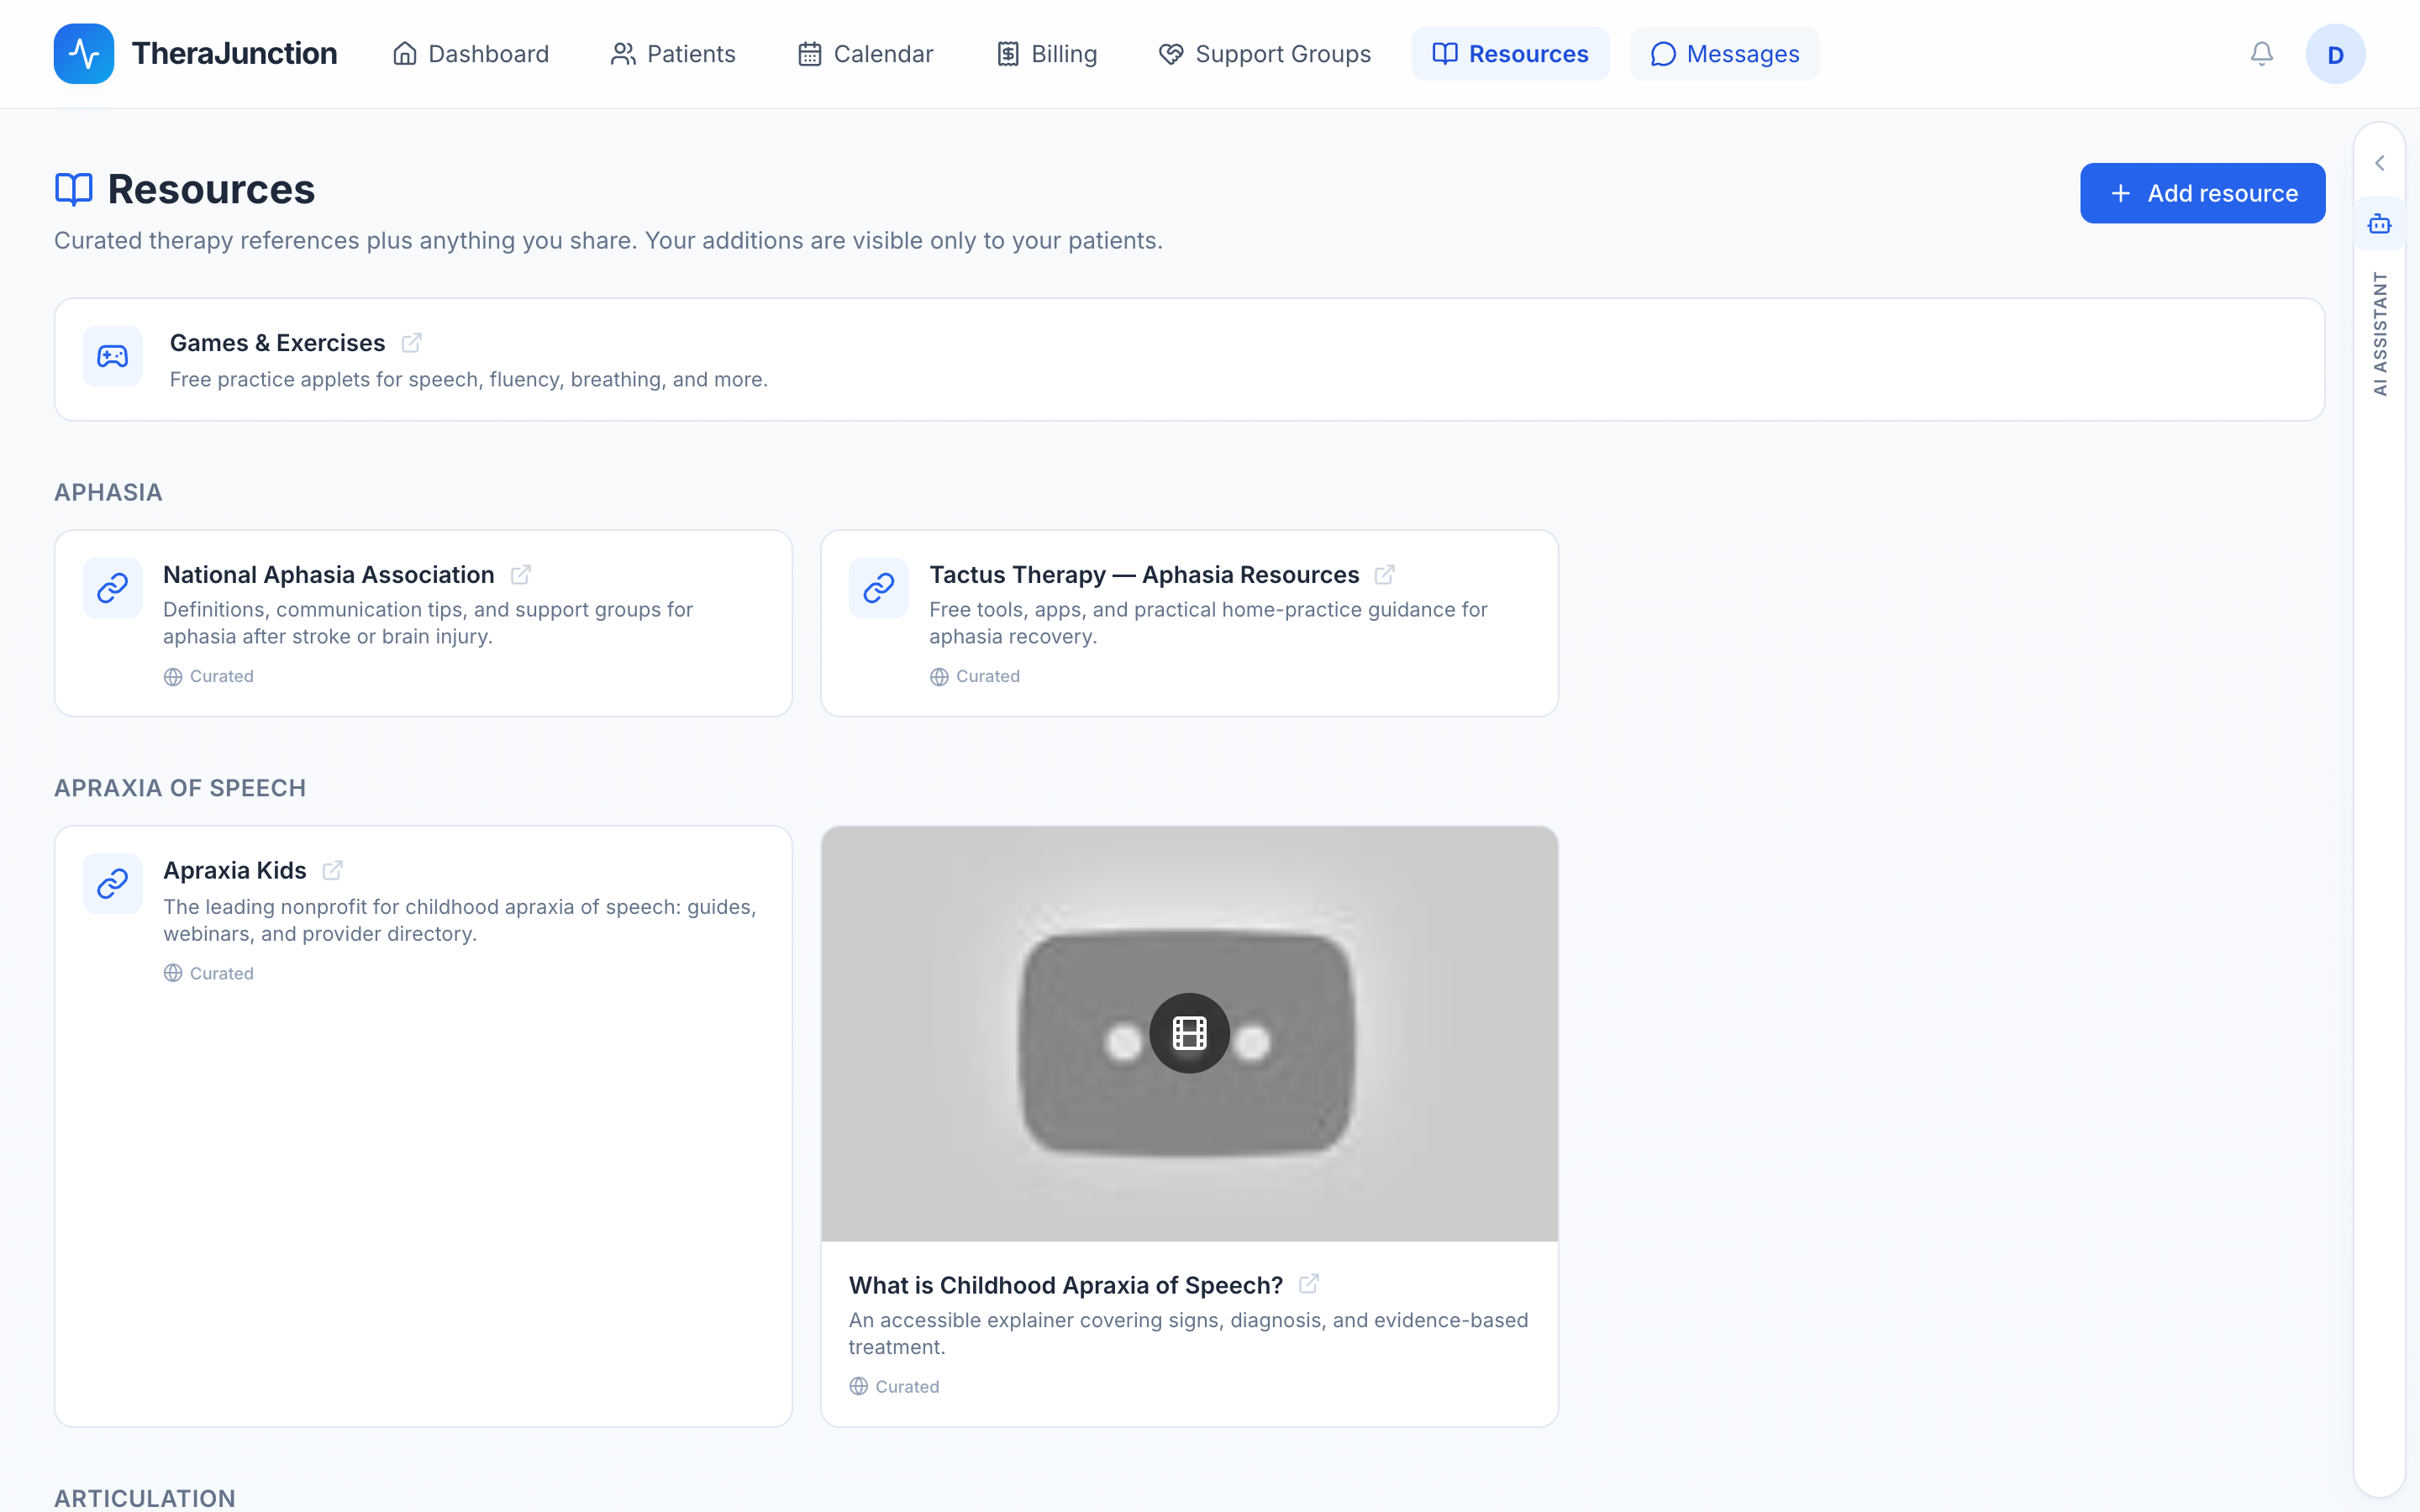
The Resources library offers a searchable collection of speech therapy materials, clinical intake tools, assessment protocols, home exercise templates, and parent educational handouts.
- Targeted search: Filter materials by communication disorder, target age group, or therapeutic modality.
- Direct client sharing: Attach clinical handouts and visual guides directly to secure client messages or assign them as supplementary home practice tasks.
11. Settings you will come back to
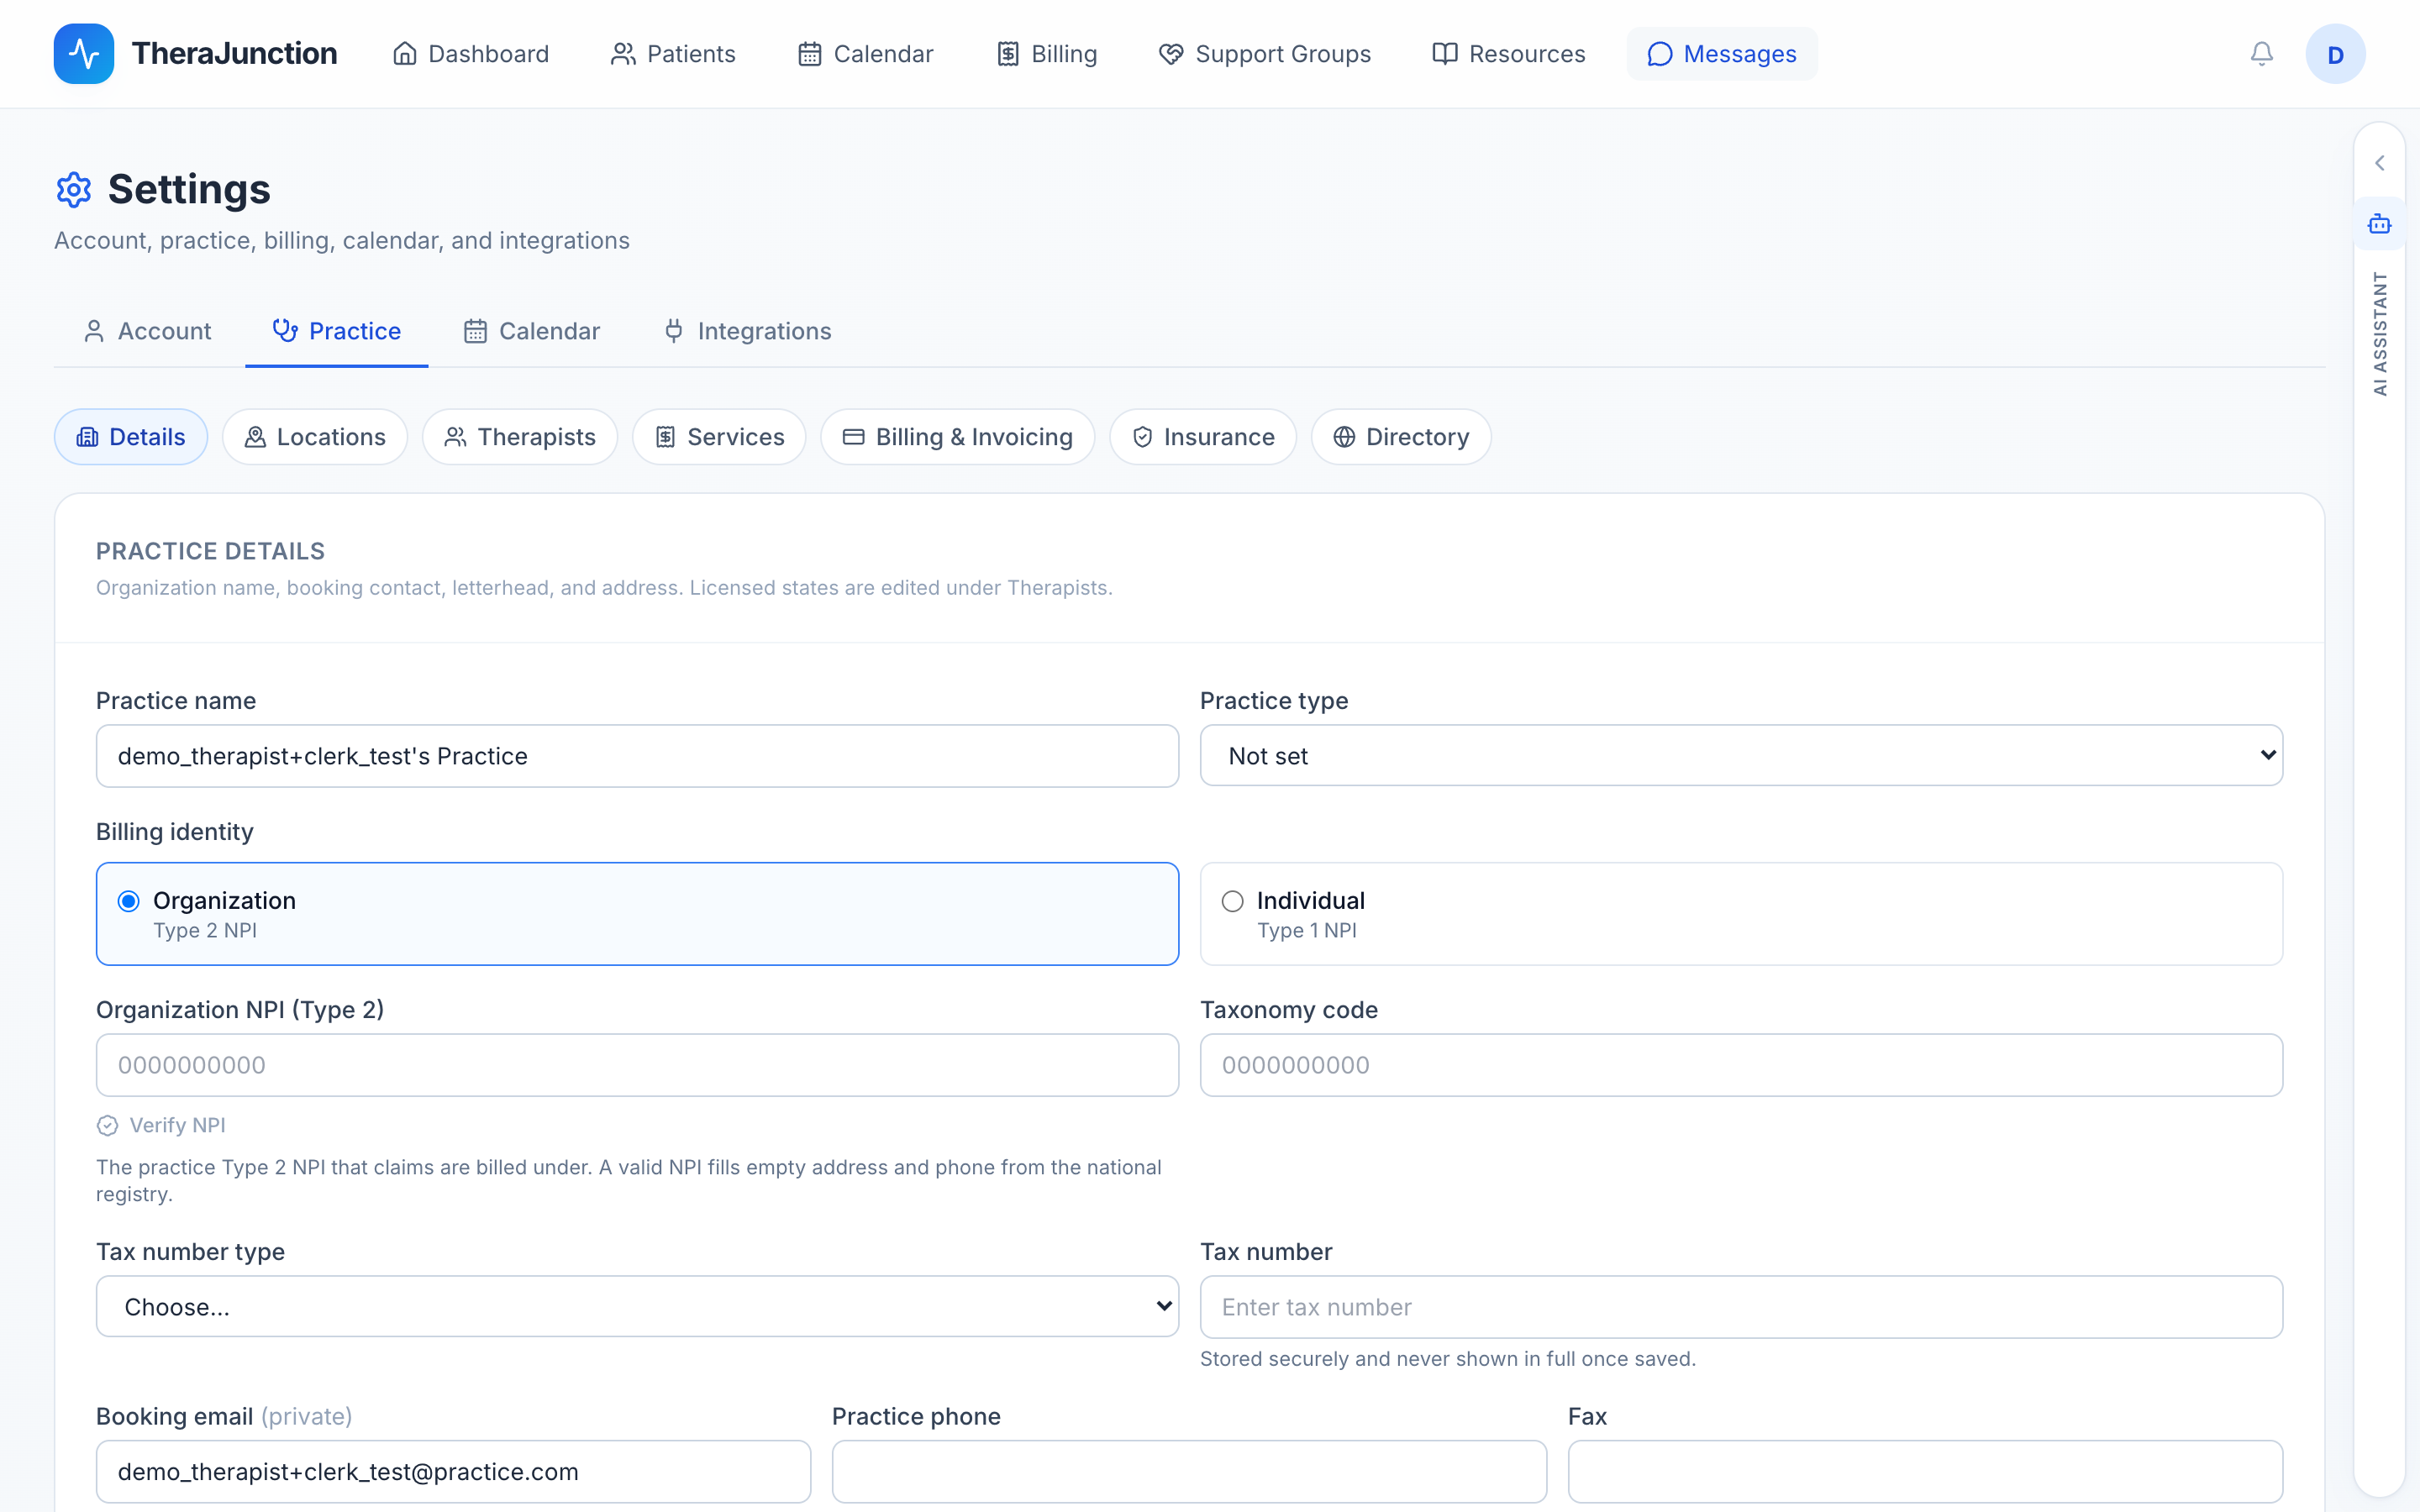
The Settings menu organizes practice and clinician configuration into three primary areas:
| Area | Tab | Configuration Settings |
|---|---|---|
| Practice | Details | Legal practice name, provider type (Org vs Individual), NPI, taxonomy, tax ID (EIN/SSN), physical billing address, claim readiness check |
| Practice | Locations | Physical clinic addresses, suite numbers, primary location toggle |
| Practice | Therapists | Clinician roster, invitations, weekly recurring availability hours |
| Practice | Services | Service catalog, CPT codes, default visit durations, standard fees |
| Practice | Insurance | Accepted insurance payers, electronic payer IDs, network status |
| Practice | Directory | Public directory profile preview, direct booking URL, hours, bio |
| Practice | Billing & Invoicing | Stripe Connect account status, merchant onboarding, payout settings |
| Account | Profile | Display name, mobile phone number, local timezone |
| Account | Credentials | Clinical licenses, state license numbers, credential types |
| Calendar | Preferences | Week start day, appointment slot intervals (15 to 60 min), buffer times |
12. Billing after a session
12.1 The post-session workflow
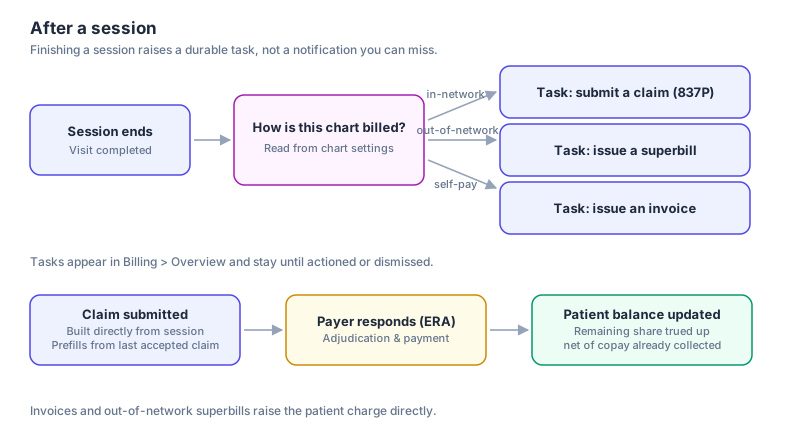
Whenever an encounter finishes (whether an in-person visit, a teletherapy call,
or a manual report), TheraJunction triggers an automated billing workflow
(on_session_completed).
A therapist completing a clinical session is usually preparing to welcome their next patient. A temporary popup or toast notification is easily missed. To prevent unbilled visits, TheraJunction raises a durable billing task stored in the database.
12.2 Durable billing tasks
Billing tasks appear in the Billing → Overview hub and persist until you take action. Tasks are categorized by the chart's billing method:
- In-network chart (
claim): For clients using in-network insurance with active coverage on file. The task prompts you to Submit a claim. Clicking it opens the electronic 837P claim builder pre-populated with the session's clinical codes. The client receives an invoice for their copay or coinsurance only. - Out-of-network chart (
superbill): For insured clients where your practice is out-of-network. The task prompts you to Issue a superbill. The client pays the full session fee and receives an itemized superbill to submit to their insurance plan for reimbursement. - Self-pay chart (
invoice): For private-pay clients (and in-network charts lacking active insurance policies). The task prompts you to Issue an invoice for the full practice fee. - Denial review (
denial_review): Raised when a previously submitted claim is denied by the insurance payer. Prompts you to review payer reason codes, correct and resubmit, appeal, or invoice the patient.
If an encounter was non-billable (such as a complimentary consultation or a screen), you can dismiss the task by entering a mandatory administrative reason. Every dismissed task remains logged in the billing audit trail.
12.3 The Billing Hub tabs
The Billing workspace contains three primary views:
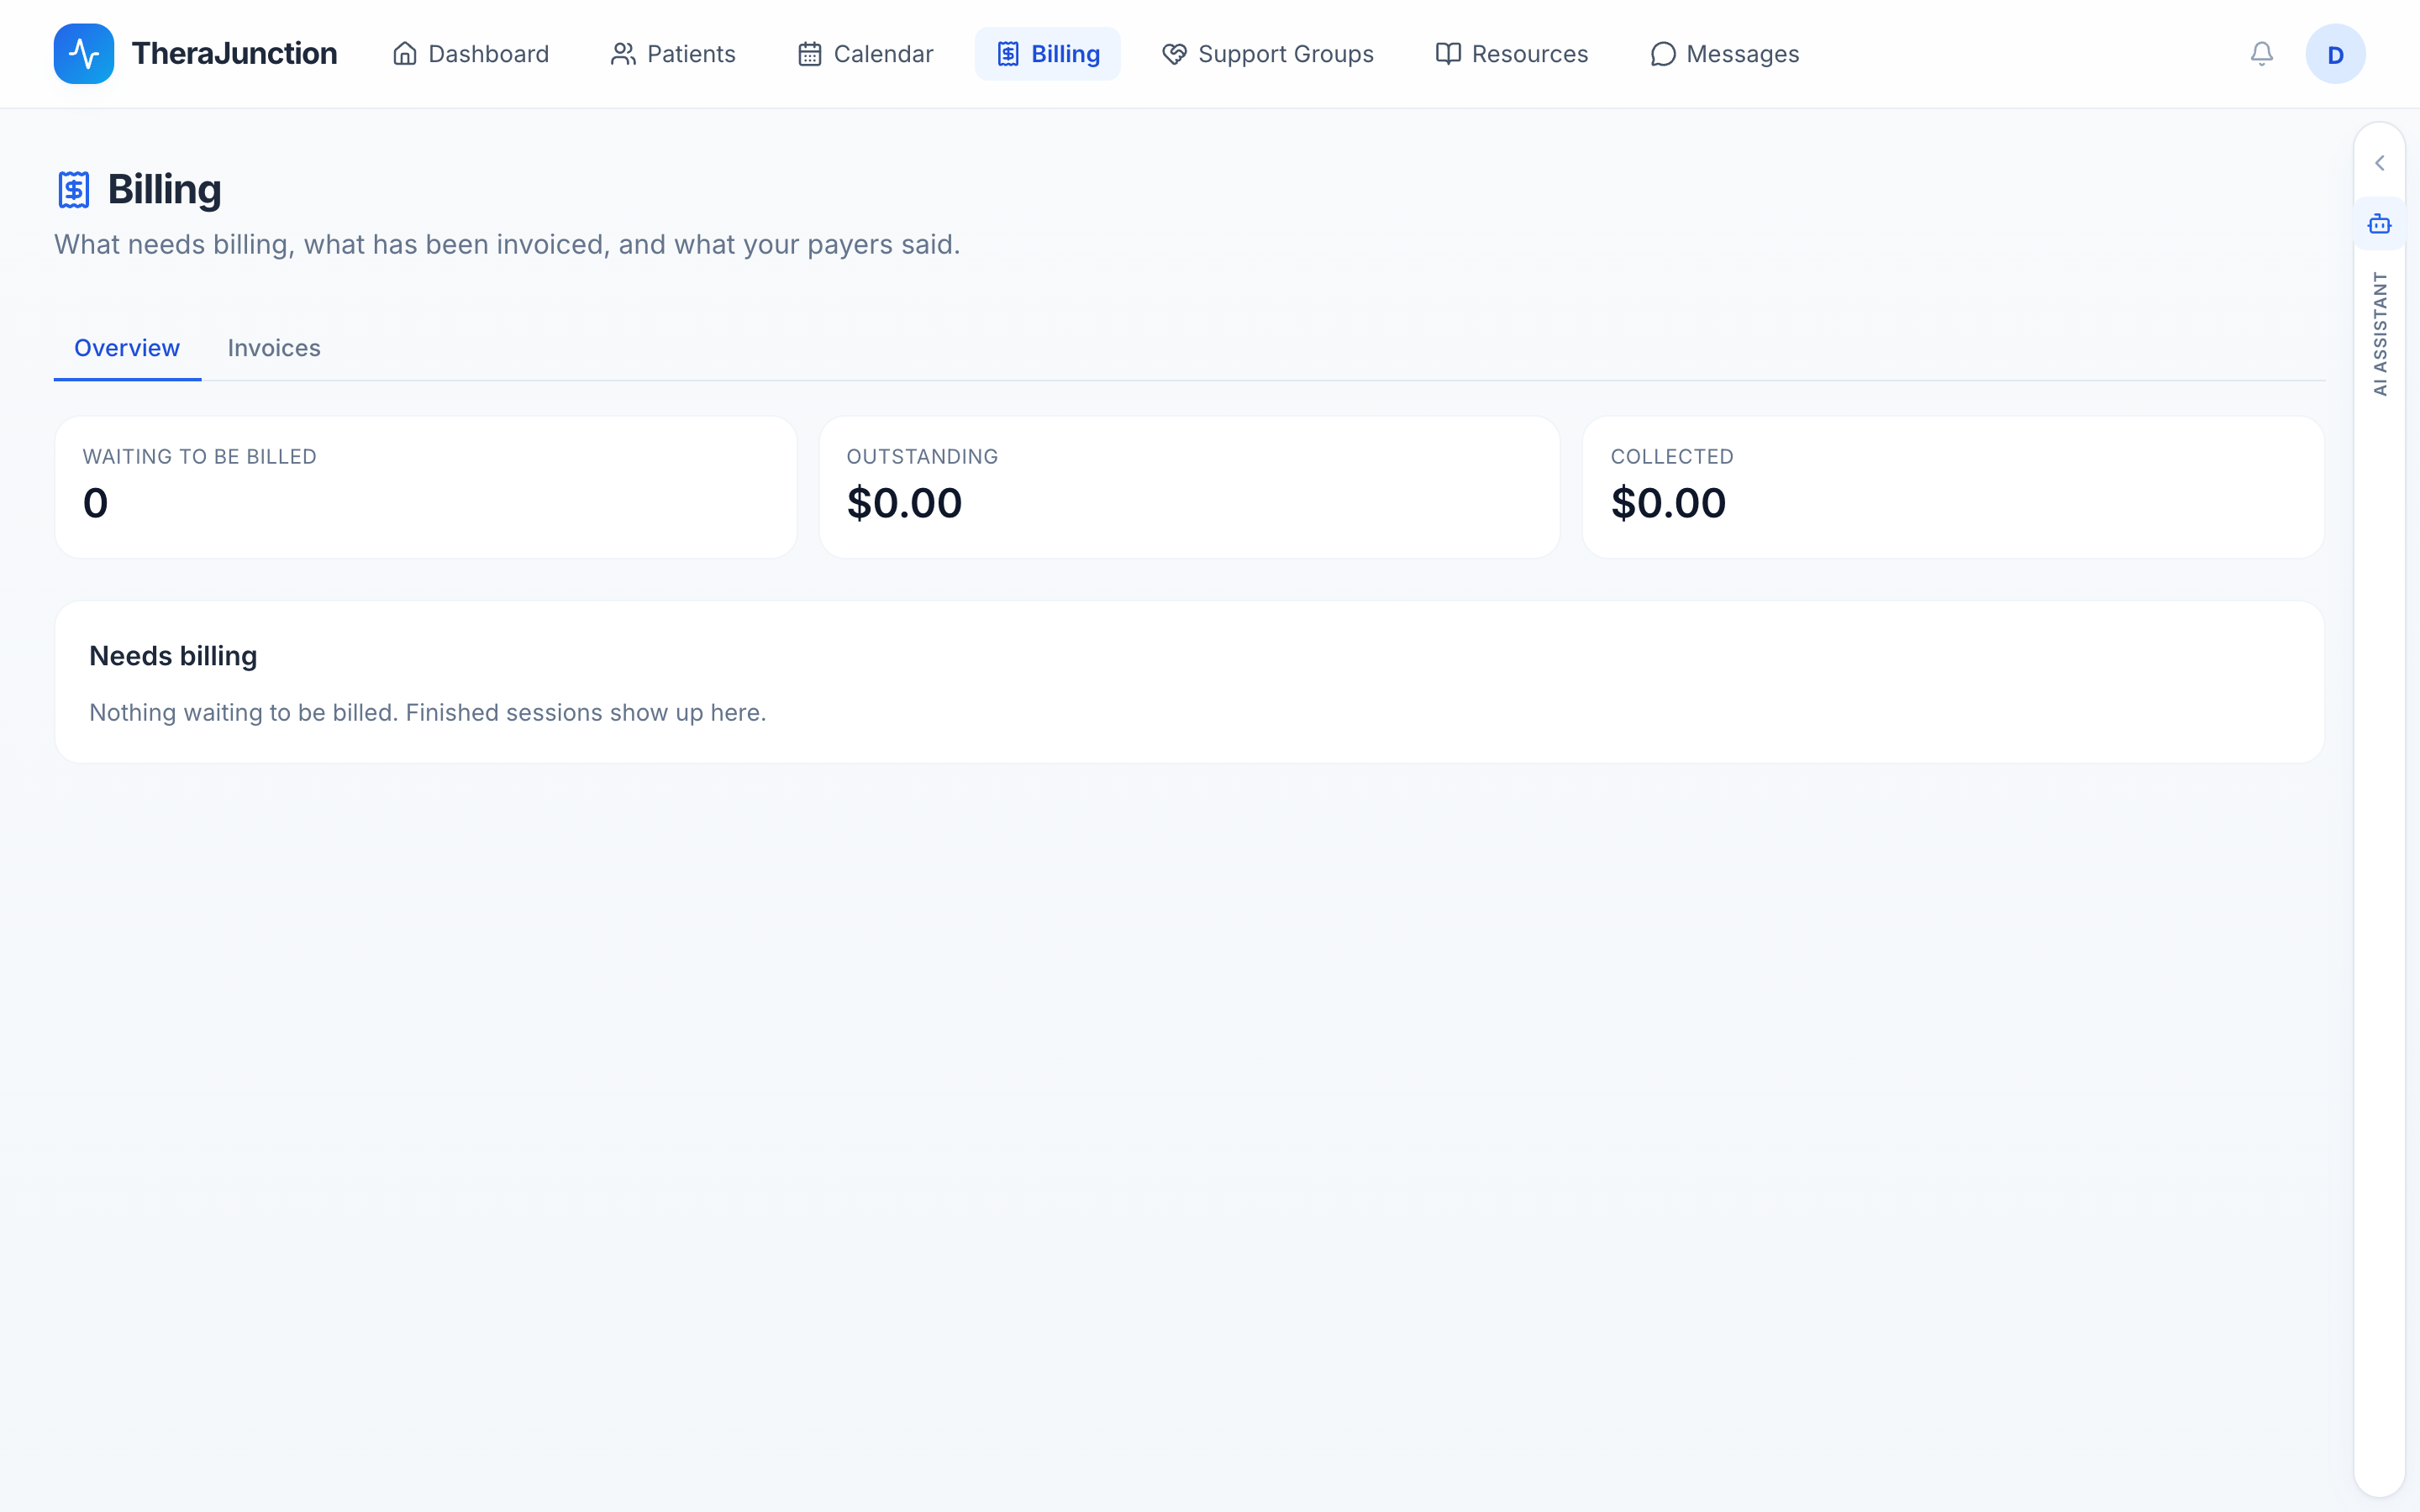
- Overview: Displays summary financial metrics:
- Waiting to be billed: Count of open billing tasks awaiting action.
- Outstanding: Total uncollected balance across all issued patient invoices and cost shares.
- Collected: Total revenue collected through the platform.
- Needs billing queue: Lists all pending session tasks with direct action buttons (Submit claim, Generate superbill, Issue invoice).
- Invoices: Complete ledger of all patient invoices with status badges (Draft, Issued, Paid, Void), line items, PDF downloads, and email resend controls.
- Claims: High-level claim pipeline metrics (total submitted, claims requiring attention) with a direct link to the full electronic claims ledger.
Both clinicians and clients can download billing history as a CSV spreadsheet at any time.
13. Practice details for claims
13.1 Billing profile fields
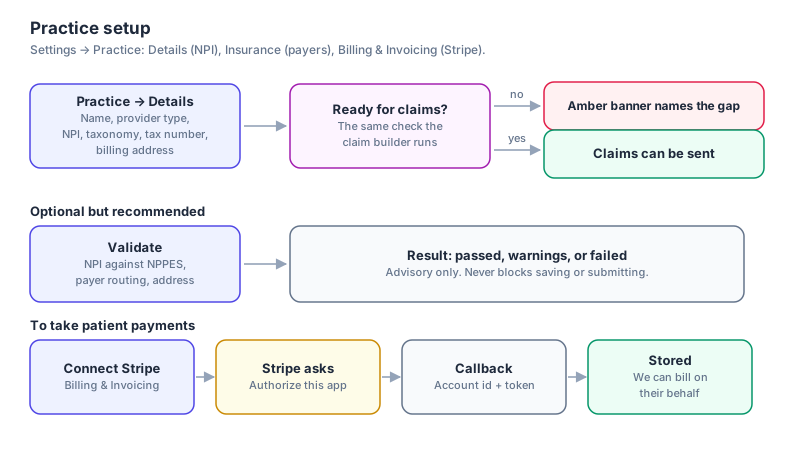
Electronic 837P professional claims require complete, validated practice identifiers. Configure these under Settings → Practice → Details:
| Field | Description | Claim Location (837P / CMS-1500) |
|---|---|---|
| Legal Practice Name | Official registered entity name | Loop 2010AA / Box 33 |
| Provider Type | Organization (Type 2) or Individual (Type 1) | Determines NPI and tax entity rules |
| Billing NPI | 10-digit organizational or solo NPI | Loop 2010AA / Box 33a |
| Taxonomy Code | 10-character clinical specialty code | Loop 2000A / Box 33b |
| Tax Number Type | Employer Identification Number (EIN) or SSN | Loop 2010AA / Box 25 |
| Tax ID Number | Stored securely; write-only display | Loop 2010AA / Box 25 |
| Billing Address | Physical street address (no PO boxes) | Loop 2010AA / Box 33 |
13.2 Provider type and NPI hierarchy
Provider type dictates how your practice is identified on electronic claims:
- Organization (Type 2 NPI): Required if your practice is incorporated as an LLC, PLLC, PC, or Corporation. Claims name your organization as the billing entity (Type 2 NPI in Loop 2010AA) with your EIN. The individual treating SLP is identified as the rendering provider (Type 1 NPI in Loop 2310B).
- Individual (Type 1 NPI): Standard for unincorporated solo practitioners. Your individual Type 1 NPI serves as both the billing provider and rendering provider.
Tax identification is write-only. For security, once saved, your federal
tax ID is never returned in full over the API. The screen displays only the
last four digits (such as XX-XXX1234). Leave the field empty to preserve your
stored number, or enter a new value to replace it.
Physical address requirement: Health insurance payers and clearinghouses strictly reject PO boxes in billing provider fields. The billing address must be a verifiable physical street address.
13.3 Readiness checks and registry validation
A status banner at the top of the Details screen evaluates your billing profile in real time:
- Claims ready: All required identifiers are present and properly formatted.
- Action required: Identifies specific missing fields (such as missing taxonomy code or invalid tax ID format). This check runs the same validation engine that inspects claims before transmission.
Click Validate to run an automated check against the federal NPPES NPI registry. The validator confirms your NPI is active, verifies your taxonomy code, checks address standardization, and confirms electronic payer routing. Validation notices are advisory and do not prevent saving.
13.4 Accepted payers and network status
Manage the health plans your practice accepts under Settings → Practice → Insurance.
For each payer, specify your Network Status:
- In-network: You hold a participating provider contract with the plan. Finished sessions generate electronic 837P claims, and the patient is billed their in-network copay or coinsurance.
- Out-of-network: You do not hold a direct contract. Finished sessions generate superbills, and the patient is billed your full practice fee.
14. The patient's insurance
14.1 Adding a policy
Clients enter insurance coverage directly through the patient portal under Billing → Insurance, or you can enter it manually on the patient's chart.
Required fields for insurance verification:
- Payer: Selected from the national payer directory.
- Member ID: Subscriber or policy identification number.
Additional policy fields:
- Insurance rank: Primary, Secondary, or Tertiary.
- Group number and Plan name: Policy grouping identifiers.
- Plan type: HMO, PPO, EPO, POS, Medicaid, or Medicare.
- Policyholder (Subscriber): Select Self if the patient owns the policy. If covered by a parent or spouse, select Other and provide the subscriber's full legal name, date of birth, biological sex, and street address. Electronic claims require the subscriber's address (Loop 2010BA).
- Cost sharing details: Flat copay dollar amount, coinsurance percentage, individual deductible, and deductible met status.
Copay or coinsurance, not both. Insurance plans structure patient cost shares as either a flat dollar copay (such as $30 per visit) or a percentage coinsurance (such as 20% of allowed charges). The form toggles between these modes.
14.2 Insurance card photos
Patients can upload front and back photos of their insurance card via their mobile device or browser (JPG or PNG format, up to 10 MB). Card images are stored in encrypted, HIPAA-compliant storage accessible only to authenticated care team members. Card images are never transmitted via email or exported in public records.
14.3 Chart-level claim settings
Configure billing settings on the patient's chart under Claim settings:
| Setting | Function |
|---|---|
| Client billing method | Explicit setting: in_network, out_of_network, or self_pay |
| Client signature on file | Documented consent for Assignment of Benefits and Release of Information |
| Default billing diagnoses | ICD-10 diagnosis codes that pre-populate new clinical sessions |
The chart's billing method is the single source of truth for all post-session billing automation. It defaults based on the client's intake preference and your network status, but can be updated by the clinician at any time.
15. Acceptance and eligibility
15.1 Real-time eligibility inquiries
When you accept an insured patient from the directory, TheraJunction initiates an automated electronic 270 eligibility inquiry in the background via our clearinghouse integration. You can also run an on-demand check anytime by clicking Check eligibility on the patient chart or session billing panel.
Eligibility inquiries operate asynchronously and never block or delay accepting a patient into your practice.
15.2 Verification outcomes
The clearinghouse returns an electronic 271 response that is parsed and recorded on the policy:
- Active coverage: The system confirms coverage dates, identifies plan copay and coinsurance amounts, and extracts deductible balances. The policy is marked Active.
- Inactive or terminated: The payer reports that the member ID is invalid, coverage has lapsed, or the plan is inactive. The policy is marked Inactive.
- Payer not found: The member ID could not be matched with the selected payer.
15.3 Inactive coverage workflows
When eligibility cannot be confirmed:
- The clinician receives an immediate dashboard alert detailing the payer's response.
- The client receives a portal notification explaining that their insurance could not be verified, prompting them to upload updated card details or switch to private self-pay.
- If the patient proceeds without verified active coverage, post-session billing defers charging patient balances until a formal claim adjudication or superbill is settled, avoiding overbilling.
Self-pay charts bypass clearinghouse eligibility checks entirely.
16. Claims
16.1 Building an 837P claim from a session
Electronic claims are generated directly from an in-network session, never from a superbill.
When an in-network session completes, the billing task prompts you to submit a
claim. Clicking Submit claim (or navigating to /claims/new?sessionId=...)
opens the electronic 837P claim builder. The builder links the encounter
record, pulls attending clinician credentials, extracts the Place of Service,
and loads the patient's active primary insurance policy.
Superbills are the out-of-network reimbursement document and are never used to generate an electronic claim.
16.2 Procedure and diagnosis coding
Each claim requires standard ICD-10 diagnosis coding and CPT procedure lines:
- Place of Service (POS): Automatically assigned from the session record.
In-person clinic visits use POS
11(Office). Teletherapy visits automatically assign POS10(Telehealth Provided in Patient's Home) or POS02(Telehealth Provided in Location Other than Home). - Diagnosis codes (ICD-10-CM): Searchable by code number (such as
F80.0) or clinical keyword (such as "phonological", "apraxia", or "dysfluency"). TheraJunction includes a curated clinical SLP catalog that excludes non-specific grouping headers that payers routinely reject. The primary diagnosis is assigned as pointer A, with secondary conditions assigned to subsequent pointers. - Procedure codes (CPT): Searchable by code number (such as
92507) or description. Specify service units (typically 1 unit per session) and the fee per unit. Modifiers (such asGNfor services delivered under an outpatient speech-language pathology plan of care, or95for synchronous teletherapy) can be appended to each service line.
16.3 Intelligent prior-claim prefill
When submitting a claim for a patient and payer you have previously billed, TheraJunction retrieves coding from your last accepted claim for that same patient.
The claim builder displays an informational banner offering to prefill:
- Primary and secondary ICD-10 diagnosis codes.
- CPT procedure service lines, unit counts, and fees.
- Healthcare provider taxonomy codes.
Strict patient privacy boundary: Prefill operates strictly on the same patient's previous claim history. It never borrows or merges clinical data from another patient. You can accept prefilled values or modify codes before submission.
16.4 Pre-submission validation
Before any data is transmitted to the clearinghouse, TheraJunction's local validation engine verifies the claim against federal CMS-1500 and HIPAA ANSI X12 837P rules:
- Valid 10-digit NPIs for both billing and rendering providers.
- Appropriate 10-character taxonomy codes.
- Physical street address for the billing entity (no PO boxes).
- Valid member ID and subscriber demographic details.
- Valid ICD-10 diagnosis formatting with appropriate line item pointers.
- Active date of service and positive line item fee amounts.
Catching errors locally prevents multi-day clearinghouse rejection delays and provides human-readable explanations of any missing data.
16.5 Clearinghouse submission and status tracking
Click Submit Claim to transmit the 837P batch electronically to our
clearinghouse partner (Stedi). The system generates an internal Claim Control
Number (such as TJ260915A1B2) that is echoed by the clearinghouse and payer
in all subsequent status transactions.
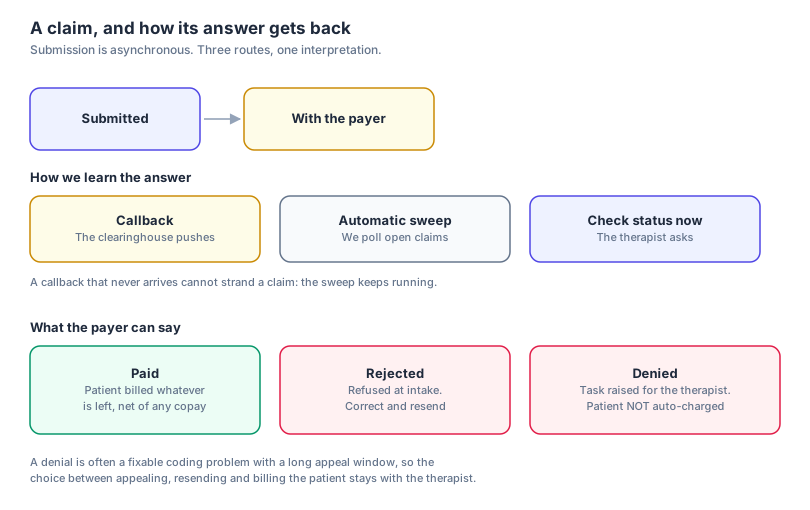
Payers adjudicate claims asynchronously, taking anywhere from several hours to several weeks. Claim statuses update across three channels:
- Clearinghouse Webhook Callbacks: Real-time push notifications from the clearinghouse as soon as payer 277CA acceptance reports or 835 remittances are issued.
- Continuous Background Sweep: Automated background polling that checks open submitted claims on a daily schedule.
- Check status now: A button on each claim record in the claims table allowing you to query the clearinghouse immediately.
| Claim Status | Meaning | Next Action |
|---|---|---|
| Draft | Claim created but not yet transmitted | Review codes and submit |
| Validation Failed | Local check identified missing fields | Correct errors and submit |
| Submitted | Transmitted to clearinghouse; awaiting payer intake | Monitored automatically |
| Accepted | Payer accepted claim for adjudication | Awaiting adjudication |
| In Process | Payer is adjudicating claim lines | Monitored automatically |
| Paid | Claim adjudicated and paid in full | Remittance posted |
| Partially Paid | Payer approved partial payment with adjustments | Patient share trued up |
| Rejected | Refused at clearinghouse or payer intake | Correct and resubmit |
| Denied | Adjudicated by payer with payment refused | Review denial task |
| Voided | Claim formally cancelled or replaced | Archived |
16.6 Remittance advice (835 ERA) and posting
When the payer completes adjudication, they issue an Electronic Remittance Advice (835 ERA). TheraJunction parses the remittance:
- Allowed amount: The maximum fee permitted under your payer contract.
- Paid amount: The dollar amount disbursed directly to your practice via electronic funds transfer (EFT).
- Contractual adjustments (CO): The discount write-off required by your participating provider agreement.
- Patient responsibility (PR): The remaining balance owed by the patient (copay, coinsurance, or unmet deductible).
Automated patient true-up: When the ERA posts, the system updates the session's patient invoice to match the exact patient responsibility determined by the payer, net of any copay already collected. If the patient already paid their copay at the visit, they are billed only for remaining deductible or coinsurance balances.
16.7 Denials versus rejections
A clear distinction exists between claim rejections and claim denials:
- Rejection: A mechanical refusal at intake by the clearinghouse or payer front-end (such as an invalid member ID format or missing rendering NPI). The claim was never entered into the payer's adjudication system. Rejections are resolved by fixing the highlighted field and resubmitting.
- Denial: The payer formally adjudicated the claim and determined that one or more service lines are not payable under the member's policy. Denials include official Claim Adjustment Reason Codes (CARC) and Remittance Advice Remark Codes (RARC).
Denial safety rule: When a claim is denied, the patient is never charged automatically. Denials are frequently correctable coding discrepancies or pre-authorization issues, and appeal windows typically extend for months. Charging the patient the full session fee immediately would be clinically and contractually inappropriate.
16.8 Correcting, appealing, or voiding claims
A denied claim generates a durable Denial review task in your Billing Overview. Opening the task presents four options:
- Correct and resend: Fix a coding, modifier, or diagnosis issue and
resubmit. This generates a replacement claim (frequency code
7) chained to the original claim control number. - Appeal: File an appeal directly with the payer accompanied by your clinical session documentation. Dismiss the task with the reason "Appealed".
- Bill the patient: If the service is genuinely non-covered under the client's policy and an advance notice or financial agreement was signed, convert the balance to a patient invoice.
- Void claim: Submit a formal 837P cancellation (frequency code
8) if the claim was billed in error.
17. What the patient pays
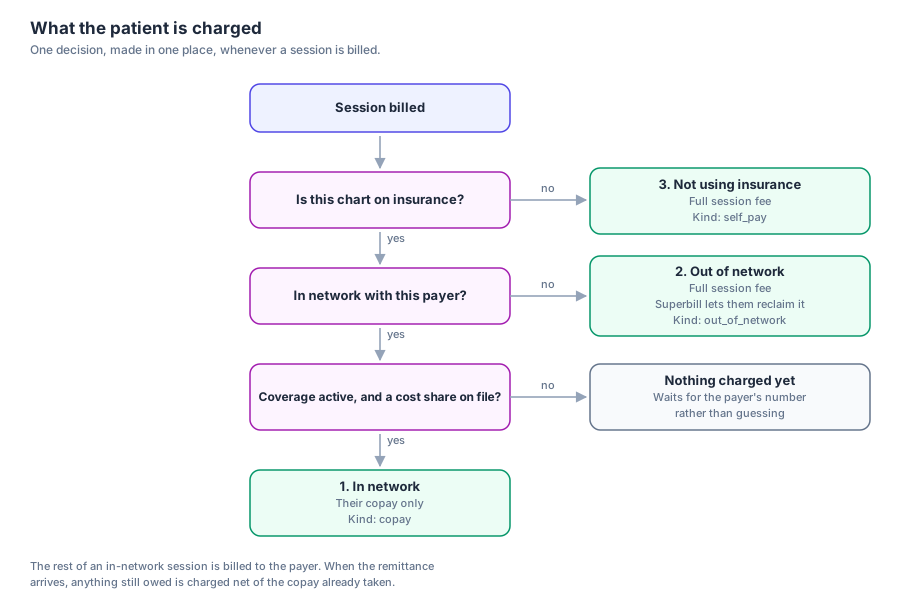
Patient responsibility is determined by three distinct clinical billing scenarios:
17.1 In-network cost share
When your practice is in-network and the client's insurance coverage is confirmed active:
- The client is charged their verified copay only (or coinsurance percentage) at the time of service.
- The remainder of the session fee is billed to the insurance payer via the electronic 837P claim.
- When the payer's 835 ERA remittance arrives, any remaining patient responsibility (such as an unmet deductible) is invoiced net of the copay already collected.
- If coverage status is unconfirmed or copay amounts are not documented, the system defers charging the client until the payer's remittance is returned, ensuring patients are never overbilled.
17.2 Out-of-network full fee
When the client carries insurance but your practice is out-of-network:
- The client is charged the full session fee agreed upon with your practice.
- In-network copays do not apply.
- TheraJunction issues an itemized superbill that the client submits directly to their insurer to seek reimbursement.
17.3 Self-pay private practice fee
When the client chart is set to self-pay:
- The client is charged the full agreed private session fee.
- The self-pay designation overrides any insurance card on file.
- The client receives a standard itemized invoice; no insurance claims or superbills are generated.
17.4 Automatic payment and card on file
Patient billing operates through Stripe:
- Autopay enabled: If the client saved a credit or debit card and opted into automatic payments, their card is charged automatically whenever a copay or invoice is issued.
- Autopay disabled: The client receives an email invoice with an itemized PDF and a secure link to review and pay from their portal.
18. Invoices and superbills
18.1 Service catalog and fee schedules
Manage your billing rates under Settings → Practice → Services.
Each service entry contains a title, optional CPT code, duration, and standard fee. Changes to your service catalog apply to future encounters; past invoices and superbills maintain their historical price snapshot.
18.2 Invoicing a session
To bill a self-pay encounter or issue a direct patient invoice:
- Open the completed encounter and locate the Session billing panel.
- Select services from your catalog or enter custom service lines and fees.
- Apply discounts if appropriate (as a percentage or a fixed dollar amount). Every discount requires an administrative reason that appears on the statement.
- Click Save and email invoice.
The client receives an email notification with an attached itemized PDF. If autopay is authorized, the saved card is charged immediately and the receipt is delivered automatically. Unpaid invoices can be voided; refunded charges are managed through your Stripe dashboard.
18.3 Superbills for out-of-network reimbursement
A superbill is a specialized medical statement designed for out-of-network patients to submit to their insurance plan for direct member reimbursement.
Unlike a standard invoice, a superbill includes full clinical billing identifiers:
- Clinician legal name, academic credentials, and individual NPI.
- Practice legal name, tax ID (EIN), physical clinic address, and telephone.
- Patient legal name, date of birth, and home address.
- Date of service and Place of Service code.
- ICD-10-CM diagnosis codes with clinical descriptions.
- CPT procedure codes with service descriptions, units, and fees charged.
- Total fee charged, total amount paid by patient, and remaining balance due.
Generating and sharing a superbill:
- On an out-of-network session, navigate to the billing panel and click Generate superbill (or open Superbills → New).
- The form pre-fills practice credentials, patient demographics, session diagnoses, and service line items.
- Review the fees and record any payments already collected.
- Click Create and share superbill.
Sharing the superbill publishes the document to the patient's portal, emails an itemized PDF to the family, and automatically creates an invoice for any unpaid balance. Re-sharing an existing superbill does not duplicate charges.
19. How money reaches you
Revenue moves through two separate paths that never intersect:
19.1 Payer reimbursements via EFT
When in-network claims are approved:
- The insurance payer issues reimbursement directly to your practice bank account via Electronic Funds Transfer (EFT), or via mailed physical check.
- Reimbursements are paid directly to your practice's legal entity and tax ID. TheraJunction never handles, holds, or routes insurance disbursements.
- The payer sends an electronic 835 ERA remittance to TheraJunction, allowing the platform to post payments, log contractual write-offs, and true up remaining patient copay or deductible balances.
19.2 Patient payments via Stripe Connect
When clients pay copays, private session fees, or out-of-network balances:
- Client credit and debit card payments process through Stripe Connect Standard.
- Funds deposit directly into the Stripe account you linked during setup and are paid out to your practice bank account on your chosen payout schedule.
- TheraJunction does not take platform cuts or intermediate custody of patient funds.
- Your practice name appears as the billing merchant on the client's credit card and bank statement.
20. What patients see for billing
20.1 Portal billing overview
Clients access billing information within their portal under Billing:
- Outstanding balances: Clear itemized display of amounts currently due, with a one-click Pay button.
- Invoices and receipts: Downloadable PDF copies of all issued invoices, paid receipts, and payment histories.
- Superbills: Out-of-network statements displaying full diagnostic and CPT coding, ready for families to download and submit to their insurers.
20.2 Payment methods and autopay controls
Under Billing → Payment methods, clients manage their payment details:
- Saved cards: Credit and debit cards are entered directly via secure Stripe Elements. Raw card numbers are transmitted directly to Stripe; TheraJunction stores only the card brand and last four digits.
- Automatic payment authorization: Clients can toggle autopay on or off. When active, saved cards are charged automatically when invoices or copays are finalized. Revoking autopay stops future automatic debits without voiding outstanding invoices.
- Insurance management: Under Billing → Insurance, clients view active policies, track verification status, and upload front and back card images.
21. Privacy, HIPAA, and compliance
21.1 PHI security and two-party consent
TheraJunction is designed for clinical compliance and data integrity:
- HIPAA compliance: All clinical data, session transcripts, intake questionnaires, and billing records constitute Protected Health Information (PHI). Data is encrypted in transit using TLS 1.3 and at rest using AES-256.
- Business Associate Agreement: A formal BAA governs data protection between your practice and TheraJunction.
- Two-party recording consent: To comply with state and federal wiretap and privacy statutes, clinical session recording and automated transcription remain locked until affirmative consent is confirmed on the patient chart.
- Access controls: Group practice clinicians access only their assigned caseload. Practice administrators manage clinic-wide billing and roster configurations.
21.2 Billing activity audit trail
Every billing transaction, policy update, claim transmission, and payment event is recorded in an immutable, chronological Billing Activity Log.
To maintain strict patient privacy, the audit log records metadata, timestamps, and acting user IDs without recording raw clinical notes, member ID numbers, or full tax identification numbers.
22. Week-one checklist
Use this checklist to track your setup during your first week on TheraJunction:
- [ ] Clinician account registered with role set to I'm a Therapist
- [ ] Practice setup completed (solo entity configured or group invite accepted)
- [ ] Profile finalized (full name, mobile phone, and timezone saved)
- [ ] Physical office locations configured (or virtual teletherapy verified)
- [ ] Weekly recurring availability hours entered on clinician profile
- [ ] Stripe Connect account linked and verified for payment processing
- [ ] Services catalog configured with standard CPT procedure codes and fees
- [ ] Accepted insurance payers selected and network statuses designated
- [ ] Billing profile completed (NPI, taxonomy, tax ID, and physical address)
- [ ] Practice validation check run to verify NPI registry and claim readiness
- [ ] Directory profile reviewed and public listing toggled active
- [ ] First patient chart created (or first directory inquiry accepted)
- [ ] Patient portal invitation sent and family onboarding checklist tracked
- [ ] Telehealth and Audio Recording Consent confirmed signed on chart
- [ ] First clinical encounter completed (in-person, teletherapy, or report)
- [ ] Clinical documentation reviewed and SOAP progress note signed
- [ ] Post-session billing task resolved (claim filed, superbill issued, or invoice sent)